How to Customize the Windows 11 Touch Keyboard Layout in Time and Language Settings

The touch keyboard in Windows 11 appears on your screen when you tap a text box on a touchscreen, or when you use a device with no physical keyboard attached. It comes in four layouts: Default, Small, Traditional and Split. Pick the one that suits your hands and screen size.
You can switch layouts from the touch keyboard itself. The Time & language settings control when the keyboard shows up and which languages it types in. Picking the right layout makes typing with fingers, thumbs or a stylus faster and less clumsy. The same steps apply to Windows 11 Home and Pro.
Open Settings by pressing Win plus I, click Time & Language, then click Typing. Expand the Touch keyboard section to see layout options, or tap the Settings gear icon on the touch keyboard itself and select Keyboard layout to choose Default, Small, Split or Traditional.
How to Open Time and Language Settings in 🪟 Windows 11
The quickest way in is to press the Win and I together. If you would rather use the mouse or touch, follow these steps:
- Click the Start button on the taskbar .
- Click the Settings icon, which looks like a small gear. The Settings window opens. If you don’t see the icon in the pinned apps, type “Settings” into the Start menu search box and open it from the results.

- In the Settings window, look at the menu on the left and click Time & language. The page on the right now shows date, time, language and typing options.
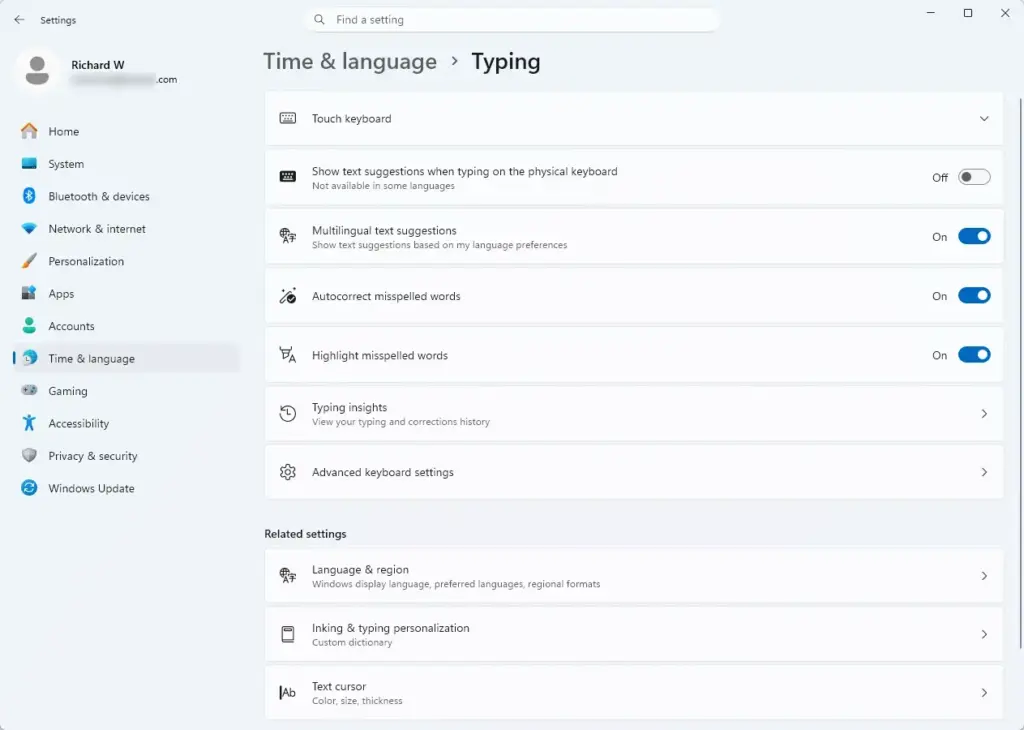
- Click Typing.

You are now on the Typing page. It holds the controls for text suggestions, autocorrect and the touch keyboard. The exact list of toggles varies a little between Windows 11 versions, so don’t worry if yours has a few more or fewer than the screenshot below.
Exploring Touch Keyboard Layout Options
Windows 11 offers four touch keyboard layouts. Each one changes how the keys are arranged on screen so they match your hardware and your habits.
- Default: The standard layout. It looks and acts like a normal physical keyboard, with numbers across the top row and the usual punctuation keys. Start here if you aren’t sure.
- Small: A compact version of the default layout, suited to one-handed use. It takes up less of the screen, which is useful on a smaller tablet or when you want to see more of the app or webpage behind the keyboard.
- Split: This layout divides the keyboard in half and pushes the keys toward the left and right edges of the screen. It is designed for tablet users who hold the device with both hands and type with their thumbs.
- Traditional: This layout mimics older desktop keyboards. It gives you an expanded set of keys, which suits advanced users who need quick access to function or navigation keys.
The Split layout only makes sense on a tablet-sized screen. On a small display the two halves can be awkward, and on a large monitor your thumbs won’t reach them.
Step-by-Step: Changing Your Touch Keyboard Layout
You can change the layout without restarting the computer. There are two places to look. The Settings route controls when and how the keyboard appears. The layout picker itself is on the keyboard.
First, check the touch keyboard options in Settings:
- Open the Settings app by pressing the Windows key plus I.
- Click Time & language in the left menu.
- Click Typing.
- Click the Touch keyboard section to expand it. You will see the options for when the keyboard appears. On most builds, Show the touch keyboard lets you choose Never, When no keyboard attached or Always.
- Look for any option that controls the keyboard size or layout and choose your preferred style. Some builds don't list the layout here. If yours doesn't, use the second method below.
Second, change the layout directly while the touch keyboard is open. This is the method that works on every build:
- Tap inside any text box to make the touch keyboard appear. If it doesn't show up on a desktop PC, set Show the touch keyboard to Always as described above.
- Tap the Settings icon (a small gear) in the top-left corner of the touch keyboard.
- Select Keyboard layout from the menu that pops up.
- Choose your preferred layout icon: Default, Small, Split or Traditional. The keyboard changes its appearance immediately.
To undo a change, repeat the same steps and pick the layout you had before. Windows remembers your last choice.
Customizing Keyboard Themes, Sizes, and Transparency
Themes, size and key appearance are not on the Typing page. They live under Personalization. Changing them makes the keys easier to read and press on a touchscreen.
- Open the Settings app using the Start menu or the Windows key plus I.
- Click Personalization in the left-hand menu.
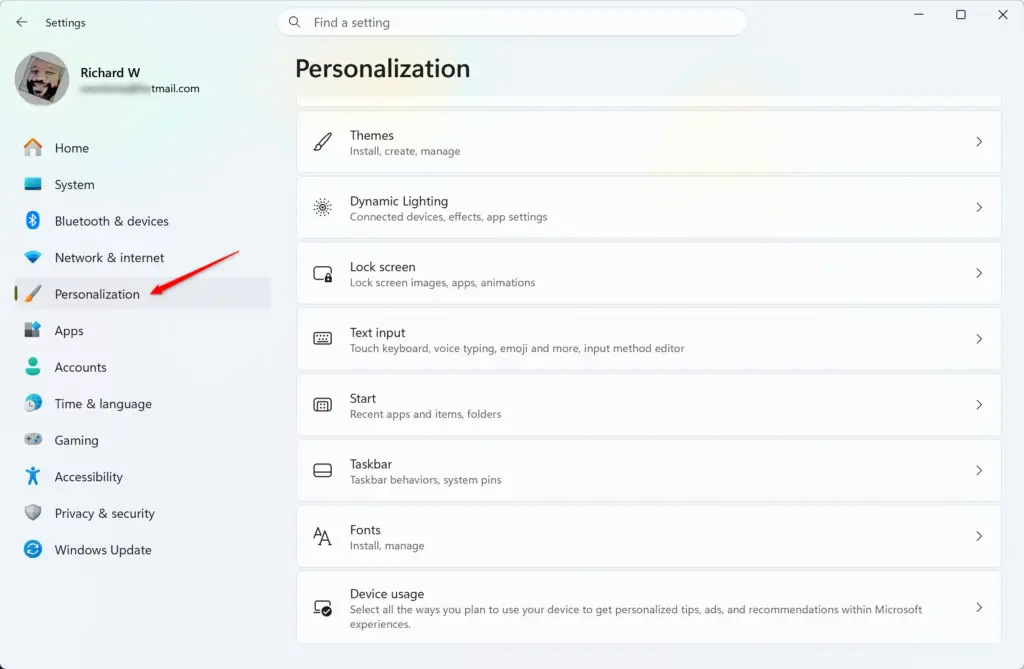
- On the right side of the screen, click Touch keyboard. On newer Windows 11 builds this page may be called Text input instead. It's the same page with the same controls.
- Look at the preview of your current keyboard and the pre-made themes beside it.
- Click a theme to apply it. The preview and the real keyboard update right away. You can choose dark themes, bright colorful themes, or themes with custom background images.
- Scroll down and drag the keyboard size (scale) slider to make the keyboard bigger or smaller.
- Toggle Key background on or off. With it on, each key gets its own backing, so the keys stand out against your background.
If a theme makes the keys hard to read, go back and select the default theme, or drag the size slider back to its original position. Nothing here needs a restart.
Advanced Tip: Adding and Switching Multiple Typing Languages
To type in another language, add it under Time & language. Windows then pairs the touch keyboard layout with the right dictionary and lets you switch languages quickly.
- Open the Settings app and click Time & language.
- Click Language & region.
- Under Preferred languages, click the Add a language button. A window opens with a list of languages.
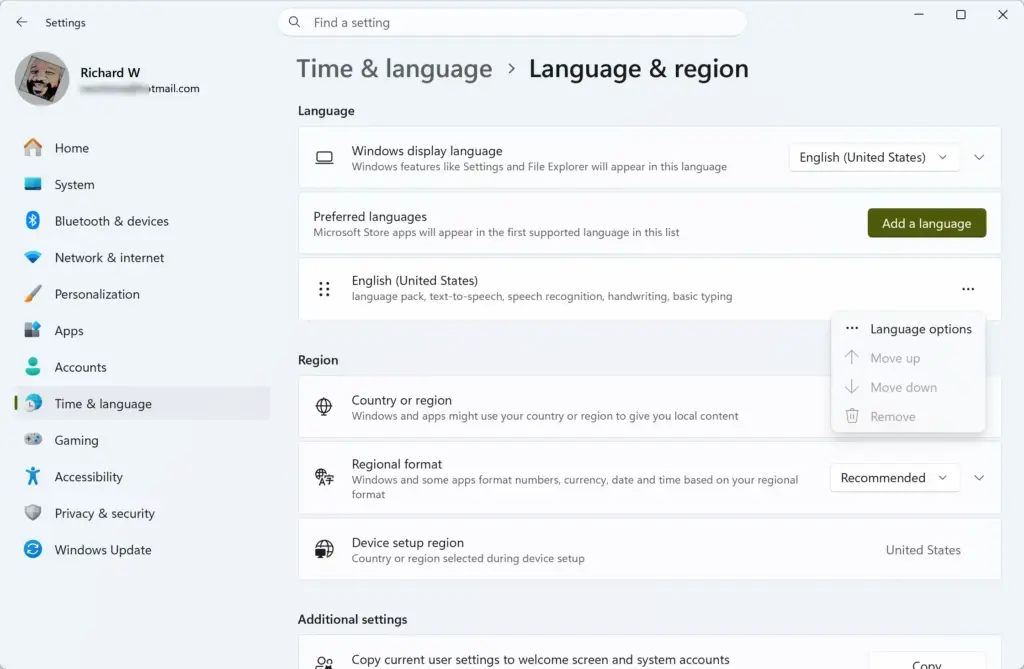
- Type the name of the language into the search box, select it from the results and click Next.
- Follow the on-screen prompts to install the language pack. If the installer offers a checkbox for basic typing, leave it checked so you get the keyboard. The download needs an internet connection and can take a minute or two.
- Once the language is installed, switch between languages by clicking the language abbreviation (for example, ENG) at the bottom-right of the taskbar. You can also press the Windows key plus the Spacebar. The touch keyboard keys change to match the language you pick.
Unique Expert Tip: Creating Shortcuts and Using Voice Typing with Your Custom Layout
Voice typing works with any touch keyboard layout. It saves effort on the smaller layouts, because you can speak instead of hunting for punctuation keys.
- Tap inside any text box to bring up your touch keyboard.
- Tap the Microphone icon at the top-left of the touch keyboard. On a physical keyboard, press the Windows key plus H instead. A small voice typing panel appears and shows when it is listening.
- Speak clearly into your computer's microphone. Windows transcribes your words into text in real time.
If nothing is transcribed, check that a microphone is connected and not muted. Voice typing may also need an internet connection and microphone permission in Windows privacy settings. Tap the microphone icon again, or press the same shortcut, to stop listening.
Combining the Split layout for thumb typing with voice typing makes a fast mobile setup for answering emails, writing documents and chatting on the go.
Summary
Customizing the Windows 11 touch keyboard lets you control how you type on a touchscreen. You can change the layout, adjust the theme and size, add languages and use voice typing. Set these options in Settings and on the keyboard itself to match your device and your daily typing routine.
Have a question about this guide?
Answered by AI from this guide. Good questions may be added to this page — please don't include personal details.
Did this guide fix your problem?

About the Author
Richard
Tech Writer, IT Professional
Richard is a writer at Geek Rewind who turns complex IT tasks into clear, step-by-step guides. He draws on years of hands-on experience in system administration and enterprise IT operations, focusing on Windows, Linux and WordPress: the problems people actually run into, and the fixes that work. His server and WordPress guides come from systems he runs himself. Richard builds and maintains the platform behind Geek Rewind, from its Ubuntu servers and Nginx configuration to its custom WordPress plugins. Many new tutorials start with readers' questions, and he's always glad to answer them in the comments.
No comments yet — be the first to share your thoughts!