Should You Enable Speech Recognition Offline Mode in Windows 11 Language Settings

Offline speech recognition in Windows 11 lets your PC turn spoken words into text using language data stored on your own drive, with no internet connection. Cloud-based speech sends your audio to remote servers. The offline approach downloads a speech component to your hard drive so your own hardware does the work.
One caveat before you start. Windows 11 has no single “offline mode” switch, and the tools differ. The classic Windows Speech Recognition and voice access (Windows 11 22H2 and later) can work on-device. The Windows Voice Typing shortcut (Win+H) normally needs an internet connection. The steps below show where the offline pieces live. Exact menu names can shift slightly between Windows 11 builds.
No, offline speech recognition in Windows 11 is not a single toggle. Windows Speech Recognition and Voice Access (22H2+) can work offline after downloading language packs in Settings Time & language Language & region, but Windows Voice Typing (Win+H) requires an internet connection regardless of settings.
Pros of Enabling Offline Speech Recognition
Offline speech recognition has two main advantages. You can dictate and use voice commands without a connection, and your voice audio stays on your computer instead of going to the cloud. That suits remote work, travel, and anyone who dictates sensitive material.
- No Internet Required: You can use voice features on a plane, on weak hotel Wi-Fi , or during an outage. A bad signal will no longer stop you from dictating documents or searching files.
- Better Privacy: Your voice audio stays on your computer and does not travel to the cloud. Companies cannot review your spoken words to improve their products.
- Faster Response Times: Local processing often feels quicker because nothing makes a round trip over the internet. On a slow connection this can noticeably reduce typing lag.
- Reliability: Cloud servers can have outages or heavy traffic. Offline mode relies only on your own hardware, so it is ready whenever the PC is.
Cons and Drawbacks to Consider
Offline speech has real costs. The language data takes up storage, and your processor does all the work. On an older computer you may notice slight slowdowns during long dictation sessions.
- Takes Up Storage Space: Language packs for offline use are large. They use space on your system drive, which matters on small SSDs.
- Uses System Resources: Your PC does the heavy lifting, so it uses more processor power and memory. Older or budget machines may feel it.
- May Miss Out on Cloud Updates: Cloud services pick up new slang and unusual words constantly. Local language packs only change when Windows updates them, so the offline dictionary can feel a bit less smart, especially with names and technical terms.
How Offline Speech Recognition Affects Your Privacy
The main privacy gain is simple: when speech is processed on your device, there is no recording to send anywhere. Cloud-based settings can let companies collect voice clips to improve their services. Offline processing keeps your spoken words on your own drive.
If privacy is your top priority, offline processing is worth setting up. You can also check Settings Privacy & security Speech. The Online speech recognition toggle there controls whether Windows uses cloud speech services. Switch it off if you do not want your audio going to the cloud. Be aware that features which rely on the cloud, such as Voice Typing, may stop working when it is off.
Hard Drive Space and Performance Impacts
Offline speech packs can take anywhere from hundreds of megabytes to several gigabytes, depending on the language. Check your free space before you download one.
If your drive is nearly full, you may get low-space warnings after the download. Processing speech locally also needs CPU power. On a modern PC with a fast processor and plenty of memory, you will not notice a difference. On an older machine, you may see a slight dip in speed while you dictate long blocks of text.
How to Check Your 🪟 Windows 11 Language Settings
Before you turn on offline speech, confirm that the language you speak is installed on your PC. The speech pack has to match your language, and in some cases your region (for example, English (United States) versus English (United Kingdom)).
- Click the Start button and select Settings (the gear icon). The Settings window opens.
- Click Time & language in the left-hand menu.
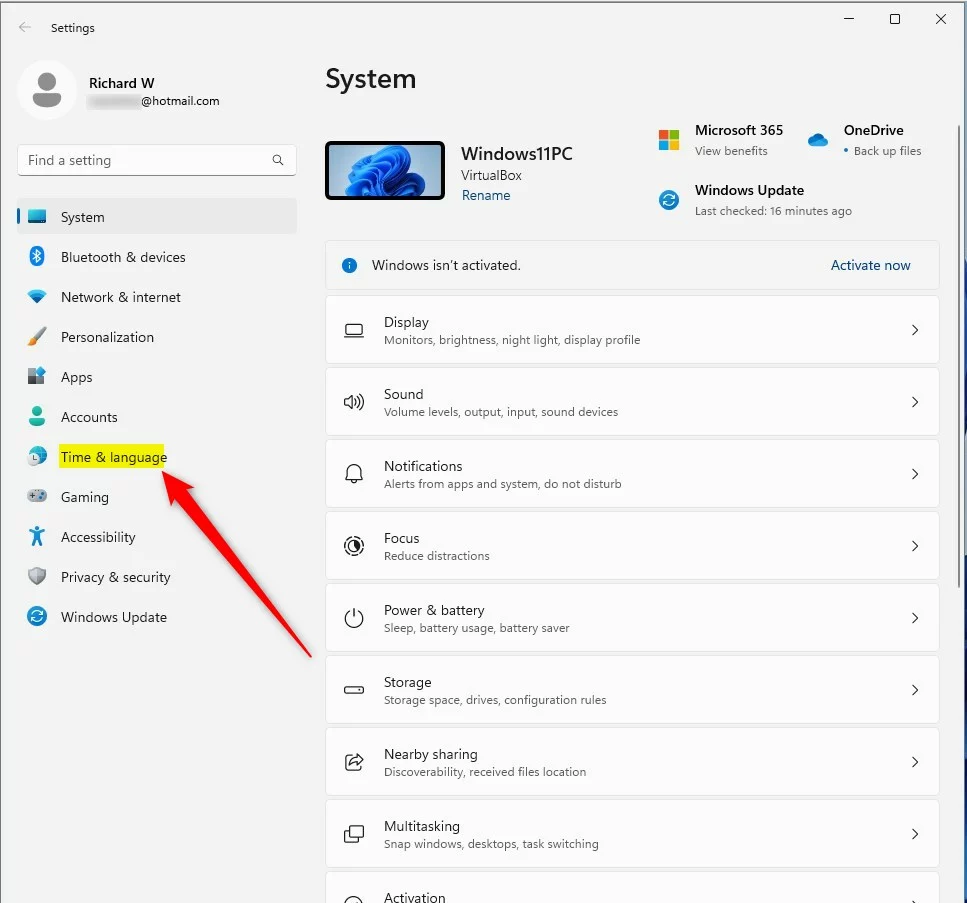
windows 11 time and language icon - Click Language & region. You will see your Windows display language and a list of languages.
- Look under the Preferred languages section to see your installed languages.
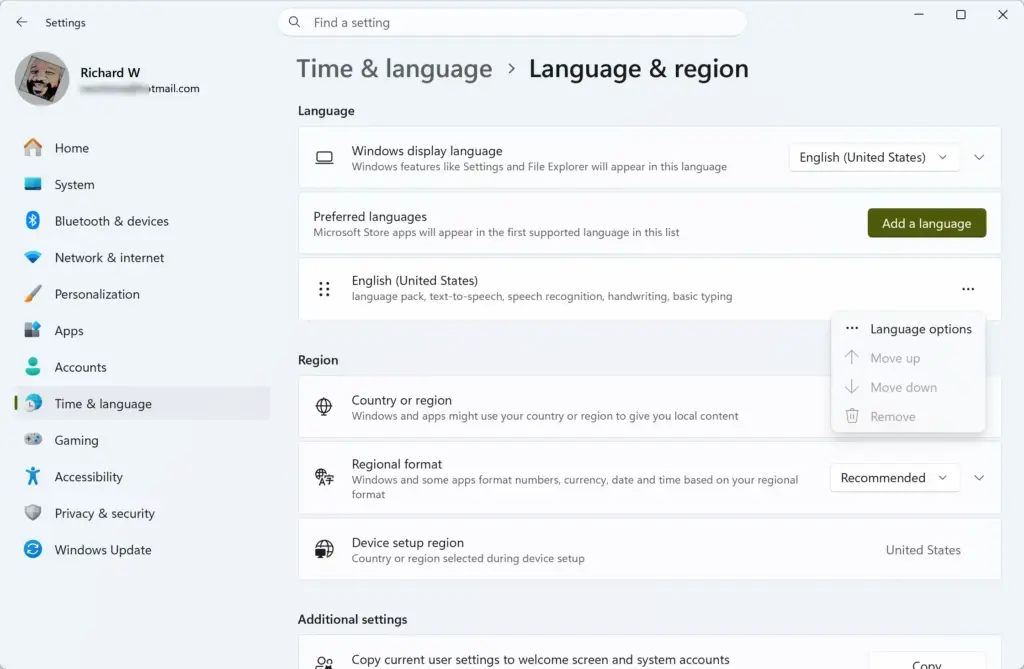
Settings › Time & language › Language & region › Preferred languages - If your language is not listed, click Add a language, search for it, select it, and follow the on-screen steps to install it.
Language installs need an internet connection while they download. Do this step before you go offline.
Step-by-Step Guide: How to Enable Offline Speech Recognition in 🪟 Windows 11
The steps below follow the Speech page in Settings, where voice packs are managed. Do them while you are still online, because the pack has to download first.
- Click the Start button and open the Settings app.
- Select Time & language from the sidebar menu.
- Click Speech from the available options.
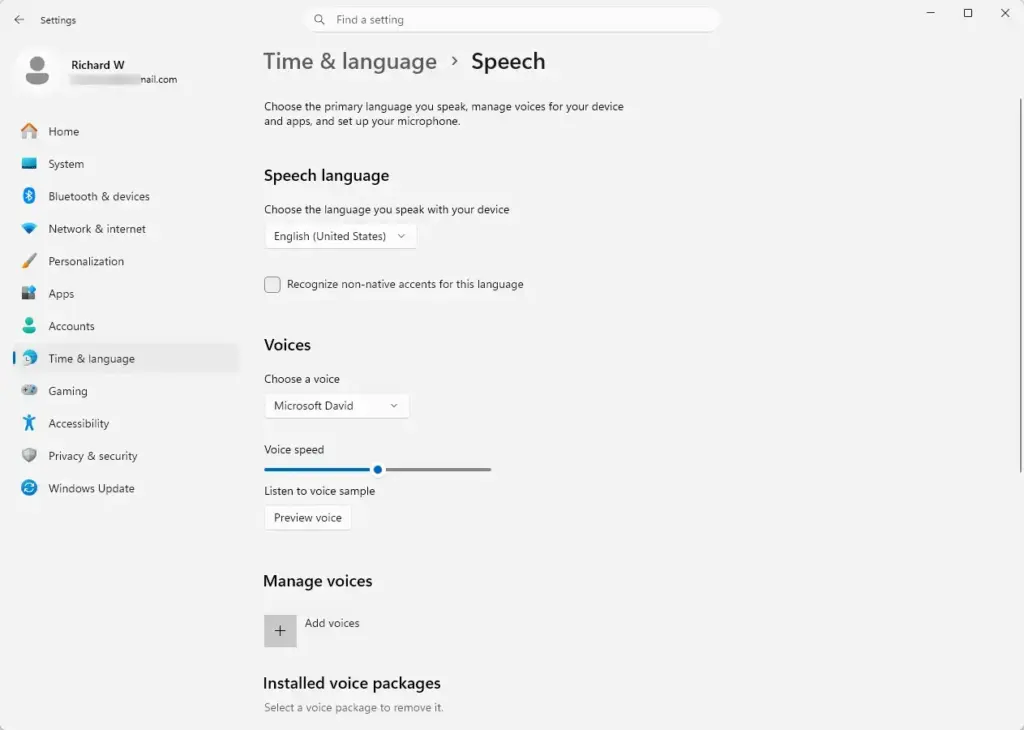
Settings › Time & language › Speech - Scroll down to the section labeled Manage voices.
- Look for the option that says Add voices and click the Add button next to it.
- Wait for the window with the list of available languages. Scroll through it or use the search bar to find your language.
- Check the box next to your desired language.
- Click the Add button to begin downloading. Progress shows on screen.
If you are using a work or school computer, your IT administrator may block you from adding new language packs. On Home and Pro the steps are the same, but managed devices often have these options greyed out.
On some builds, the list under Manage voices covers text-to-speech voices. If you do not see a speech recognition option there, go back to Time & language Language & region, open the options for your language, and look for a speech recognition feature to install. A restart is not usually needed, but restart if the feature does not appear.
Once the download finishes, test it. Disconnect from the internet and try voice access, which processes speech on the device. Note that the Windows Voice Typing shortcut (Windows key + H) normally needs an internet connection, so if it fails offline, that does not mean your pack failed.
Managing and Removing Offline Speech Packs
Remove a speech pack you no longer use to get your disk space back. This is also the right move if you downloaded the wrong language.
- Open the Settings app from your Start menu.
- Click Time & language in the left-hand menu.
- Select Speech. The speech options page opens.
- Scroll down to find the language pack you want to remove under the voice settings.
- Click the language pack name or the menu options next to it.
- Select Remove or Uninstall to delete the files from your computer.
Deleting unused language packs is a good way to recover storage space.
If you change your mind, you can download the pack again using the setup steps above. If a remove button is greyed out, the pack may be in use or your device may be managed by an organization.
Expert Tips for Better Offline Speech Accuracy
Local processing makes more mistakes than the big cloud services, but you can narrow the gap. Most accuracy problems come from poor audio, not the software.
- Invest in a Good Microphone: Built-in laptop microphones pick up room echo and fan noise. A dedicated headset microphone makes a big difference in how accurately your computer understands you.
- Speak Clearly and Naturally: Do not shout, but speak at an even, steady pace. Mumbling or rushing makes local processing stumble.
- Minimize Background Noise: Turn off loud music, close noisy windows, and move away from humming appliances while you dictate.
- Use Punctuation Commands: Say "period," "comma," or "new paragraph" so your text is formatted as you go.
Also check Settings System Sound and make sure the right microphone is selected as the input device. Windows sometimes switches to a different one after an update.
Unique Angle: Troubleshooting Silent Failures After Windows Updates
Major Windows updates sometimes reset language components or damage local speech dictionary files. If your offline speech stops responding after an update, reinstalling the speech pack usually fixes it.
- Go to Settings Time & language Speech.
- Check whether your language pack shows an error or an incomplete status.
- Remove the language pack entirely using the steps outlined earlier.
- Restart your computer.
- Reconnect to the internet if you are offline, then re-download and reinstall the offline speech pack.
Also run Windows Update and install any pending updates, since a later patch may fix the problem. Make sure you have enough free disk space for the download.
Reinstalling or resetting Windows 11 is a last resort. It can clear corrupted system files and restore normal offline voice features if nothing else works. It can take about 30 to 60 minutes or longer, and it keeps your personal files only if you choose the Keep my files option during setup. Back up your important files first, and expect to reinstall your apps in some cases.
Summary
Offline speech recognition in Windows 11 processes your voice on your own computer, using downloaded language packs instead of the cloud. The tradeoffs are privacy and reliability against storage use and processing load. If you work offline or care about privacy, it is worth setting up. Install your language, add the speech pack, test it with the right tool, and remove it if you no longer need it.
Have a question about this guide?
Answered by AI from this guide. Good questions may be added to this page — please don't include personal details.
Did this guide fix your problem?

About the Author
Richard
Tech Writer, IT Professional
Richard is a writer at Geek Rewind who turns complex IT tasks into clear, step-by-step guides. He draws on years of hands-on experience in system administration and enterprise IT operations, focusing on Windows, Linux and WordPress: the problems people actually run into, and the fixes that work. His server and WordPress guides come from systems he runs himself. Richard builds and maintains the platform behind Geek Rewind, from its Ubuntu servers and Nginx configuration to its custom WordPress plugins. Many new tutorials start with readers' questions, and he's always glad to answer them in the comments.
No comments yet — be the first to share your thoughts!