What to Do When Automatic Region Detection Fails in Windows 11 Language and Region

Automatic region detection in Windows 11 fails when your internet connection, VPN, or Wi-Fi network sends mixed location signals to your computer. Windows tries to set your country and time zone automatically using three main sources: internet data, time zone settings, and the choices you made during initial account setup.
Virtual private networks (VPNs), proxy servers, and mobile hotspots often hide your real location and cause this feature to break. When Windows gets confused, it falls back on the region you picked when you first installed the operating system.
The fixes below go from quickest to most thorough. After each one, check whether the region now looks right before moving on to the next. The steps are written for current Windows 11 builds. Home and Pro behave the same here, except on a work PC managed by an IT department, where some options may be locked.
When automatic region detection fails in Windows 11, open Settings , select Time & language, click Language & region, and choose your actual country from the Country or region drop-down menu. If that does not work, enable Location services in Privacy & security, then verify your time zone matches your region in Date & time settings.
Step 1Check and Fix Your Region Settings Manually
Setting your region by hand is the fastest fix. It tells Windows which country to use instead of relying on auto-detection. Open Settings, select Time & language, click Language & region, and choose your actual country from the Country or region menu.
Update the region manually with these steps:
- Click the Start button on your taskbar and select Settings (the gear icon). You can also press Win+I. The Settings window opens.

- In the Settings window, click Time & language in the left-hand menu.
- Click Language & region on the right side of the screen. The language and region options appear.
- Scroll down to the Region section.
- Click the drop-down menu next to Country or region and choose your actual home country from the list. The new country now shows in the box.
Windows applies the change right away, and you do not need to restart. The country setting affects things like local content in the Microsoft Store and some apps. If dates, times, or currency still look wrong, the Regional format setting is probably the cause. It is covered in the last section below.
To undo the change, open the same menu and pick the previous country.
Step 2Turn on Location Services for 🪟 Windows 11
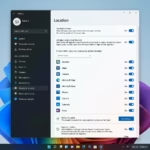
Many apps and system features can only work out where you are if location services are on. Open Settings, go to Privacy & security, select Location, and turn on the Location services switch. This gives Windows permission to check your geographic area and set the right regional defaults.
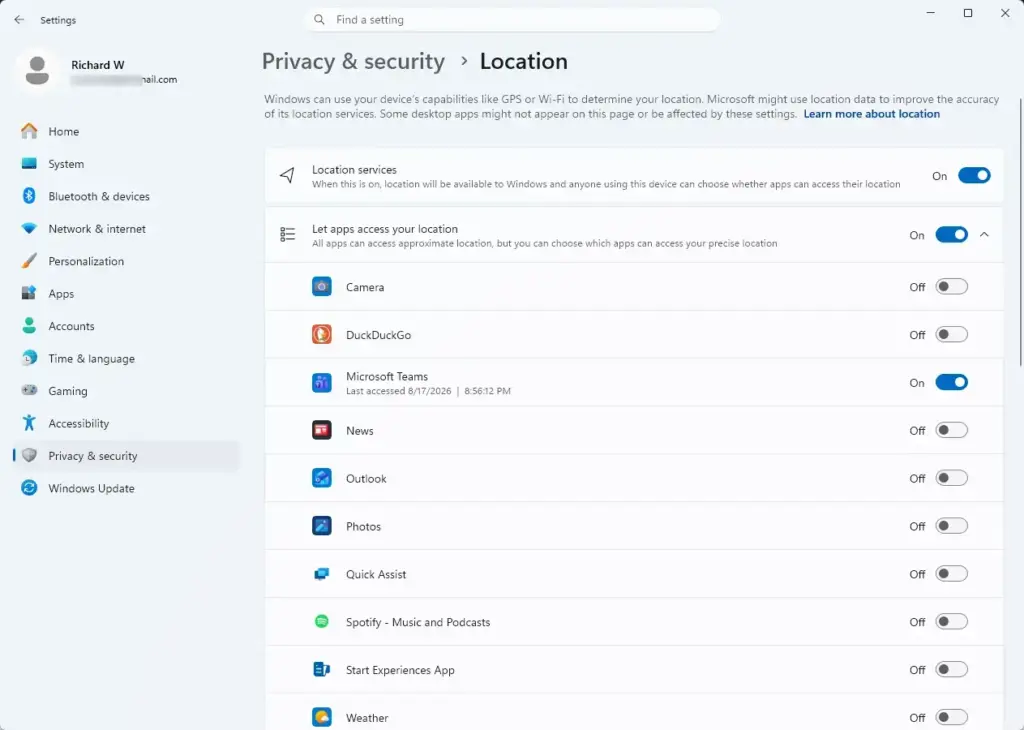
Check and enable location services using this process:
- Open the Settings app by pressing Windows Key + I.

- Click Privacy & security in the left-hand panel.
- Scroll down to the App permissions section and click Location. The location page opens.
- At the top of the page, check the main Location services switch. If it is Off, click the toggle to turn it On.
- Scroll down and make sure Let apps access your location is also On. If the switch is greyed out, the main Location services switch is still off.
- Look through the list of apps below it and make sure the Windows system features you rely on are allowed to use your location.
If the switches are greyed out and the page says your organization manages some settings, you will need to ask your IT team.
Location services use Wi-Fi and network information, so they work best on a connected laptop or desktop with Wi-Fi turned on. To undo this change, switch Location services back to Off.
Step 3Align Your Time Zone with Your Region
A wrong time zone can contradict your region and confuse detection. Open Settings, go to Time & language, click Date & time, and pick your correct local time zone. Matching your clock to your physical location helps Windows sort out regional errors.
Follow these steps to make sure your time zone is accurate:
- Open the Settings app and select Time & language.
- Click Date & time. The clock and time zone options appear.
- Find the Set time zone automatically option. If your computer supports it and you have location services turned on, you can turn this switch On. If Windows asks you to turn on location services first, go back to the previous section and do that.
- If automatic time zone detection is not working properly, turn the switch Off and use the drop-down menu next to Time zone to choose your local time zone manually. The clock should change to your local time straight away.
- Under the Additional settings section, click the Sync now button to force your clock to synchronize with the official internet time servers. This also fixes a clock that has drifted.
No restart is needed. If you later travel, remember to switch the time zone setting back to automatic or pick the new zone yourself.
Step 4Check Your Microsoft Account Profile Location
If you sign in to Windows with a Microsoft account, the country on that account can clash with your PC. Sign in to your Microsoft account page in a web browser, open your profile info, and update your country or region if it does not match where you live now. This keeps your computer and online account in step.
Check the region listed on your Microsoft account profile with these steps:
- Open your web browser and go to the official Microsoft account website.
- Sign in with the same email address and password you use to log in to your Windows 11 computer (for example, user@example.com).
- At the top of the dashboard page, click Your info.
- Click Edit profile info, or look for your address and country details.
- Check that your country or region matches your actual physical location. If it is wrong, update it and save your changes.
- Restart your computer so Windows can sync the updated profile details from your Microsoft account.
If you sign in with a local account instead, skip this section, because there is no online profile to check.
Advanced Fix: Disabling VPNs and Proxy Servers
That can make Windows pick the wrong region. Open your VPN app, disconnect from the remote server, and restart your computer so Windows can read your actual local IP address.
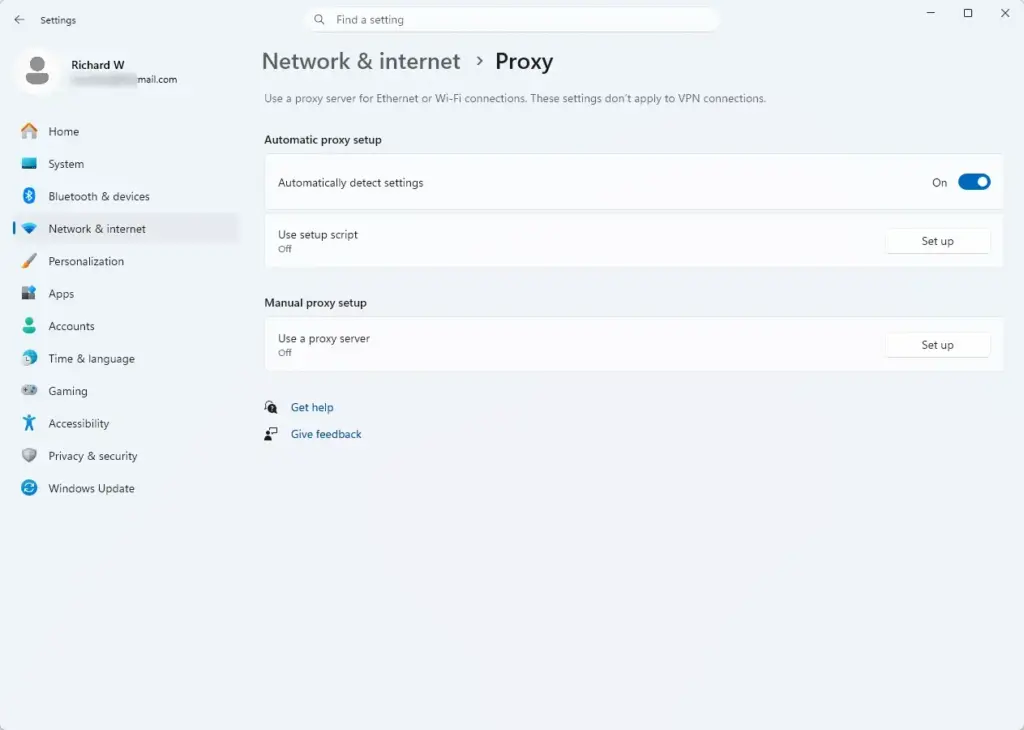
To test whether your VPN is causing the issue:
- Disconnect from your VPN software completely. Closing the window is not enough, so use the app's Disconnect option or quit it from the system tray.
- Turn off any proxy connection settings running on your device.
- Restart your web browser and your computer.
- Check your region settings in Windows 11 to see whether automatic detection has recovered.
If the region fixes itself, the VPN was the cause. If you must use a VPN for work or privacy, remember that your system may occasionally show regional content based on the VPN server's location rather than your physical desk. In that case, set the region manually as in the first section and leave it.
Unique Expert Tip: Clearing Regional Cache and Resetting Location History
Windows keeps a record of locations it has detected, and old or wrong entries can stick around. Clearing that history makes Windows start over and look at your current surroundings. Open Settings, go to Privacy & security, click Location, and click the Clear button next to Location history.
- Open the Settings app and click Privacy & security.
- Select Location from the options.
- Scroll down until you find the Location history section.
- Click the Clear button next to Clear location history for this device. This deletes the location records stored on this computer. It cannot be undone, but Windows will build up new history as you use apps that ask for your location.
After clearing your history, restart your computer and check your language and region settings again. This cleanup often resolves stubborn detection errors that do not respond to normal menu changes.
Unique Expert Tip: Checking Regional Formats and Administrative Language Settings
Your country can be right while dates, currency, and measurement units still look wrong. That is controlled by a separate setting. Open Settings, go to Time & language, select Language & region, and choose the right option from the Regional format list. This applies local display standards across your computer.
To make sure your formats match your region:
- Open Settings and navigate to Time & language Language & region.
- Expand the Region section if it is collapsed.
- Find Regional format and click the drop-down menu to select a format that matches your country (for example, English (United States) or English (United Kingdom)). Dates and currency in your apps now follow that style.
- To apply these settings to the whole system, including the welcome screen and new user accounts, click the classic Control Panel settings link usually found under related settings. You can also type Region in the Start menu search bar.
- In the classic Region window, go to the Administrative tab.
- Click the Copy settings button. This lets you copy your current display language and regional settings to the welcome screen and system accounts, and to new user accounts if you tick that option.
Copying settings to system accounts needs administrator rights, so you may be asked to approve a prompt. Sign out and back in, or restart, to see the changes on the sign-in screen.
Summary
Fixing automatic region detection failures in Windows 11 comes down to a few checks: set your country manually, turn on location services, and clear your location history. Then check your time zone, update your Microsoft account profile, and turn off any active VPN that hides your real location. If detection still fails after all of that, keep the region set manually. It will stay put until you change it.
Was this guide helpful?

About the Author
Richard
Tech Writer, IT Professional
Richard is a writer at Geek Rewind who turns complex IT tasks into clear, step-by-step guides. He draws on years of hands-on experience in system administration and enterprise IT operations, focusing on Windows, Linux and WordPress: the problems people actually run into, and the fixes that work. His server and WordPress guides come from systems he runs himself. Richard builds and maintains the platform behind Geek Rewind, from its Ubuntu servers and Nginx configuration to its custom WordPress plugins. Many new tutorials start with readers' questions, and he's always glad to answer them in the comments.
No comments yet — be the first to share your thoughts!