Configure Regional Format Overrides in Windows 11 Language and Region Settings

Regional format overrides in Windows 11 let you separate your display language from the way your computer shows dates, times, currency, and numbers. For example, you can keep your menus in English while setting your calendar to use day-month-year instead of month-day-year.
Windows 11 sometimes changes these regional settings back to the default after a system update or when syncing across devices. You can stop this by locking in your choices through the Language and Region settings. The sections below cover the sync setting, the Settings app, the classic Control Panel , location privacy, and the system-wide defaults that can make Windows forget your formats at sign-in.
To configure regional format overrides in Windows 11, open Settings , go to Time & language Language & region, then open the Regional format dropdown and choose your preferred country or region. To customize individual elements like date or time style, click the arrow next to Regional format, select Change formats, and adjust each dropdown as needed.
Step 1Stop Windows From Syncing Your Region Settings
Your formats then revert to match whichever device synced last. Turn off syncing for these items first, or later changes may be undone.
- Click the Start button and select Settings. You can also press the Win and I together. The Settings window opens.
- Click Accounts on the left side of the screen.
- Click Windows backup. You should see the sync options for your Microsoft account.
- Find Remember my preferences and click it to expand the section.
- Uncheck any boxes related to language, region, or general Windows settings , or switch Remember my preferences off completely. Windows then stops saving these choices and pushing them to your other devices.
The exact wording of these options can vary slightly between Windows 11 versions. If you only use a local account, Windows has nothing to sync and you can skip this section. To undo it, come back to the same page and turn the options on again.
Step 2Configure Regional Format Overrides in 🪟 Windows 11 Language and Region Settings
Use the Settings app to pick a regional format that differs from your display language. You do not need to reinstall Windows or change your display language. This works the same in Home and Pro.
- Press the Win and I to open the Settings app.

- Click Time & language on the left menu.

- Click Language & region.
- Scroll down to the Region section.
- Open the Regional format dropdown and choose your preferred country or region from the list. Dates, times, and numbers across Windows update to match it.
If the dropdown does not give you the exact date or time style you want, you can change the individual parts:
- In the same Region section, click the small arrow next to Regional format to expand the options.
- Click the Change formats button. On some builds it may be labeled Change format.
- Set the first day of the week, short date, long date, short time, long time, and the calendar style to what you want. Each choice is a dropdown, and the change takes effect as soon as you pick it.
Some apps that are already open only read these settings at launch. If one still shows the old format, close it and open it again. To undo your changes, set Regional format back to the recommended option.
Step 3Use the Classic Control Panel for Deeper Regional Overrides

Some older desktop programs ignore the modern settings and read their formats from these older ones. If an app keeps showing the wrong format after the steps above, check here.
- Click the Start button, type Control Panel, and press Enter.
- Click Clock and Region, and then click Region. A small window opens.
- On the Formats tab, choose your format from the dropdown list.
- Check the preview box at the bottom to see how numbers, currency, time, and dates will look. If you need finer control, the Additional settings... button on this tab lets you adjust individual items.
- Click Apply to save your changes.
These changes apply to your own account only. To apply them system-wide, you need administrator rights:
- Click the Administrative tab at the top of the Region window. If you are signed in as a standard user, Windows asks for administrator credentials before you can change anything here.
- Click the Copy settings... button.
- At the bottom of the new window, check the boxes to copy your current settings to the Welcome screen and system accounts and to New user accounts. Your preferred format is then used even before you sign in.
- Click OK on all open windows and restart your computer. The restart is needed for the system accounts to pick up the change.
Step 4Check Location Privacy Settings That Override Your Region
Location settings can interfere with your regional preferences, especially if you travel or use a VPN. Checking them helps keep Windows from changing your formats based on where it thinks the PC is. Be aware that turning off location also affects other apps, such as maps and weather. If you rely on those, consider switching off access only for individual apps.
- Open the Settings app.
- Click Privacy & security on the left menu.
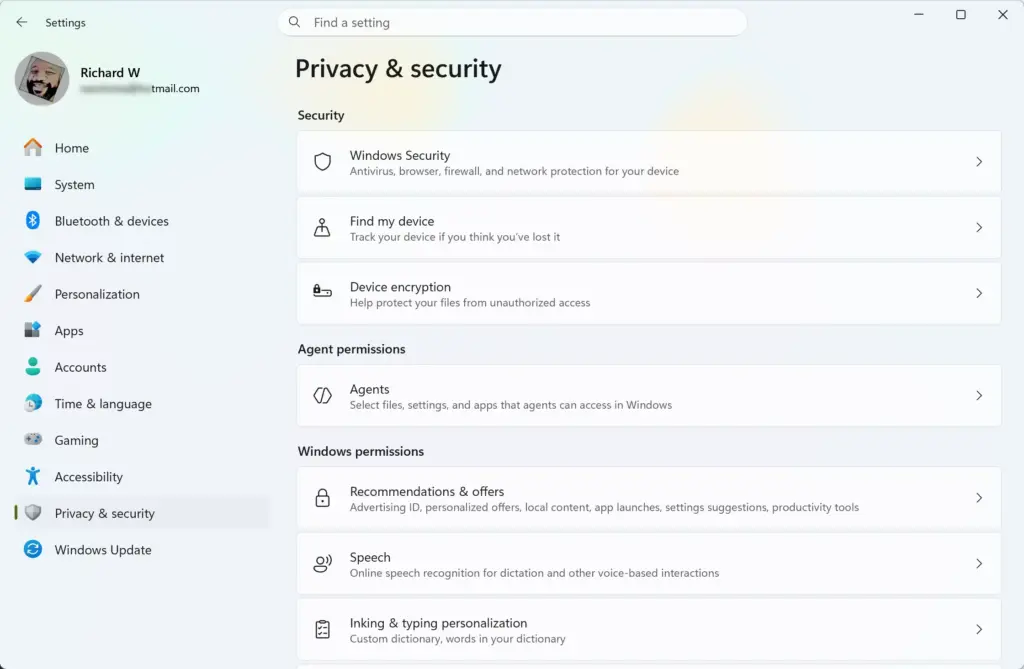
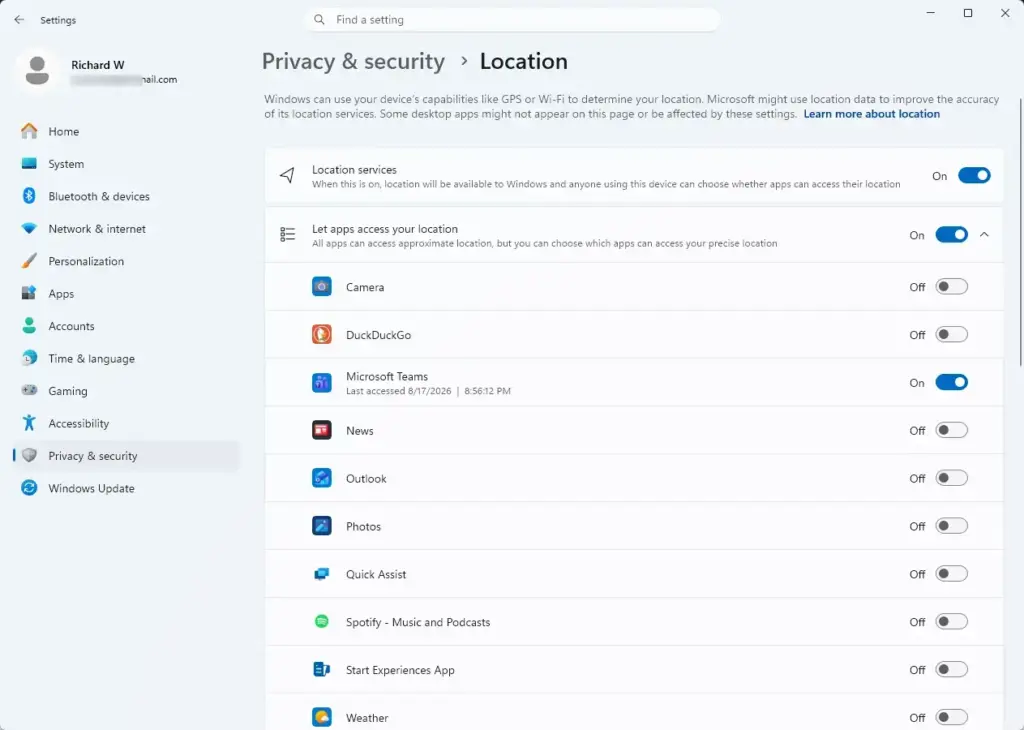
- Click Location.
- Turn off the main Location services switch. Or scroll down and turn off location access only for the individual apps that might be changing your settings in the background.
To undo this, switch Location services back on from the same page.
Unique Expert Tip: Fixing Registry Conflicts That Force Wrong Formats at Every Boot
If Windows forgets your custom date and currency formats every time you restart, it is usually loading a default user template instead of your saved choices. Advanced users sometimes go looking in the Registry Editor (started by typing regedit in the Start menu), but you do not need to edit the registry to fix this. Copying your settings to the system defaults through the graphical menus is safer and gets the same result.
- Open the Start menu, type Control Panel, and press Enter.
- Click Clock and Region, then select Region.
- On the Formats tab, select your exact desired format from the main dropdown menu and click Apply.
- Open the Administrative tab at the top of the Region window. This step requires administrator privileges, so sign in with an administrator account or enter an administrator password when asked.
- Click the Copy settings... button.
- Check both boxes at the bottom of the window to apply your current regional settings to the Welcome screen and system accounts and to New user accounts.
- Click OK and restart your PC straight away so the changes take hold.
After the restart, sign in and check that your formats are still in place. If they revert again, go back to the sync and location sections above, as one of those is the likely cause.
Summary
Configuring regional format overrides in Windows 11 involves turning off cloud syncing, adjusting both the modern and classic settings menus, checking location privacy settings, and copying your formats to the system defaults. Together these steps keep your preferred date, time, and currency styles in place.
Have a question about this guide?
Answered by AI from this guide. Good questions may be added to this page — please don't include personal details.
Did this guide fix your problem?

About the Author
Richard
Tech Writer, IT Professional
Richard is a writer at Geek Rewind who turns complex IT tasks into clear, step-by-step guides. He draws on years of hands-on experience in system administration and enterprise IT operations, focusing on Windows, Linux and WordPress: the problems people actually run into, and the fixes that work. His server and WordPress guides come from systems he runs himself. Richard builds and maintains the platform behind Geek Rewind, from its Ubuntu servers and Nginx configuration to its custom WordPress plugins. Many new tutorials start with readers' questions, and he's always glad to answer them in the comments.
No comments yet — be the first to share your thoughts!