Why Does Windows 11 Language and Region Keep Resetting Your Display Language

Windows 11 display language resets happen when your user account settings conflict with the language profiles Windows keeps in the background. These include the welcome screen profile, the system account profile, the template used for new users, and the regional format. During a restart or update, Windows can compare them, find a mismatch, and fall back to a different language.
The fix is to make every one of those places agree. You check your account settings, copy them to the welcome screen and new user accounts, and line up your regional format. If that doesn’t work, you rebuild a damaged language pack. Each step below can be undone, and I note how where it matters.
Windows 11 resets your display language when your user account settings conflict with the language profiles stored for the welcome screen, system account, and new user template. Fix it by opening Control Panel , clicking Region, going to the Administrative tab, and clicking Copy settings to apply your language to all system accounts and the sign-in screen.
Checking Your Current Language and Region Settings
Start by checking what Windows is using now. This shows whether your preferred language is fully installed and set as the display language. A language that is only partly installed is a common reason for a reset.
Follow these steps to check your basic language settings:
- Press Win+I to open the Settings app (the gear icon).
- Click Time & language on the left menu.
- Click Language & region on the right side. You should see a Windows display language dropdown and a Preferred languages list below it.
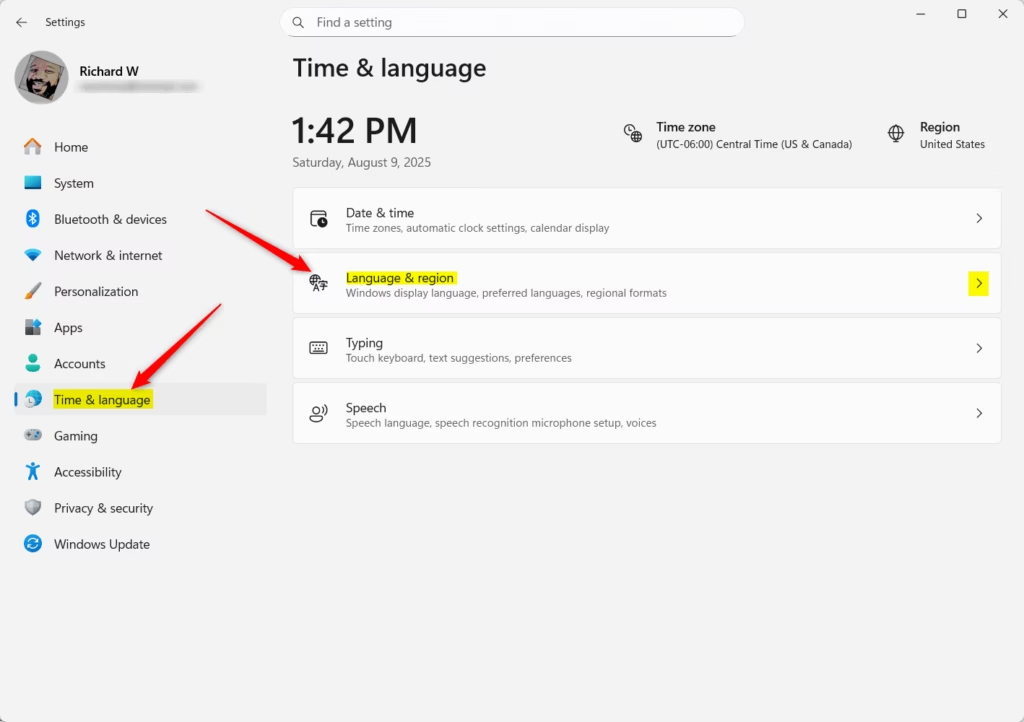
Windows 11 Settings: Time, language, and region options for taskbar customization. - Check the Windows display language dropdown. It should show the language you want. If it shows something else, pick your language from the list. Windows will ask you to sign out and back in before the change takes effect.
- Look under Preferred languages and make sure your desired language is listed. If it is not, click the Add a language button, search for your language, select it, and follow the prompts to install it . Tick the boxes for Install language features and Set as my Windows display language. Wait for the download to finish before you close the window.
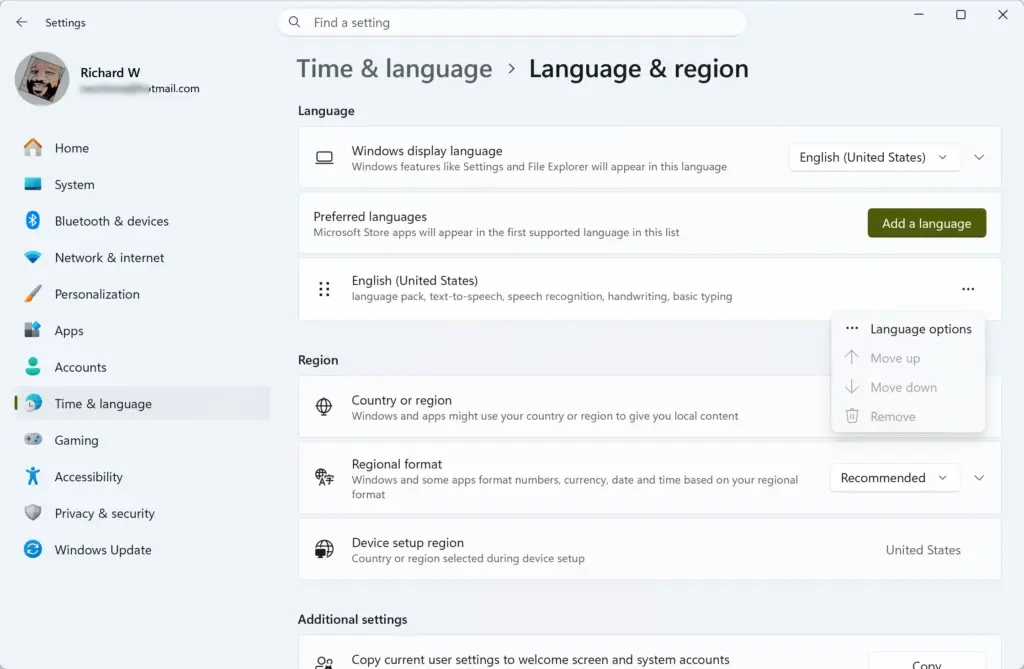
- Click the three dots next to your preferred language and select Language options. Check that optional features such as handwriting or speech recognition show as installed and not stuck on “Downloading ” or showing an error.
If you can’t add a display language at all, you may be on Windows 11 Home Single Language, which only allows one display language. A work or school PC can also have language settings locked by policy. In that case your IT department controls the setting, and resets may be coming from them.
How to Fix Display Language Reverting After Restart
Copying your settings from the classic Control Panel applies your display language to the whole system.
Here is how to force Windows to apply your language settings globally:
- Open the Start menu, type Control Panel in the search bar, and click to open the classic Control Panel application.

Control Panel - In the top right corner, change the View by option to Large icons or Small icons. You should now see a flat list of all Control Panel items.
- Click Region to open the Region dialog window.
- Click the Administrative tab at the top of the window.
- Under the Welcome screen and new user accounts section, click the Copy settings... button. This action requires administrator privileges. If User Account Control prompts you, click Yes or enter an administrator password. If the button is greyed out, you are probably signed in with a standard account, so sign in as an administrator and try again.
- A new window opens showing your current settings alongside the settings for the welcome screen and new user accounts. Look at the bottom for the checkboxes Welcome screen and system accounts and New user accounts.
- Tick both boxes. This copies your current display language, input language, and regional formats to the system login screen and all future user accounts.
- Click OK to save the changes. Click OK again on the Region window if it is still open.
- Restart your computer so the changes apply. After the restart, the sign-in screen should show your chosen language.
To undo this, change your language back, open the same window, and copy the settings again. Existing user accounts are not changed by the New user accounts box, only accounts created later.
Checking Regional Formats and Sync Issues
A mismatch between your display language and your country or regional format can also trigger unexpected language changes. Setting the regional format to match your language and location removes one more source of conflict.
To check and fix your regional formats:
- Open the Settings app by pressing Windows Key + I.

Settings - Click Time & language and then select Language & region.
- Scroll down to the Region section. Check that Country or region shows where you actually are.
- Click the dropdown menu next to Regional format and select the exact region that matches your language. For example, choose English (United States) if your display language is US English.
- Click Regional format to expand it, and verify that the first day of the week and date styles match your expectations. If they are wrong, change them here.
Also check whether your settings are syncing from another device. If you use a Microsoft account, go to Settings, then Accounts, then Windows backup, and look under Remember my preferences. If Language preferences is ticked, a different language on another PC can overwrite this one. Turn that option off to stop it. The exact layout can differ slightly between Windows 11 versions.
Advanced Fix: Handling Corrupted Language Packs
Remove the language completely, restart, and download it again for a clean install.
To remove and reinstall a broken language pack:
- Open the Settings app and go to Time & language Language & region.
- If your preferred language is currently selected as the display language, temporarily switch the Windows display language to a different language. Windows won't let you remove the language that is in use. If you don't have another one, install a temporary language first with Add a language. Sign out and back in when asked.
- Once your display language is changed away from the problematic language, click the three dots next to your main preferred language and select Remove. The language should disappear from the Preferred languages list.
- Restart your computer.
- Return to Time & language Language & region, click Add a language, and reinstall your preferred language from scratch. Stay connected to the internet and let all the downloads finish without interruption.
- Switch your display language back to your freshly installed language, sign out and back in, and copy the settings to the welcome screen using the Control Panel method outlined earlier.
You can remove the temporary language afterwards if you don't need it.
Summary
Windows 11 keeps resetting your display language when your user account and the system welcome screen disagree. Fix that by reinstalling damaged language packs, matching your regional format to your language, and copying your settings to the login screen and new user accounts. Together these keep your preferred display language in place across restarts and updates.
Have a question about this guide?
Answered by AI from this guide. Good questions may be added to this page — please don't include personal details.
Did this guide fix your problem?

About the Author
Richard
Tech Writer, IT Professional
Richard is a writer at Geek Rewind who turns complex IT tasks into clear, step-by-step guides. He draws on years of hands-on experience in system administration and enterprise IT operations, focusing on Windows, Linux and WordPress: the problems people actually run into, and the fixes that work. His server and WordPress guides come from systems he runs himself. Richard builds and maintains the platform behind Geek Rewind, from its Ubuntu servers and Nginx configuration to its custom WordPress plugins. Many new tutorials start with readers' questions, and he's always glad to answer them in the comments.
No comments yet — be the first to share your thoughts!