Why Does Windows 11 Switch Your Input Method Automatically

Windows 11 can change your keyboard layout without warning when you switch between apps or press certain shortcut keys. The feature is meant to manage several languages for you. In practice it often mixes up your typing, either by tying a keyboard to each program window or by reacting to Shift + Alt or Win+Space.
The quickest fix is to turn off the setting that allows a different input method for each app window. It takes about a minute in Settings. This guide also covers the other causes, so you can work through them in order if the first fix is not enough.
Windows 11 switches input methods automatically because a setting lets each app window use a different keyboard layout, or because accidental presses of Shift + Alt or Win+Space trigger built-in language-switching hotkeys. Turn off “Let me use a different input method for each app window” in Settings Time & language Typing Advanced keyboard settings to stop the changes.
Why Does 🪟 Windows 11 Switch Your Input Method Automatically?
Windows 11 switches input methods on its own for a few reasons: shortcut keys, extra language packs, or a setting that gives each app its own keyboard. The fixes are to turn off the per-app memory, remove keyboards you do not use, and disable the switching hotkeys.
Here are the main reasons your PC keeps changing input method:
- Accidental hotkeys: Windows has built-in shortcuts that cycle through your installed languages. Press one by mistake while gaming or typing fast and the language changes at once. Left Alt + Shift and Win+Space are the usual culprits.
- App-specific settings: Windows can remember a different input language for every open window. When you click from your browser to a chat app, the keyboard may jump to whatever you used in that chat last time.
- Language bar settings: Older settings buried in the system can make the input method change based on which window has focus.
- Ghost language packs: Leftover language components or regional keyboards can stay on the system after an update or setup. Windows then cycles through them even though you never use them.
Windows has nothing to switch to.
Method 1Stop Windows from Remembering Language for Each App
That is why your input method changes when you click between programs. Turning off this option locks one keyboard in place across every app.
Follow these steps:
- Open the Start menu and select Settings, or press Windows Key + I. The Settings window opens.

Taskbar - In the left pane, click Time & language.

Settings › Time & language - On the right, click Typing.
- Scroll down and click Advanced keyboard settings. A page with more keyboard options opens.
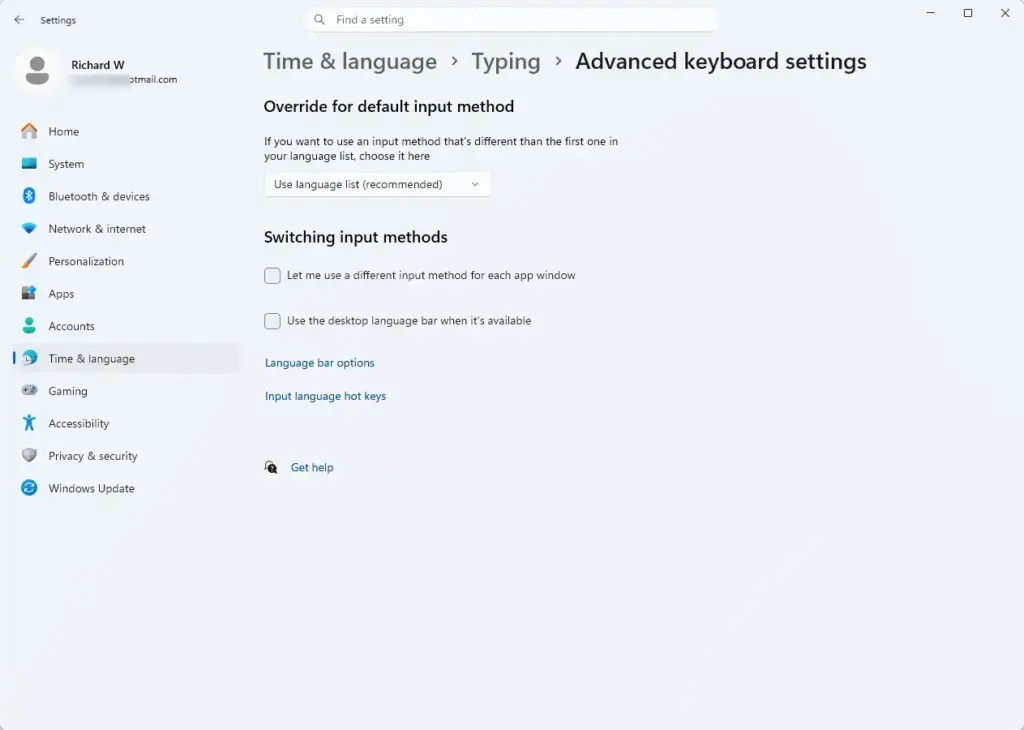
Settings › Time & language › Typing › Advanced keyboard settings - Find the option Let me use a different input method for each app window.
- Uncheck it to turn it off. The change applies straight away, and you do not need to restart.
Windows will now stop swapping your keyboard language when you click into a different program, and the language you pick stays active in all apps. If you ever want the old behavior back, return to the same page and tick the box again.
Method 2Remove Unwanted Keyboard Layouts and Languages
Extra keyboard layouts and languages often appear after updates or during setup. Windows then cycles through options you never chose. Removing the ones you do not need is the surest way to stop random changes.
Check your installed languages and remove what you do not use:
- Open the Start menu and click Settings.
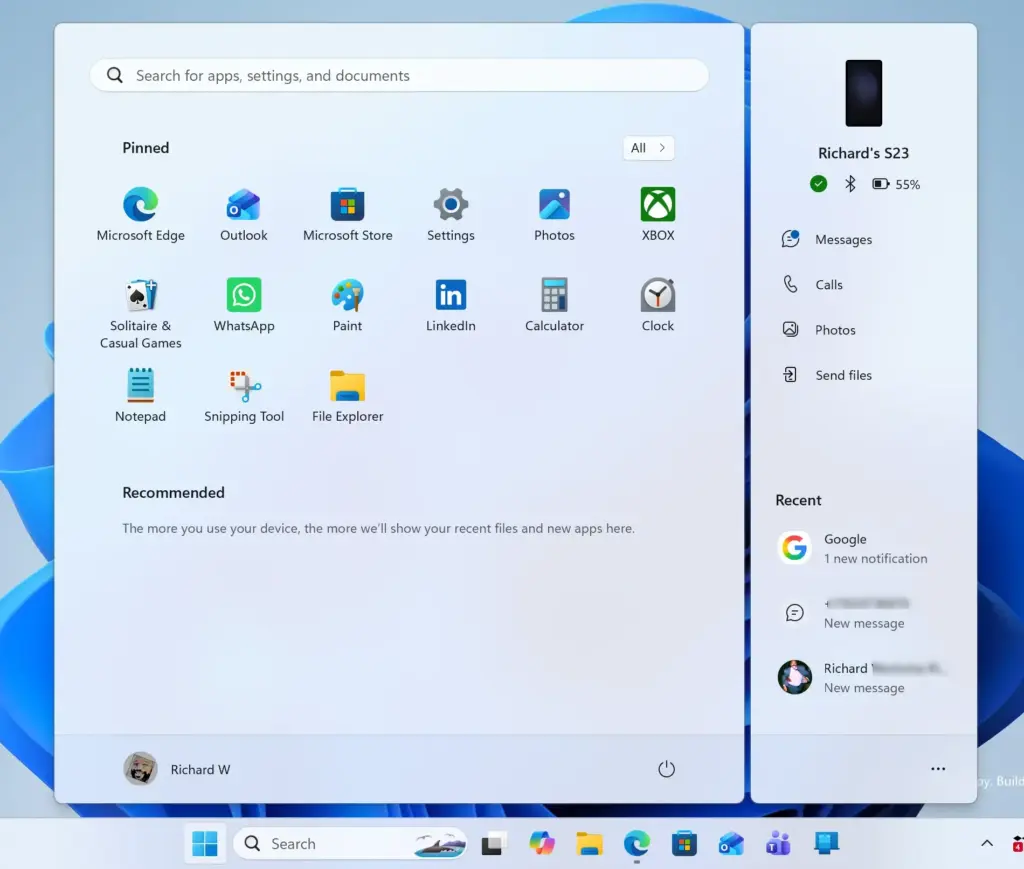
Start Menu - Select Time & language.
- Click Language & region.
- Look under Preferred languages to see what is installed. Every language in this list can bring its own keyboard layout with it.
- If you see a language you do not use, click the three dots (...) next to it.
- Click Remove in the menu. If it is your Windows display language, Windows may not let you remove it. Add and select another display language first, then remove the old one.
If you want to keep a language but get rid of one of its extra keyboards, open the three-dot menu for that language and choose Language options. Then look at the keyboards listed there. Removing languages and keyboards you do not use takes away the options Windows could switch to. If you later need one back, use Add a language on the same page.
Method 3Disable Accidental Keyboard Hotkeys
Windows switches the input language the moment you press a switching shortcut, even if you hit it by accident while typing or gaming. You can disable these shortcuts in the advanced typing settings, so the language changes only when you choose.
Follow these steps:
- Open Settings from the Start menu.

Settings - Go to Time & language and select Typing.
- Click Advanced keyboard settings.
- Click Input language hotkeys. A small, old-style dialog window opens.
- On the Advanced Key Settings tab, look at the list of hotkeys used to switch between input languages.
- Select an action, such as Between input languages, and click the Change Key Sequence button. A second small window opens.
- Set both options to Not Assigned and click OK.
- Repeat this for any other active switching shortcut in the list, then click Apply and OK.
With these set to Not Assigned, pressing Left Alt + Shift will no longer change your typing language. To undo this, open the same window and pick a key combination again.
Note that this dialog does not control the Windows + Space shortcut. If that is what keeps hitting you, the practical fix is to remove the extra keyboards, as in the previous section. With only one keyboard installed, the shortcut has nothing to switch to.
Method 4Check for Pending Windows Updates
Bugs in Windows itself can cause odd behavior, including random language switching. Installing pending updates is a quick check, and it often clears up stubborn problems like this.
Make sure your system is up to date:
- Open the Start menu and click Settings.
- Select Windows Update from the list on the left.

Settings › Windows Update - Click the Check for updates button on the right. Windows looks for updates and lists any it finds.
- Let Windows download and install them. If it asks, click Restart now to finish. Save your work first.
After the restart, check whether the switching has stopped. If it has not, move on to the sections below.
Unique Expert Tips: Fixing Hidden Regional and Proofing Conflicts
Most basic guides stop after the typing settings. But regional formats and Office program settings can still override your Windows choices. You can fix this by lining up your regional formats and by checking the proofing and language settings inside Microsoft Office. These background settings are often the reason a layout keeps changing after everything else looks right.
1Check Office Proofing Tools and Language Links
Microsoft Word can change your input language by itself. Its proofing tools detect the language of the text and may try to match your keyboard to it. Checking the Word options stops it from overriding your main Windows keyboard.
To check this in Microsoft Word:
- Open Microsoft Word and click File in the top left corner.
- Click Options at the bottom of the left menu. The Word Options window opens.
- Click Proofing.
- Look at the spelling and grammar options and make sure any automatic language detection settings are set the way you want, so they do not force layout changes while you type.
- Click Advanced in the left list and look under Editing options for Automatically switch keyboard to match language of surrounding text. Uncheck it if it is ticked. This option may not appear if you have only one language set up for Office.
- Click OK to save.
Other Office apps have similar language settings, so check them if the problem only happens in one of those programs.
2Align Your Regional Formats with Your Display Language
When your regional formats and display language do not agree, Windows background services can get confused and change your input method. Making your region and language settings match gives Windows no reason to correct your layout.
To verify your region settings:
- Open Settings and go to Time & language.
- Click Language & region.
- Scroll down to the Region section.
- Check that Country or region and Regional format match your primary language setup. If they do not, use the drop-down menus to change them.
You do not usually need to restart after changing these. Some apps only pick up the new format after you close and reopen them.
Summary
This guide showed you how to stop Windows 11 from changing your typing language or keyboard layout on its own. You turned off the per-app language memory, removed keyboards you do not use, disabled the accidental switching shortcuts, and checked for updates. You also looked at Word and regional settings, the two hidden places that can override all of that. Together these keep your typing steady and predictable.
Did this guide fix your problem?

About the Author
Richard
Tech Writer, IT Professional
Richard is a writer at Geek Rewind who turns complex IT tasks into clear, step-by-step guides. He draws on years of hands-on experience in system administration and enterprise IT operations, focusing on Windows, Linux and WordPress: the problems people actually run into, and the fixes that work. His server and WordPress guides come from systems he runs himself. Richard builds and maintains the platform behind Geek Rewind, from its Ubuntu servers and Nginx configuration to its custom WordPress plugins. Many new tutorials start with readers' questions, and he's always glad to answer them in the comments.
No comments yet — be the first to share your thoughts!