Turn On Spell Check In Windows 11 Typing Settings

Windows 11 has a built-in spell checker that underlines misspelled words and can fix typos as you type. You turn it on in Settings Time & language Typing, where two switches control it.
The first switch, Highlight misspelled words, puts red underlines under words Windows thinks are wrong. The second, Autocorrect misspelled words, fixes common typos for you as you type. Both change right away, and you do not need administrator rights to make them.
These switches only cover the system-wide spell checker, which is the tool many Windows apps can use. They do not control every app. Word, Edge, Chrome and a few others have their own spell check settings, and this article covers those too.
To turn on spell check in Windows 11, open Settings Time & language Typing, then switch on Highlight misspelled words for red underlines. Turn on Autocorrect misspelled words if you want Windows to fix typos as you type. Both take effect immediately and need no administrator rights. Apps with their own spell checkers, such as Word, Edge and Chrome, use separate settings.
What the Typing settings control
The Typing page has several toggles that affect what happens while you type. Two of them matter here:
- Highlight misspelled words underlines words that are not in the dictionary for your current language. Right-click the word to see suggested fixes.
- Autocorrect misspelled words replaces a misspelled word with the most likely correction as soon as you finish typing it, usually when you press Space or add punctuation.
Many people turn on highlighting only. It shows you the mistake and leaves the decision to you. Autocorrect can change names, product terms or code-like text without asking, so use it with care.
The same page also has Show text suggestions when typing on the physical keyboard. This shows word predictions as you type. It is a separate feature from spell check, and you can leave it off.
Before you start
Check three things first. They explain most cases where spell check does not seem to work.
- Your Windows 11 build (the exact version number of Windows). Windows changes the layout of the Typing page between feature updates. Names and order of the toggles can shift a little. The two options above are the ones to look for. Open Settings System About if you need to check your version.
- Your keyboard language. Spell check uses the dictionary for the language you are typing in. If the language is not installed or its keyboard is not active, you may get no underlines at all.
- The app you are testing in. Apps that use the Windows spell checker respond to these toggles. Apps with their own checker may ignore them.
The steps are the same on Windows 11 Home and Windows 11 Pro. You do not need to restart the PC.
Turn on spell check in 🪟 Windows 11 Typing settings
This is the main method. It turns on underlining and, if you want it, autocorrect for the whole system. It does not need administrator privileges because the setting applies to your own user account.
Open the Typing page from Settings
- Press Windows + I to open Settings. The Settings window opens with a list of categories on the left.

Windows 11 Start menu with Settings gear icon highlighted. - Select Time & language in the left pane. The right pane shows Date & time, Language & region, Typing and other entries.
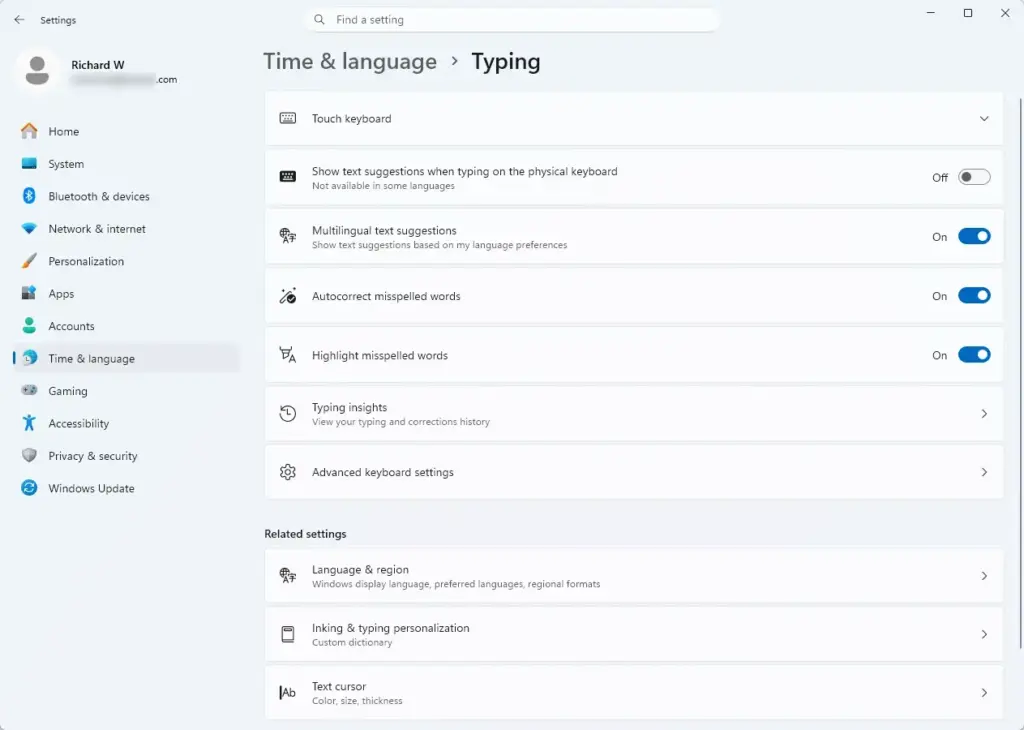
Settings › Time & language › Typing - Select Typing. The page lists text suggestion and spelling options as toggle switches.
Switch on the spelling options
- Find Highlight misspelled words and set the toggle to On. This makes Windows underline words it does not recognise in apps that use the system spell checker.
Settings › Time & language › Typing - Find Autocorrect misspelled words and set the toggle to On if you want Windows to fix typos for you. Leave it Off if you would rather correct words yourself.
- Close Settings. Each toggle saves as soon as you flip it, so nothing else needs saving.
You should now see both toggles showing On when you return to the page.
Open the Typing page directly
If you want to skip the menus, use the Run box (a small window for opening settings and programs by name). This opens the same page in one step.
- Press Windows + R to open the Run dialog.
- Type
ms-settings:typingand press Enter. The Typing page in Settings opens.
You can also press the Windows key, type Typing settings, and select the result. The search result takes you to the same page.
Check that spell check works
Test it right away so you know the change took effect.
- Open an app that uses the Windows spell checker and click into a text box. Some Microsoft Store apps and many text fields in Windows itself qualify.
- Type a word you know is misspelled, such as
recieve, then press Space. - Look at the word. With Highlight misspelled words on, a red wavy line appears under it. With Autocorrect misspelled words on, Windows may replace it with
receiveinstead. - Right-click an underlined word. A menu opens with suggested spellings. Select one to replace the word.
If nothing happens, the app probably does not use the Windows checker. Go to the section on apps with their own spell check below.
Add a word to the dictionary or ignore it
Many apps that use the Windows spell checker let you deal with this from the right-click menu.
- Right-click the underlined word and look for Add to dictionary. This stops the word being flagged in future.
- If you see Ignore all instead, it hides the flag only for the current text or session.
The exact menu entries depend on the app. If neither option appears, the app is managing its own proofing.
If the spelling options are missing or greyed out
The toggles can be hard to find or locked. These are the common causes, in the order you should check them.
The options are not on the page you expect
Check you are on Settings Time & language Typing and not Settings Accessibility, which has no spell check toggles. On some builds the page also opens with the Typing insights or text suggestion options first, so scroll down. If you still cannot see Highlight misspelled words or Autocorrect misspelled words, your build may label them differently. In that case, look for the toggle that mentions misspelled words. If you cannot find it, the label may differ on your build, so look for any toggle that mentions misspelled words.
The toggles are greyed out or show a managed message
A message such as Some settings are managed by your organization means an administrator controls the setting. This is common on work or school PCs. You cannot override it from Settings. Ask your IT team, or if you are the administrator, check the policies applied to the device.
The language has no dictionary
Spell check needs a language that Windows supports and has installed. Open Settings Time & language Language & region and check the languages listed under Preferred languages. If your language is missing, select Add a language, choose it, and let the language features install. Then switch your keyboard to that language and test again. 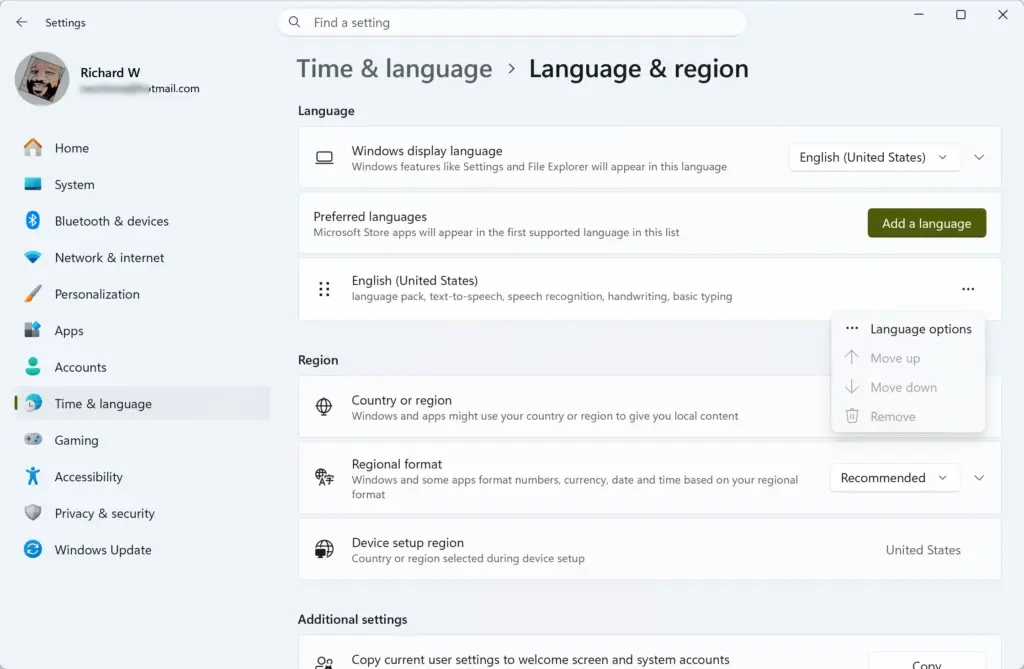
You are typing in a different language than you think
The taskbar shows a language code such as ENG near the clock. If you have more than one keyboard installed, select that code and pick the language you are writing in. Spell check follows the active keyboard, so a mismatch makes correct words look wrong or hides underlines entirely.
The change does not show in an open app
Some apps read the setting only when they start. Close the app completely and open it again. If that does not help, sign out and back in so every app reloads your settings.
Apps that have their own spell check
Turning on the system toggles does not force every program to underline errors. Several popular apps keep separate proofing settings, and those settings win over the Windows ones.
- Microsoft Edge has its own spelling option in its language settings. Open the Edge menu, select Settings, then Languages, and look for the spell check option there. Menu names can change as Edge updates.
- Google Chrome has a similar spell check option in its own language settings.
- Microsoft Word and the other Office apps use their own proofing tools. In Word, open File Options Proofing to control them.
- Notepad in recent versions may have its own spelling and autocorrect settings. If your copy shows spelling options in its own settings, change them there. Some builds of Notepad may not include these settings, so check your copy.
If an app underlines errors even though you turned off the Windows toggles, it is using its own checker. Change it inside that app.
Spell check and the touch keyboard
The toggles above apply when you type on a physical keyboard. If you use a tablet or the on-screen keyboard, the touch keyboard has its own options on the same Typing page. Look for a Touch keyboard section and check what is offered there. Options vary by device and build, so I do not list specific toggle names for it.
Turn spell check off again
You can reverse the change at any time. It does not affect your documents.
- Open Settings Time & language Typing
Settings › Time & language › Typing - Set Highlight misspelled words to Off to remove the red underlines.
- Set Autocorrect misspelled words to Off to stop Windows changing words as you type.
The underlines disappear in apps that use the Windows checker. Words you added to the dictionary earlier may remain stored, but they have no visible effect while the checker is off.
Tips for getting good results
- Use highlighting first. Turn on Highlight misspelled words and leave Autocorrect misspelled words off for a few days. If the corrections it would make are right, switch autocorrect on.
- Turn autocorrect off when you write code, commands or file paths. Autocorrect can change text that looks like a misspelling but is not.
- Match your keyboard to the language. If you write in two languages, switch the keyboard each time. Otherwise the checker flags every word in the other language.
- Add proper names once. Use Add to dictionary where the app offers it so you stop seeing the same false alarms.
If this didn't work
If underlines still do not appear, test in a different app, then check the app's own language or proofing settings and the active keyboard language in the taskbar. If the toggles themselves are locked, an organization policy is the likely cause and only an administrator can change it. Once highlighting works, the next useful task is adding a second language under Settings Time & language Language & region so you can check spelling in both.
Is there a keyboard shortcut for spell check?
Windows has no single keyboard shortcut that runs spell check across all apps. In Word, press F7 to open the Spelling and Grammar check. In most browsers and text boxes, right-click a misspelled word to see suggested fixes. To check spelling system-wide, turn on Highlight misspelled words in Settings Time & language Typing
How do I remove the UK keyboard from 🪟 Windows 11?
Open Settings, select Time & language, then select Language & region. Under the language that includes the UK keyboard, open its language options, find the Keyboards section, and select Remove next to the UK layout. Keep at least one keyboard on the list, or Windows will not let you remove the last one.
How to fix keyboard keys typing wrong characters in 🪟 Windows 11?
Wrong characters usually mean the keyboard layout is set wrong. Press Windows key + Space to switch input languages, and check the language indicator on the taskbar. Then open Settings Time & language Language & region and confirm the keyboard matches your physical keys. If the problem continues, test the keys in Notepad, and check whether Num Lock or Shift is stuck on.
How to get spell check on android keyboard?
Open Settings on your phone, then go to Languages & input (or System Languages & input) and select your on-screen keyboard, usually Gboard. Open Text correction and turn on Spell check or Show suggestions. The exact menu names vary by phone and keyboard app, so look for those words if the labels differ.
Have a question about this guide?
Answered by AI from this guide. Good questions may be added to this page — please don't include personal details.
Did this guide fix your problem?

About the Author
Richard
Tech Writer, IT Professional
Richard is a writer at Geek Rewind who turns complex IT tasks into clear, step-by-step guides. He draws on years of hands-on experience in system administration and enterprise IT operations, focusing on Windows, Linux and WordPress: the problems people actually run into, and the fixes that work. His server and WordPress guides come from systems he runs himself. Richard builds and maintains the platform behind Geek Rewind, from its Ubuntu servers and Nginx configuration to its custom WordPress plugins. Many new tutorials start with readers' questions, and he's always glad to answer them in the comments.
No comments yet — be the first to share your thoughts!