How to Turn On or off Highlight Misspelled Words in Windows 11

- 5 steps
- Needs administrator rights
Windows 11 underlines misspelled words with a red squiggly line as you type. You can turn this on or off in the Settings app. The steps below cover both.
Open Settings, go to Time & language Typing, then toggle Highlight misspelled words on or off. Checked or on underlines misspelled words with red lines; unchecked or off disables the feature. Changes take effect immediately without restarting.
Why Use This Feature?
Windows 11 has a built-in spell checker. When it is on, any word it doesn’t recognize gets a red squiggly line underneath. That lets you catch typos while you type instead of after you hit send.
Some apps, like Microsoft Word, have their own spell checker with its own settings. The Windows setting won’t change how those behave.
What Happens When You Use It?
With this setting on, Windows underlines any typed word that isn’t in its dictionary or in your personal dictionary. To fix a flagged word, right-click it and pick one of the suggested corrections from the menu. You can also choose to ignore the word or add it to the dictionary if it is correct, such as a name or a technical term.
Option 1Use Settings
Turn On or Off Highlight Misspelled Words in Settings
- Open Settings by pressing
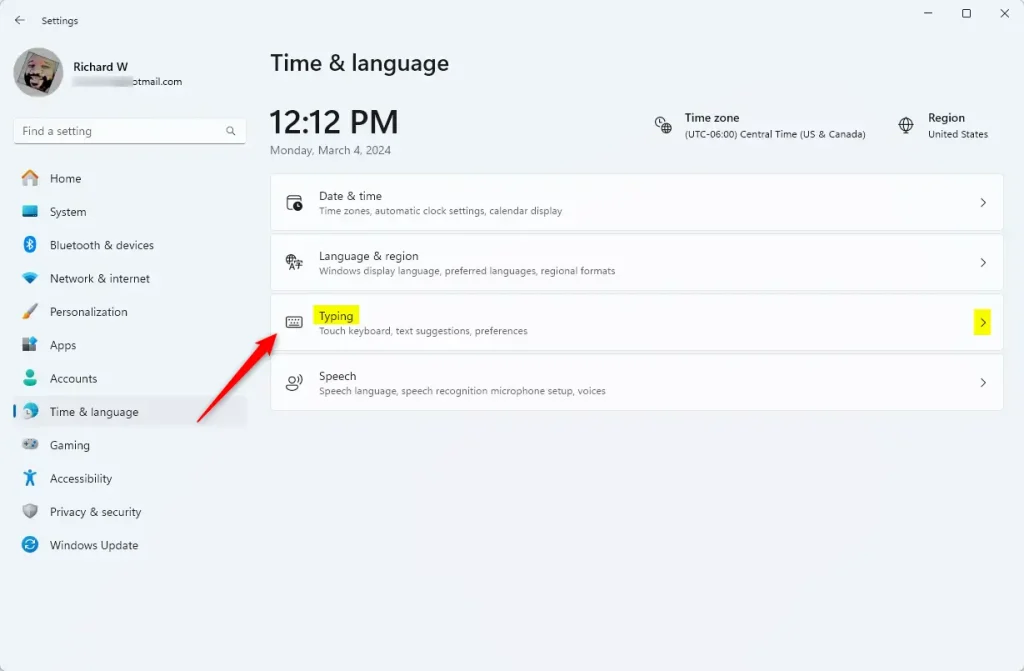
Win+I. The Settings window opens. - Click Time & language in the left pane.
- Click Typing on the right side. (see screenshot below)
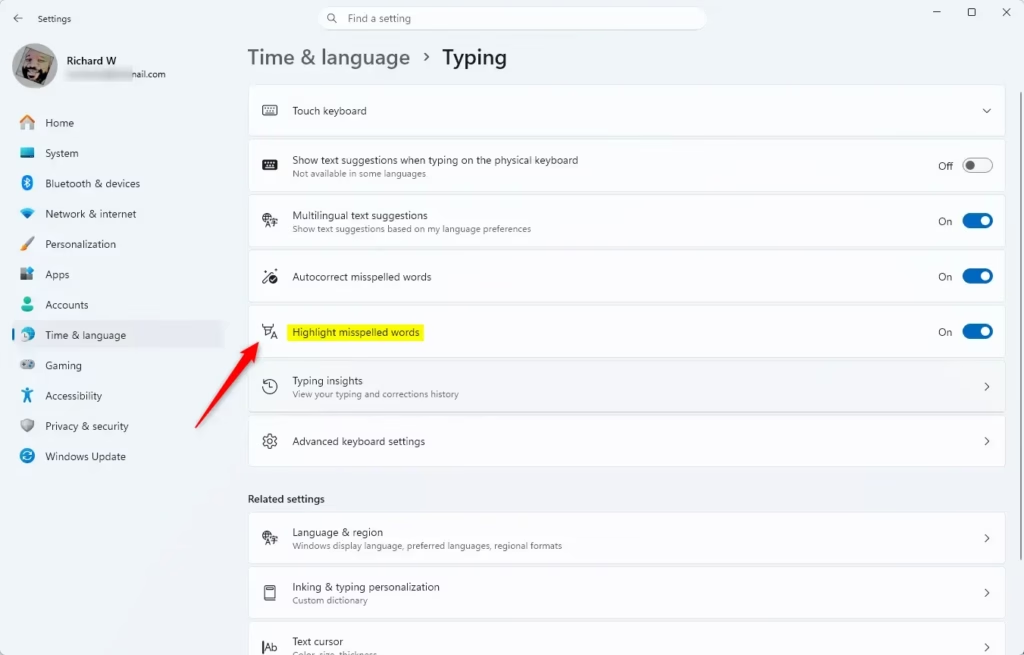
You should now see the typing options, including the spell-checking controls. Look for the entry named Highlight misspelled words. It sits near Autocorrect misspelled words, which is a separate setting.
- Turn Highlight misspelled words on (the default) or off. On some builds this is a checkbox, on others a toggle switch. Checked or On means misspelled words get underlined. Unchecked or Off means they don’t. (see screenshot below)
- Close Settings. The change takes effect right away and you don’t need to restart. Open an app like Notepad and type a made-up word to confirm it.
To undo the change, repeat the same steps and set the option back.
Option 2Use Registry
Turn On or Off Highlight Misspelled Words Using Registry
⚠️ Admin privileges required
If you are on a standard account, you will be asked for administrator credentials or the steps will fail.
Turn On Highlight Misspelled Words
This is the default setting:
reg add "HKEY_CURRENT_USER\SOFTWARE\Microsoft\TabletTip\1.7" /v EnableSpellchecking /t REG_DWORD /d 1 /f
Turn Off Highlight Misspelled Words
reg add "HKEY_CURRENT_USER\SOFTWARE\Microsoft\TabletTip\1.7" /v EnableSpellchecking /t REG_DWORD /d 0 /f
Summary
Windows 11 marks misspelled words with a red underline, and the Settings app gives you full control over whether it does. If the underlines don't appear after you turn the option on, check that the app you are typing in uses the Windows spell checker and has its own spell check enabled.
Have a question about this guide?
Answered by AI from this guide. Good questions may be added to this page — please don't include personal details.
Did this guide fix your problem?

About the Author
Richard
Tech Writer, IT Professional
Richard is a writer at Geek Rewind who turns complex IT tasks into clear, step-by-step guides. He draws on years of hands-on experience in system administration and enterprise IT operations, focusing on Windows, Linux and WordPress: the problems people actually run into, and the fixes that work. His server and WordPress guides come from systems he runs himself. Richard builds and maintains the platform behind Geek Rewind, from its Ubuntu servers and Nginx configuration to its custom WordPress plugins. Many new tutorials start with readers' questions, and he's always glad to answer them in the comments.
No comments yet — be the first to share your thoughts!