How to Enable Spell Check In Google Chrome


Spell check in Google Chrome is a built-in feature that puts a red underline under misspelled words. It catches typos as you type in web forms, emails, and online posts. Chrome turns it on by default in the desktop versions, so in most cases you only need to check that it is still on or change how it works.
You can turn on enhanced spell check or change your preferred language by opening Settings Languages This guide shows where that page is, what each option does, and how to undo your changes.
Open Google Chrome, click the three vertical dots in the top right, select Settings, click Languages on the left, then click the Spell check tile to enable it. Chrome flags misspelled words with red underlines as you type in web forms and emails.
Enable or disable the Spell checker in Google Chrome
To enable spell check in Chrome, open the browser settings, click Languages, and go to the Spell check section, where you can turn the feature on or off. Chrome flags misspelled words with red underlines as you type, which helps you avoid mistakes in emails, documents, and web forms.
The steps below are written for the current Chrome on Windows 11. Chrome updates often, so a label may look slightly different on an older or newer build.
Follow these steps to open the spell check settings:
- Open the Google Chrome browser browser. A normal browser window should appear.
- Click the three vertical dots in the top right corner. A menu opens below them.
- Select Settings. The Settings page opens in a new tab.
- Click Languages on the left side of the screen. The language options for the browser appear on the right.
- Click the Spell check tile. The spell check options expand. If your version shows them without a tile, scroll down to the Spell check section instead.
Typing chrome://settings/languages into the address bar takes you straight to the same menu. This is faster if you open this page often.
Managing your settings
The Basic option checks spelling locally on your computer. The Enhanced option sends what you type to Google for more thorough checks, using the same technology as Google Search.
If privacy is a concern, for example when you type in forms that hold personal or work information, stay with Basic. If you want better suggestions and do not mind the text going to Google, choose Enhanced.
Checking types include:
- Basic: Checks your spelling locally on your computer. Your text stays on the PC, but the checker is less capable.
- Enhanced: Sends your text to Google to check your spelling using the same technology as Google Search. It catches more errors, but it needs an internet connection.
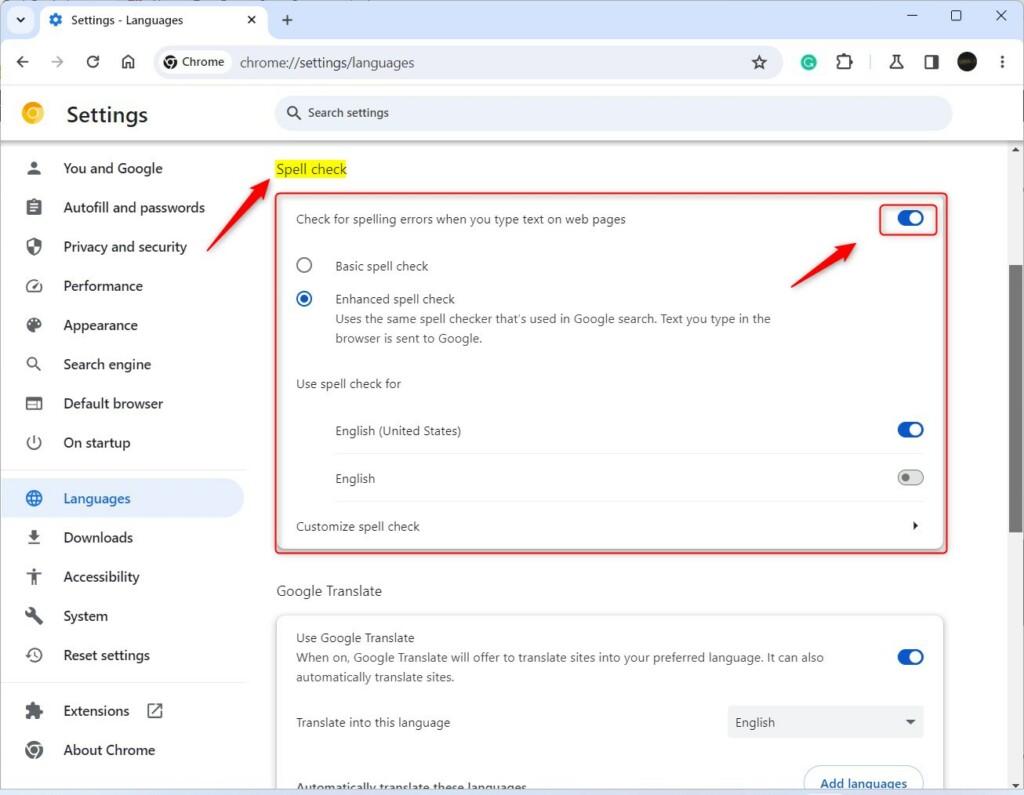
To pick one, open the Spell check section as shown above and select the option you want. The choice applies as soon as you select it. To undo it, come back to the same page and select the other option.
If you do not see the Enhanced option, your version of Chrome may not offer it, or your organization may manage the browser and restrict it. If red underlines do not appear at all, check that spell check is turned on for your language, then reload the page and click into the text box again.
Closing Google Chrome completes the process, since preferences save automatically. You do not need to restart the browser for the new setting to take effect. If you have other tabs open, a text box may only pick up the change after you reload that page.
Conclusion
Managing spell check settings in Google Chrome helps keep your writing clear and prevents accidental mistakes across the web. Check the setting once after a Chrome update or a new profile, and it should keep working without further attention.
Did this guide fix your problem?

About the Author
Richard
Tech Writer, IT Professional
Richard is a writer at Geek Rewind who turns complex IT tasks into clear, step-by-step guides. He draws on years of hands-on experience in system administration and enterprise IT operations, focusing on Windows, Linux and WordPress: the problems people actually run into, and the fixes that work. His server and WordPress guides come from systems he runs himself. Richard builds and maintains the platform behind Geek Rewind, from its Ubuntu servers and Nginx configuration to its custom WordPress plugins. Many new tutorials start with readers' questions, and he's always glad to answer them in the comments.
No comments yet — be the first to share your thoughts!