How to Add and Switch Between Multiple Keyboard Layouts in Windows 11

Windows 11 lets you add multiple keyboard layouts so you can switch between them without changing your language. You choose which layouts are installed in Settings. You then switch between them with Win+Space or with a click on the taskbar .
This is especially useful if you type in different languages or need accented letters. For example, the United States-International layout lets you type é, ñ, and ü without installing a different language pack. Adding a layout takes under a minute. It doesn’t need administrator rights or a restart.
This guide covers Windows 11. It walks through adding a layout, switching between layouts, changing the keyboard shortcut, using an international layout, and removing a layout you no longer need.
To add an international keyboard in Windows 11, open Settings with Win+I, select Time & language, then Language & region. Select the three dots next to your language, choose Language options, and select Add a keyboard under Installed keyboards. Pick United States-International. It works immediately, with no restart. Switch layouts with Win+Space.
Language vs keyboard layout: what you are adding
Windows keeps two things separate. A language controls display text, spelling and regional formats. A keyboard layout is attached to a language. It is also called an input method, and it is the map that decides which character each key produces.
This matters because the layout you want may not live under the language you already have. For example, United States-International is listed under English (United States). A French AZERTY layout is listed under French, so you add the French language to get it. You can add the language without making it your display language, so your menus stay in English.
Add a keyboard layout to a language you already have
Use this method when the layout belongs to a language already listed on your PC, such as the international keyboard under English (United States).
- Open Settings by pressing Win+I.

Windows 11 Start menu with Settings gear icon highlighted. - Select Time & language in the left pane, then select Language & region. You now see a Preferred languages list.
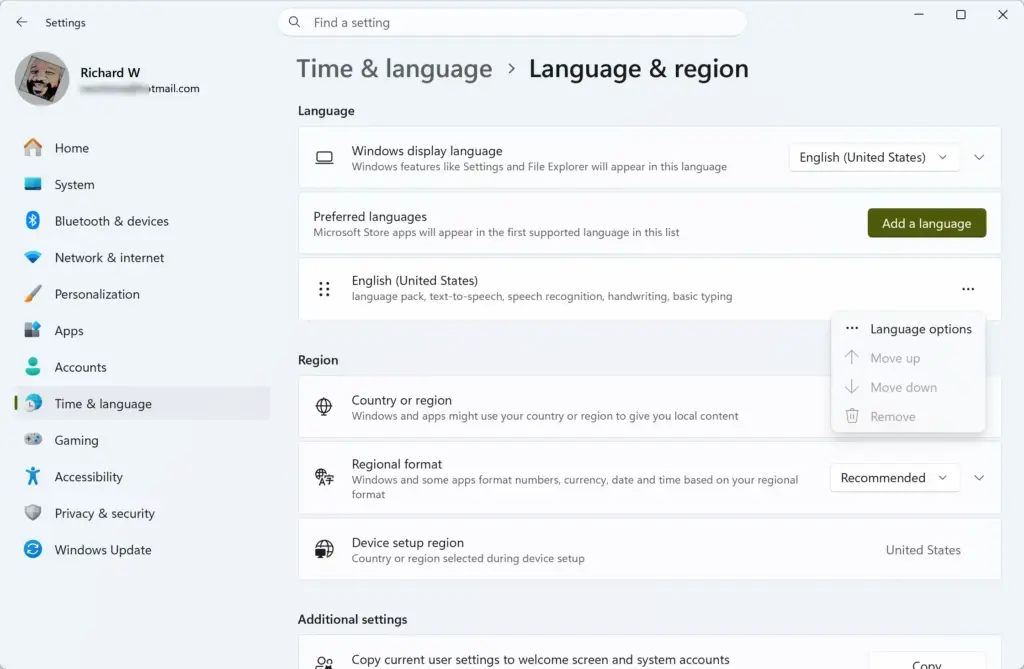
Settings › Time & language › Language & region › Preferred languages - Select the three dots (…) next to the language you want to add a layout to, then select Language options. The language’s page opens with a Keyboards section near the bottom.
- Select Add a keyboard next to Installed keyboards. A list of layouts available for that language opens.
- Select the layout you want, for example United States-International. It appears in the Installed keyboards list straight away.
The layout is active immediately. No download or restart is needed, because these layouts ship with Windows.
If the layout you want is not in the list, it belongs to a different language. Use the next section.
Add a new language to get its keyboard layout
Use this method when the layout you need belongs to a language that is not on your PC yet. This step downloads files, so you need an internet connection.
- Open Settings Time & language Language & region.
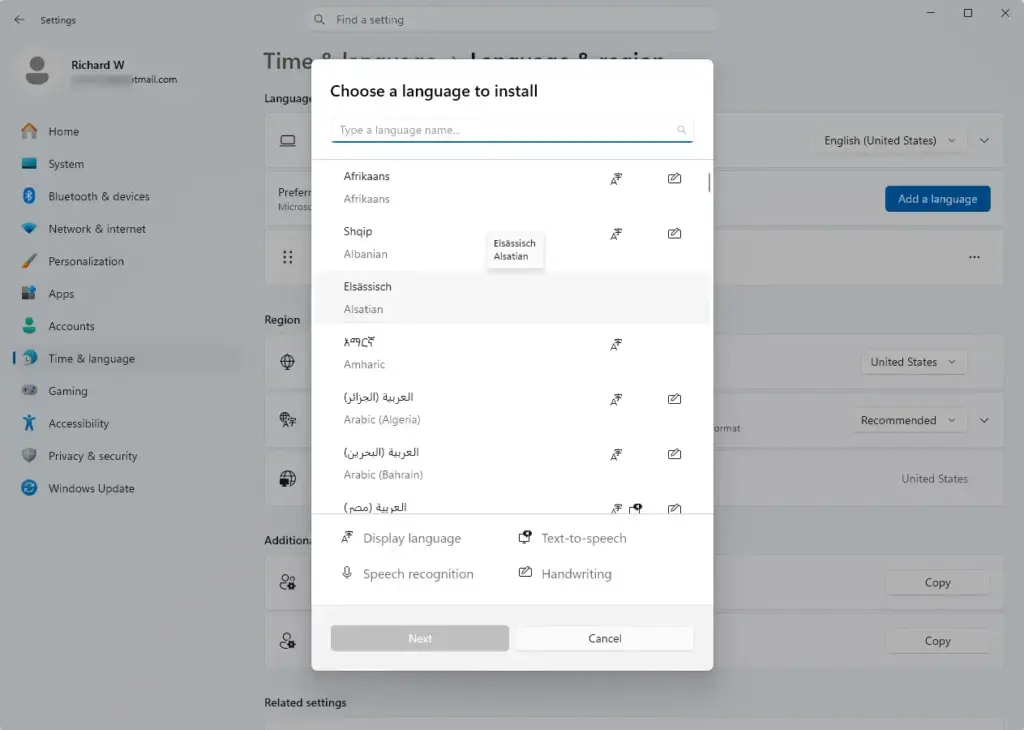
- Select Add a language next to Preferred languages. A search window opens.
Settings › Time & language › Language & region › Preferred languages - Type the language name, select it in the results, and select Next. You see a page of optional language features.
- Clear the Set as my Windows display language check box if you want to keep your current menus and dialogs. Windows ticks this box for some languages.
- Clear any other features you don’t need, such as speech recognition or handwriting. These are optional downloads, and the keyboard works without them.
- Select Install. A progress indicator shows next to the language while Windows downloads it. The language then appears in Preferred languages.
If you leave Set as my Windows display language ticked, Windows asks you to sign out before the new display language takes effect. Skip that option if you only want the keyboard.
If the download fails or stalls, check your internet connection and confirm that Windows Update works. Language files come through the same download service. If the PC is managed by a school or employer, an administrator may block language installs. In that case you must ask them to allow it.
After the language installs, open its Language options as in the previous section. Many languages come with a default layout. Use Add a keyboard to add others, and remove any layout you do not want.
Switch between keyboard layouts
Windows gives you two quick ways to change layouts. Both only appear once you have at least two layouts installed.
Use the keyboard shortcut
Press Win+Space. A small pop-up appears above the taskbar listing your layouts, and each press moves the selection to the next one. Release the keys to stay on the highlighted layout.
On most PCs, Left Alt + Shift also cycles through layouts. This shortcut is a setting you can change, as covered below.
Use the language indicator on the taskbar
Look at the right end of the taskbar , near the clock. You see a short code such as ENG. Select it and a menu lists your installed layouts. Select the one you want.
This menu is the taskbar ’s language flyout. It is the same pop-up that Win+Space opens, so you can pick a layout with the mouse or step through the list with the keyboard. Both do the same thing.
Check it before you type a password, because the wrong layout produces the wrong characters.
If you do not see the indicator, you probably have only one layout installed. Windows hides it in that case. Add a second layout and it appears. If you have two or more layouts and still do not see it, right-click the taskbar , select Taskbar settings, and check that the taskbar is not set to hide the system tray area. If the indicator still does not appear, use Win+Space instead. It works whether or not the indicator is visible.
Change the shortcut used to switch layouts
Use this if Alt + Shift triggers by accident or clashes with another program. The setting is in an older dialog that Windows 11 still uses.
- Open Settings Time & language Typing.
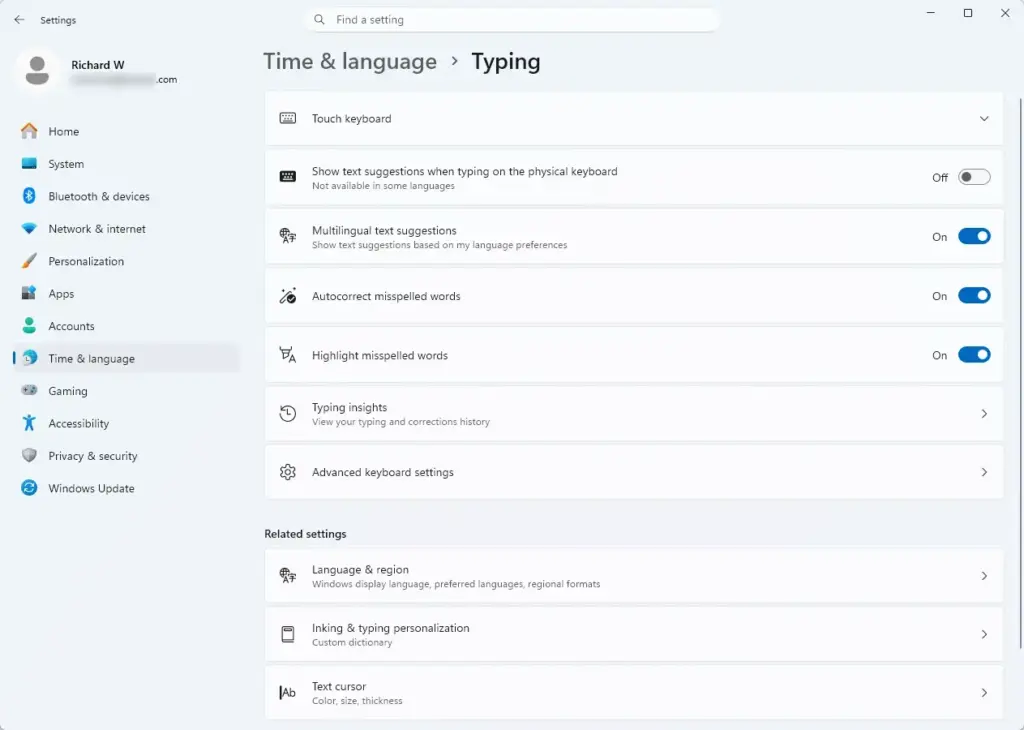
Settings › Time & language › Typing - Select Advanced keyboard settings.
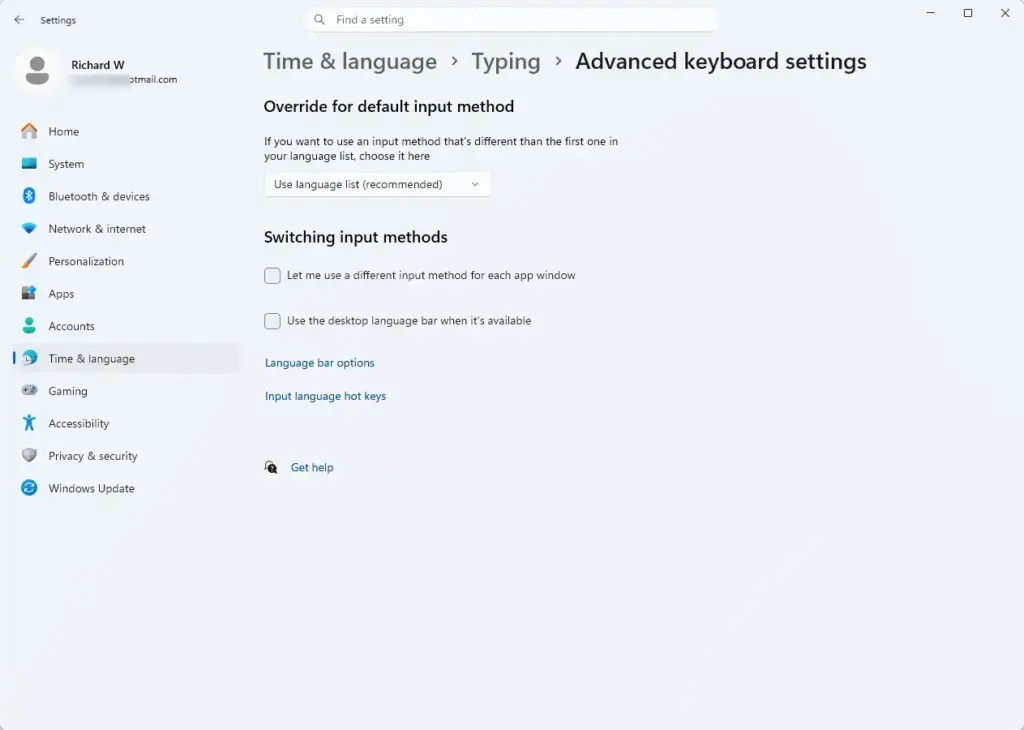
Settings › Time & language › Typing › Advanced keyboard settings - Select Input language hot keys. The Text Services and Input Languages window opens on the Advanced Key Settings tab.
- Select Between input languages, then select Change Key Sequence.
- Choose a shortcut, or choose Not Assigned to turn the shortcut off. Select OK in both windows.
The dialog may offer separate options for switching language and switching keyboard layout. Set the one that matches what you want to change. Win+Space is built in and keeps working whichever option you pick.
The Typing page has other options besides the advanced settings. One is Show the touch keyboard, under the touch keyboard settings. It controls when the on-screen keyboard appears. You can set it to Never, When no keyboard is attached, or Always. This is useful on a tablet or a 2-in-1 PC. Layouts you add in this guide are also available on the touch keyboard, and you can still switch between them from the taskbar flyout or with Win+Space.
Keep a separate layout for each app window
By default, Windows applies the layout you choose to every window. If you write in two languages at once, you can make Windows remember a layout per window.
- Open Settings Time & language Typing Advanced keyboard settings.
Settings › Time & language › Typing › Advanced keyboard settings - Turn on Let me use a different input method for each app window.
Switch layouts in one window, then click into another. The second window keeps its own layout. Turn the option off to go back to one layout everywhere.
Use the United States-International layout
The United States-International layout is the most common international keyboard choice for people who have a standard US keyboard and need accented letters. It keeps all the keys in the same place and adds accents through dead keys. A dead key prints nothing on its own and waits for the next letter to combine with it.
These keys become dead keys in this layout:
- Apostrophe (') adds an acute accent. Press ' then e to get é.
- Quotation mark (") adds a diaeresis. Press " then u to get ü.
- Grave accent (`) adds a grave accent. Press ` then a to get à.
- Tilde (~) adds a tilde. Press ~ then n to get ñ.
- Caret (^) adds a circumflex. Press ^ then o to get ô.
To type one of these symbols by itself, press the key and then press Space. For example, press ' then Space to get an apostrophe. This is the most common complaint about the layout: typing "don't" produces an odd result until you get used to pressing Space. If that gets in the way, switch back to plain United States-English for coding or fast typing, and use the international layout when you need accents.
The layout also uses the Right Alt key (called AltGr, short for Alternate Graphic) for extra characters. You can try these:
- Right Alt + 5 types €.
- Right Alt + n types ñ.
- Right Alt + s types ß.
- Right Alt + 1 types ¡.
- Right Alt + / types ¿.
Most keyboards have a physical Right Alt key. If yours does not, or if the combinations do nothing, use the dead-key method above instead.
Add the keyboard to the sign-in screen
The sign-in screen can use a different one, which causes trouble if your password contains characters that are in a different place on that layout. First check the sign-in screen: a language indicator appears at the bottom right once you click into the password box, and you can select a layout there.
This step requires administrator privileges. To copy your settings to the sign-in screen, do the following:
- Open Settings Time & language Language & region.
- Under Related settings, select Administrative language settings. The Region window opens.
- Select the Administrative tab, then select Copy settings.
- Tick Welcome screen and system accounts, then select OK. If Windows asks for administrator approval, approve it.
This changes the layout settings for the sign-in screen and system accounts, and for new user accounts if you tick that box too. It is not a harmful change, but you should know it applies beyond your own account.
Remove a keyboard layout or a language
You can reverse any of the steps above. Removing a layout does not affect your files or the other layouts.
Remove a single layout
- Open Settings Time & language Language & region.
- Select the three dots (…) next to the language, then select Language options.
- In the Installed keyboards list, select the three dots next to the layout, then select Remove. The layout disappears from the list and from the taskbar menu.
If Remove is greyed out, that layout is the only one for the language. Add another layout first, or remove the whole language instead.
Remove a whole language
- Open Settings Time & language Language & region.
- Select the three dots next to the language, then select Remove. The language disappears from Preferred languages, along with its layouts.
You cannot remove the language Windows is using as its display language. If Remove is greyed out for that reason, change the Windows display language setting at the top of the Language & region page to another language first, then sign out and back in.
Why a layout does not appear or does not work
- The indicator is missing. You have only one layout. Add a second.
- A layout is missing from the Add a keyboard list. It belongs to a different language. Add that language first.
- Keys type the wrong characters. Check which layout the taskbar indicator shows. A layout can switch when you press Alt + Shift without noticing.
- A shortcut does nothing. Open Input language hot keys and check it is not set to Not Assigned.
- Different windows use different layouts. Let me use a different input method for each app window is on. Turn it off to apply one layout everywhere.
- Options are greyed out or missing on a work or school PC. Your organisation may manage language settings. Ask your IT administrator.
If this didn't work
If a layout still does not appear after you add it, sign out and back in, then check the Installed keyboards list again. To undo any change, remove the layout or language as described above, and set Input language hot keys back to your previous shortcut. If the keys are physically mismatched with what Windows types, the problem is usually the keyboard hardware, not the layout. Compare the printed legends on your keys to the layout you chose.
Frequently asked questions
How do I change the Windows language?
Open Settings and go to Time & language Language & region Under Windows display language, choose the language from the drop-down list. The language must already be installed; sign out and back in to apply it. Windows will switch the display language after you sign out and back in.
How to switch between Windows by keyboard?
Press Alt + Tab to cycle through open windows. Hold Alt and tap Tab repeatedly to move through them. Release both keys when you reach the window you want. You can also click the taskbar to switch between apps.
How to swap keyboard layouts?
Press Windows key + Space to cycle through your keyboard layouts instantly. The layout name appears briefly on screen. You can also click the language indicator on the taskbar (bottom right) and select a different layout from the menu.
How do I change the keyboard language in 🪟 Windows 11?
Open Settings and go to Time & language Language & region. Select your language, click the three dots, and choose Add keyboards. Pick the layout you need from the list—for example, United States-International for accented characters. It activates immediately.
Still have a question?
Answered by AI from this guide. Good questions may be added to this page — please don't include personal details.
Did this guide fix your problem?

About the Author
Richard
Tech Writer, IT Professional
Richard is a writer at Geek Rewind who turns complex IT tasks into clear, step-by-step guides. He draws on years of hands-on experience in system administration and enterprise IT operations, focusing on Windows, Linux and WordPress: the problems people actually run into, and the fixes that work. His server and WordPress guides come from systems he runs himself. Richard builds and maintains the platform behind Geek Rewind, from its Ubuntu servers and Nginx configuration to its custom WordPress plugins. Many new tutorials start with readers' questions, and he's always glad to answer them in the comments.
No comments yet — be the first to share your thoughts!