Remove Input Language Keyboard in Windows 11: Step-by-Step Guide

Removing an input language keyboard in Windows 11 helps you manage your typing preferences.
An input language keyboard dictates how your keyboard keys are arranged to type in a specific language, like English or Spanish.
Windows 11 lets you add many different languages, and each one can come with its own keyboard layout. You might have installed an extra one by accident or no longer need it.
Having too many keyboard layouts can make it confusing to switch between them when you type. This guide shows you exactly how to get rid of one you don’t want anymore.
Open Settings, then Time & Language, and select Language & region. Click the three dots next to the language, choose Language options, and then select Remove under the Keyboards section. Use the Registry Editor for stubborn layouts.
How to uninstall the input language keyboard in 🪟 Windows 11
As mentioned, Windows allows multiple input language keyboards to support additional features. If a specific input language keyboard is no longer needed, you can remove it using a few steps.
This process works only if you have multiple input language keyboard layouts. Below are some related posts that can help you install or use additional input language layouts.
- How to add an input language keyboard in Windows 11
- How to change input language keyboard layouts in Windows 11
- How to override input language default methods in Windows 11
You can remove input language keyboards using the steps below.
To see a list of input language keyboards in Windows 11, go to the Start menu > Settings > Time & Language> Preferred languages.
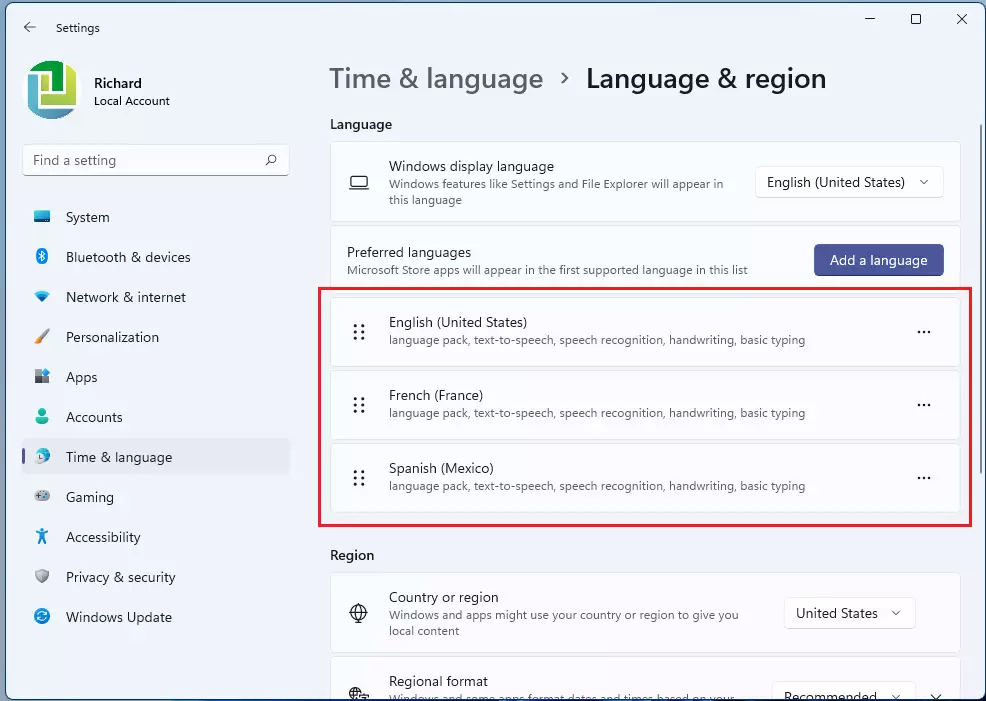
On the Language & region settings pane, under Language, click the Preferred languages tile. Select the language whose keyboard you want to remove, then click Options (the three dots icon).

Next, scroll down to the Keyboards section. On the Installed keyboards tile, click the option (three dots icon) button, then click the Remove button to remove the input language keyboard.

That completes the removal!
Conclusion:
Removing an input language keyboard layout in Windows 11 is a simple process. Here are the key takeaways:
- Manage Multiple Layouts: Windows 11 supports various input language keyboards, allowing users to switch between them as needed.
- Access Settings Easily: To remove a keyboard layout, navigate to Settings > Time & Language > Preferred languages.
- Simple Steps: Select the preferred language, access options, and use the remove function to delete unwanted layouts.
- Useful Resources: For further assistance, refer to articles on adding and changing keyboard layouts or overriding input methods.
- Customization of User Experience: Adjusting keyboard settings enhances the typing experience according to individual language preferences.
Was this guide helpful?
0% of readers found this helpful (1 votes)

About the Author
Richard
Tech Writer, IT Professional
Richard, a writer for Geek Rewind, is a tech enthusiast who loves breaking down complex IT topics into simple, easy-to-understand ideas. With years of hands-on experience in system administration and enterprise IT operations, he’s developed a knack for offering practical tips and solutions. Richard aims to make technology more accessible and actionable. He's deeply committed to the Geek Rewind community, always ready to answer questions and engage in discussions.


No comments yet — be the first to share your thoughts!