How to Install Input Language Keyboard in Windows 11

An input language keyboard in Windows 11 is a software layout that changes which characters appear on screen when you press keys. It lets you type in over 100 different languages without buying new hardware. The physical keys stay the same. Windows reads each key press and turns it into the character your chosen layout assigns to it.
Adding a new keyboard layout takes less than 5 minutes through the system settings, and you can switch between languages at any time with a quick shortcut. You do not need an administrator account for most of this, and a restart is not normally required.
To install a language keyboard in Windows 11, open Settings , go to Time & language, select Language & region, click the three dots next to your language and choose Language options, then click Add a keyboard and pick the layout. It appears under Keyboards immediately, and no restart is needed.
Why Install a Language Keyboard?
Installing a language keyboard in Windows 11 lets you type in different languages and scripts directly on your computer. You need one when you want to switch between different alphabets, accents, or writing systems for work, school, or personal messaging.
Typical cases are typing French accents on a US keyboard, writing in Cyrillic or Arabic script, or using a layout such as German or Spanish that moves some of the punctuation keys. Once a layout is installed, you switch between layouts with standard keyboard shortcuts or from the taskbar .
After installation, Windows 11 lets you switch between keyboard layouts with a shortcut or from the taskbar . This means you can write in several languages on one computer. You do not have to change your overall system settings to do it.
Your Windows menus, apps and the rest of the interface stay in the same language. Only the characters you type change. You can also keep several layouts installed at the same time and switch between them as you work.
How to Install Language Keyboard in 🪟 Windows 11
To install a language keyboard in Windows 11, open Settings and go to Time & language, then select Language & region. From there, click Add a language, search for the language you want, and follow the prompts to download the keyboard layout. You can then start typing right away.
Open its options and add the keyboard, as the steps below show. Adding a new language downloads files, so keep the PC connected to the internet.
- Open your computer settings by pressing Windows key + I or by clicking Start, then Settings. The Settings app opens with a list of categories on the left.

windows 11 start settings - In the Settings menu, click Time & language. The page shows options such as Date & time, Language & region and Typing.
- Select the Language & region tile. You should now see your Windows display language and a list of your preferred languages.
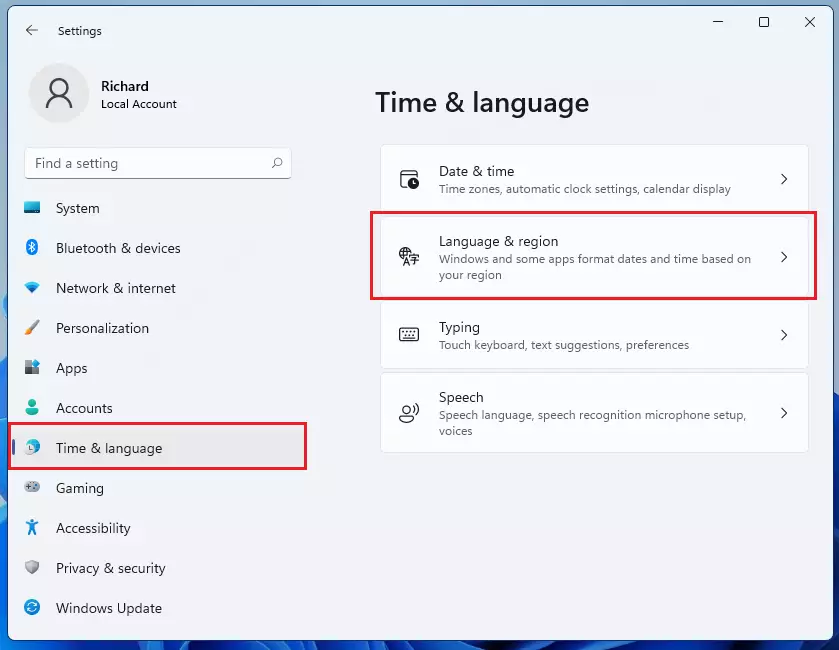
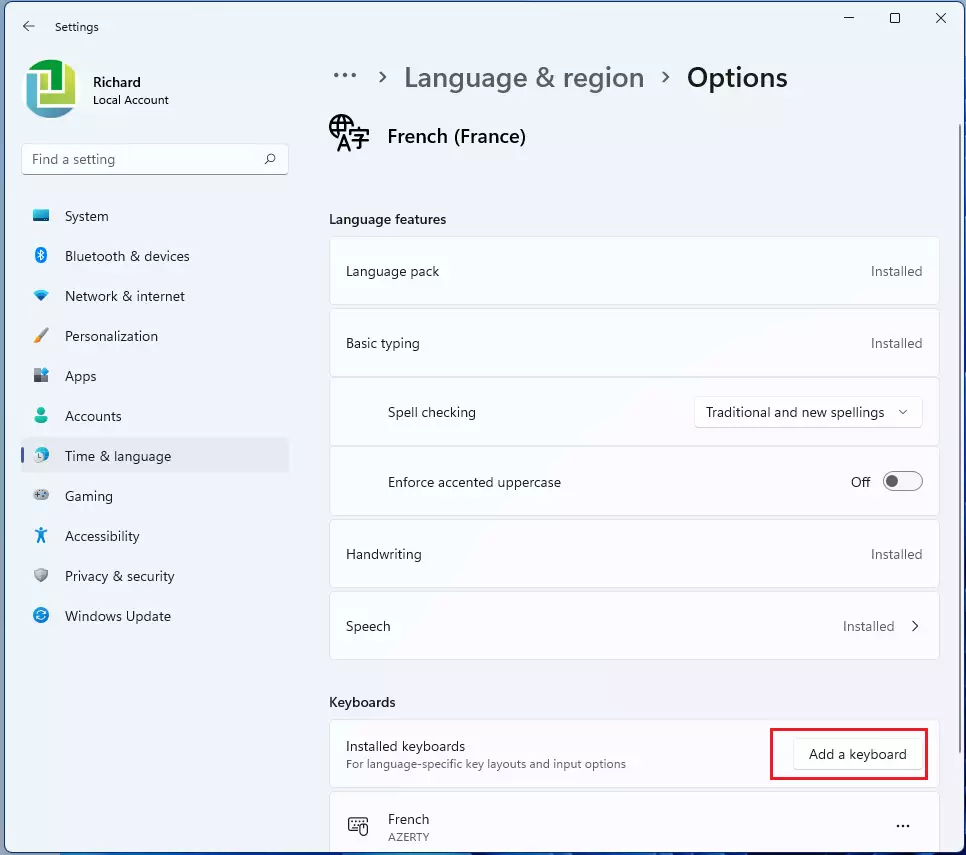
windows 11 display language change - Look for your preferred language in the list. Click the three dots (...) next to it and select Language options. If the language is not in the list yet, click Add a language first, pick it, and finish the install. Then come back to this step. The language options page opens and shows the keyboards already installed for that language.

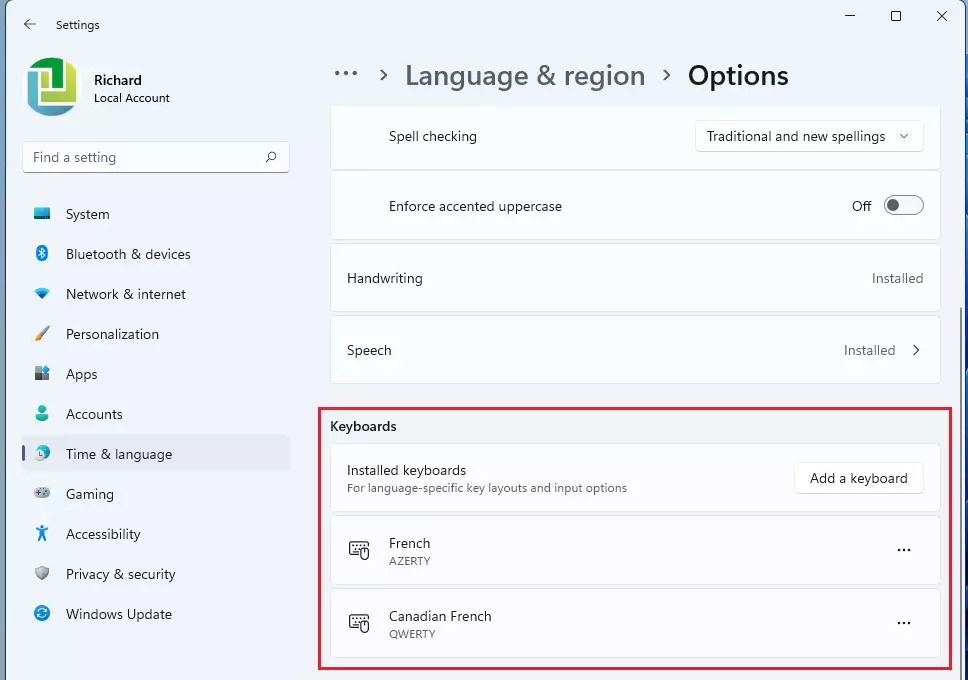
windows 11 change input language keybaord - Scroll down to the Keyboards section. Click the Add a keyboard button. A list of available layouts for that language appears.
installed keyboards windows 11 buttons - Choose the keyboard layout you want from the list to install it. The layout then shows up under Keyboards, and you can use it straight away. No restart is needed.
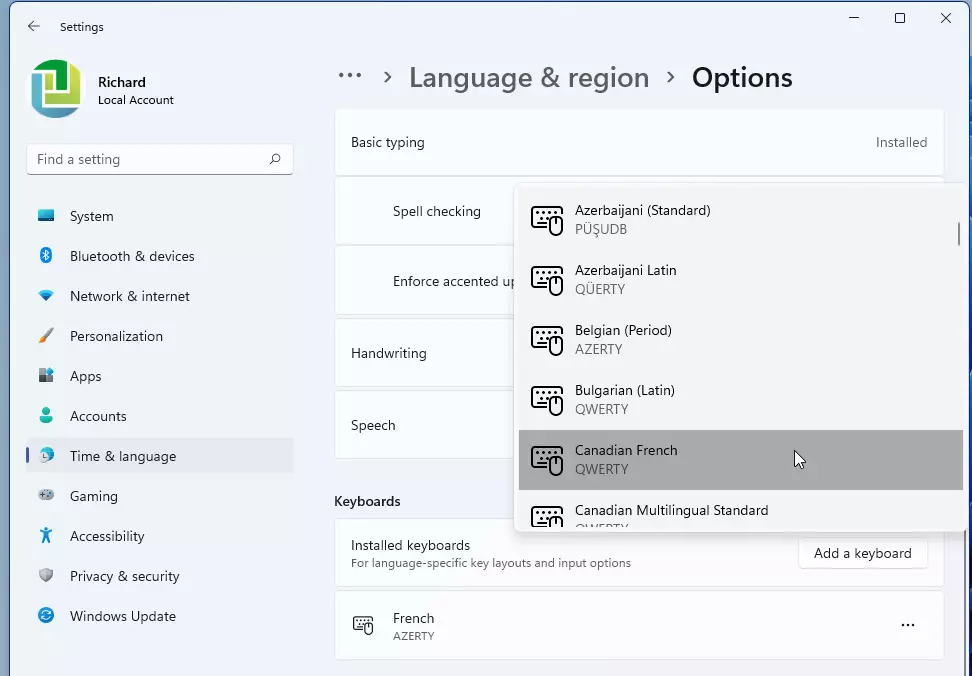
windows 11 install input language keyboard options
Once you install a language, the default keyboard for that language is usually added automatically. You can verify your new setup under the keyboard section for your preferred language. If the layout you expected is missing, go back to Add a keyboard and add it by hand.
How to Switch Between Keyboards
Press and hold the Windows key and tap the Spacebar to cycle through your available typing languages. Or click the language abbreviation on the right side of the taskbar to pick one with your mouse.
The language abbreviation only appears on the taskbar when you have two or more keyboards installed. If you only see one, add a second layout first.
- Keyboard Shortcut: Press and hold the Windows key and tap the Spacebar to cycle through your installed input methods. A small pop-up lists them and highlights the active one. Release the Windows key to confirm your choice.
- Taskbar Icon: Click the language abbreviation (e.g., ENG or FRA) on the right side of your taskbar to select a different keyboard. The abbreviation changes to show which layout is now active.
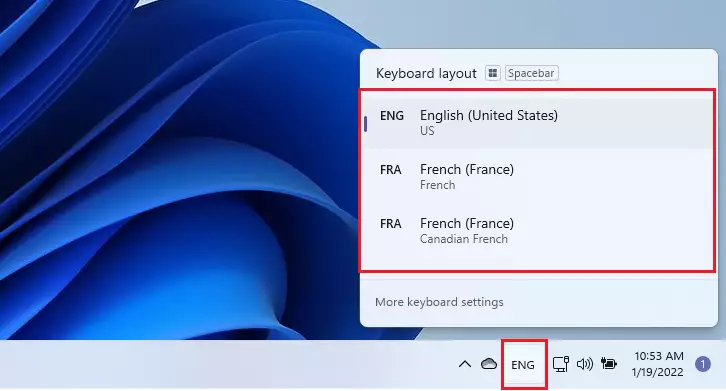
windows 11 switch keyboard input language taskbar
Display Language vs. Input Language
Your display language changes Windows menus, while your input language, or keyboard layout, only affects what you type. Adding a keyboard does not change the language of Settings, File Explorer or the Start menu. If you want the menus in another language too, change the Windows display language on the same Language & region page. That change takes effect after you sign out and back in.
How to Remove a Keyboard Layout
If you no longer need a specific layout, you can remove it at any time. Removing a keyboard does not delete your files or change your other languages. To get it back later, add it again with the steps above. Follow these steps:
- Go to Settings Time & language Language & region The list of your preferred languages appears.
- Click the three dots (...) next to the language.
- Select Language options. The options page for that language opens.
- Find the keyboard under the Keyboards section.
- Click the three dots (...) next to the keyboard and select Remove. The keyboard disappears from the list. It also drops out of the Windows key + Spacebar cycle and the taskbar menu.
Summary
Adding a new keyboard layout in Windows 11 lets you type in other languages easily. Open Settings Time & language Language & region, add the language or keyboard you need, and switch between layouts with Windows key + Spacebar or from the taskbar. If you ever change your mind, you can remove a layout from the same page.
Have a question about this guide?
Answered by AI from this guide. Good questions may be added to this page — please don't include personal details.
Did this guide fix your problem?

About the Author
Richard
Tech Writer, IT Professional
Richard is a writer at Geek Rewind who turns complex IT tasks into clear, step-by-step guides. He draws on years of hands-on experience in system administration and enterprise IT operations, focusing on Windows, Linux and WordPress: the problems people actually run into, and the fixes that work. His server and WordPress guides come from systems he runs himself. Richard builds and maintains the platform behind Geek Rewind, from its Ubuntu servers and Nginx configuration to its custom WordPress plugins. Many new tutorials start with readers' questions, and he's always glad to answer them in the comments.
No comments yet — be the first to share your thoughts!