How to Change Active Input Language Shortcuts in Windows 11 Language and Region


Active input language shortcuts in Windows 11 let you switch between keyboard layouts instantly with key combinations such as Left Alt + Shift or the Win+Space. They take a while to find because Microsoft splits the settings between the modern Settings app and older legacy dialogs that are still part of Windows 11.
This guide first covers the language and keyboard groundwork, then the steps for changing the shortcut itself. You can set your own key combination in a few clicks and type in several languages faster.
Open Settings Time & language Language & region, scroll to Preferred languages, click the three-dot menu next to a language, select Language options, then go to Keyboards and click Add a keyboard to choose your layout.
Understanding 🪟 Windows 11 Language and Region Settings
Windows 11 Language and Region settings are the central place for display languages, keyboard layouts and regional preferences. From here you can add typing options, download speech packs and control how the system shows text. In the Settings app, go to Time & language to reach them.
Check your list first, and add any language you need before you change the shortcut. The next sections show how.
Check What Languages Are Installed in Windows
Checking your installed languages takes a few clicks. The list shows your preferred languages, which one is your display language, and where to manage each language’s typing tools.
- Click the Start button and open the Settings app. You can also press the Win+I.

Windows 11 Start menu with Settings gear icon highlighted.
The Settings window opens with a category list on the left. - Click Time & language on the left side of the window.
- Click Language & region on the right side.
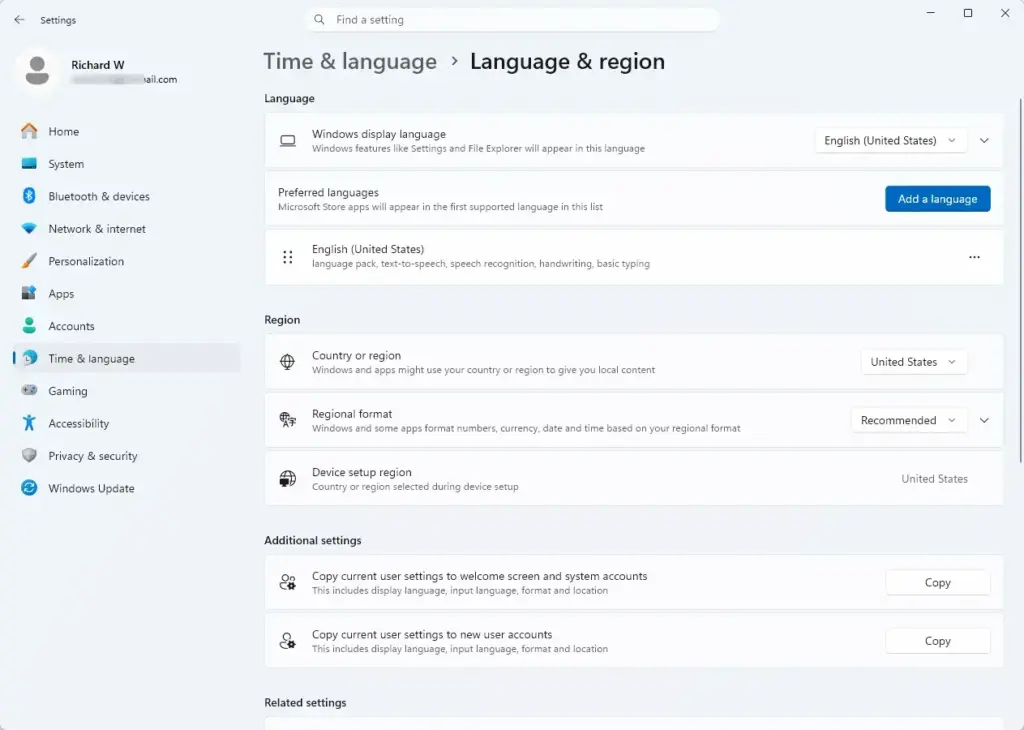
Settings › Time & language › Language & region - Look under the Preferred languages section.
You will see every language currently installed on your system. If the language you want is missing, add it in the next section.
Install a Language Pack
A language pack lets Windows display menus and accept typing in a new language. Windows downloads the files from Microsoft, so you need an internet connection. For a language with a single keyboard, you can usually start using it as soon as the install finishes.
- Open the Settings app.
- Go to Time & language and then select Language & region.
Settings › Time & language › Language & region - Click the Add a language button next to Preferred languages.
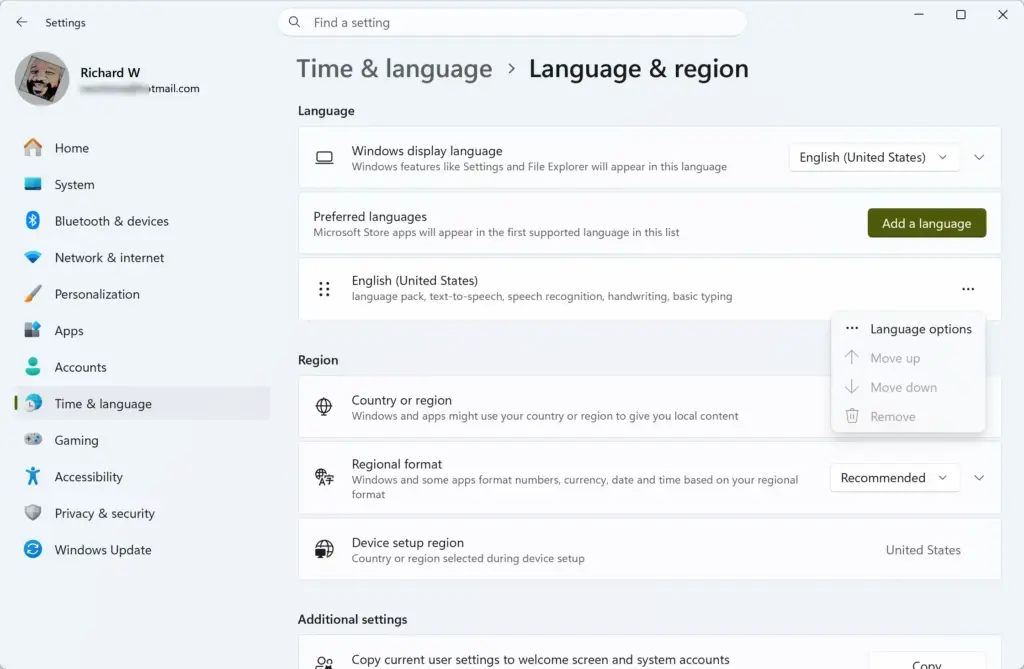
Settings › Time & language › Language & region › Preferred languages
A window opens with a searchable list of languages. - Type the name of your language into the search box, or scroll through the list to find it.
- Click your chosen language, and then click Next.
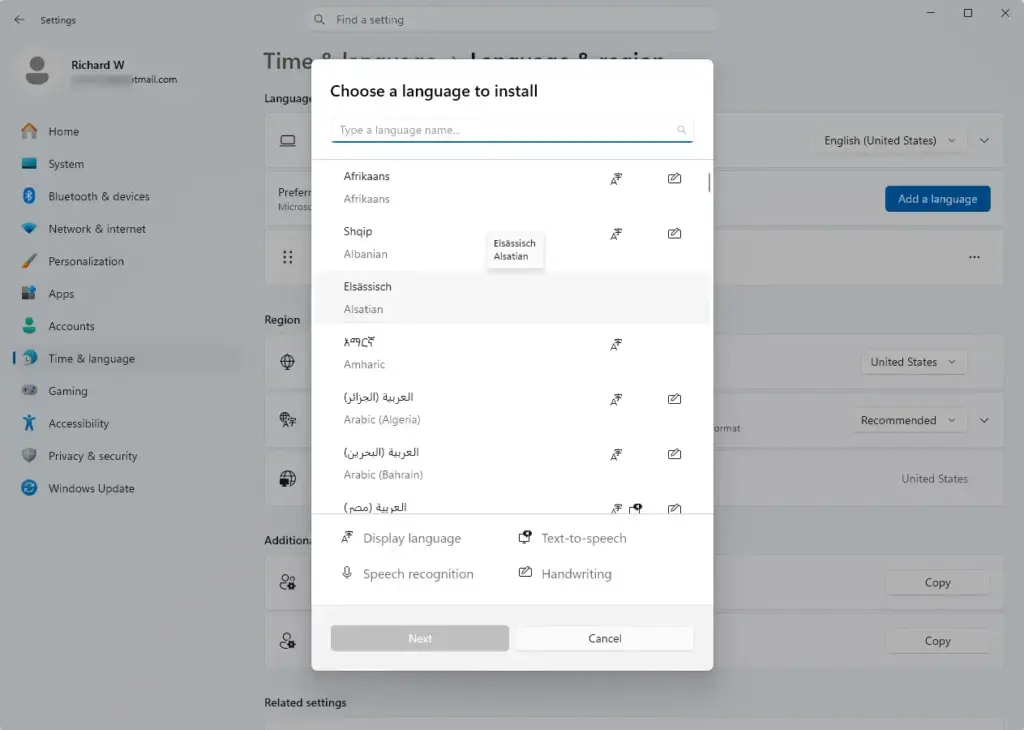
- Check the boxes for the features you want, such as Set as my Windows display language or Install speech recognition.
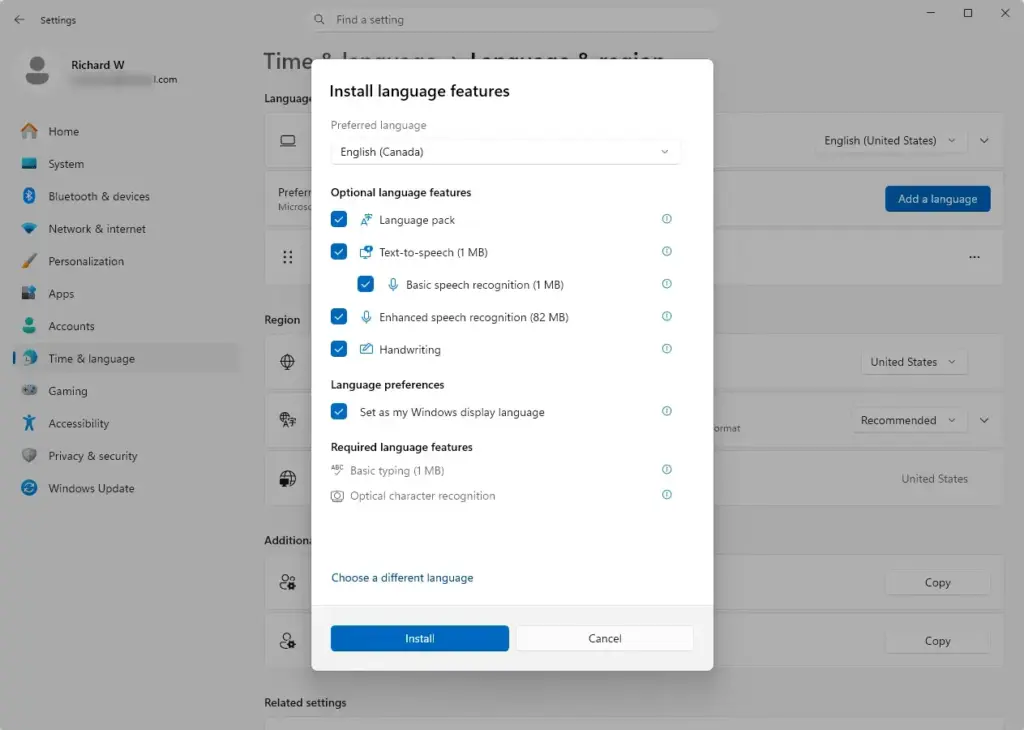
If you only want to type in the language, leave the display language box unchecked. Your menus then stay in the current language. - Click the Install button.
Your computer downloads and installs the language pack. A progress indicator appears next to the language while it works, and the language then shows in your Preferred languages list.
Change the Windows Display Language
Changing the Windows display language switches the text on menus, buttons and system settings to another language. The change is applied when you sign out and back in to your user account. You do not need to restart the whole PC.
- Open the Settings app and go to Time & language Language & region.
Settings › Time & language › Language & region - Look for the Windows display language drop-down menu near the top of the page.
- Click the menu and select a new language from your installed options.
If the language you want is not in the list, add it first, as described in the previous section. - Sign out and sign back in for the change to take full effect.
Warning: when the Windows display language is changed, it might also change the language of your default apps and websites.
To undo the change, select your old language in the same drop-down and sign out again.
Change the Language Used by Microsoft Store Apps and Websites
Microsoft Store apps and websites choose their language from your preferred languages list, not only from the display language. Windows checks the list from top to bottom and uses the first language the app or site supports. Putting your languages in the right order controls which one appears first.
- Open the Settings app and navigate to Time & language Language & region.
- Scroll down to the Preferred languages section.
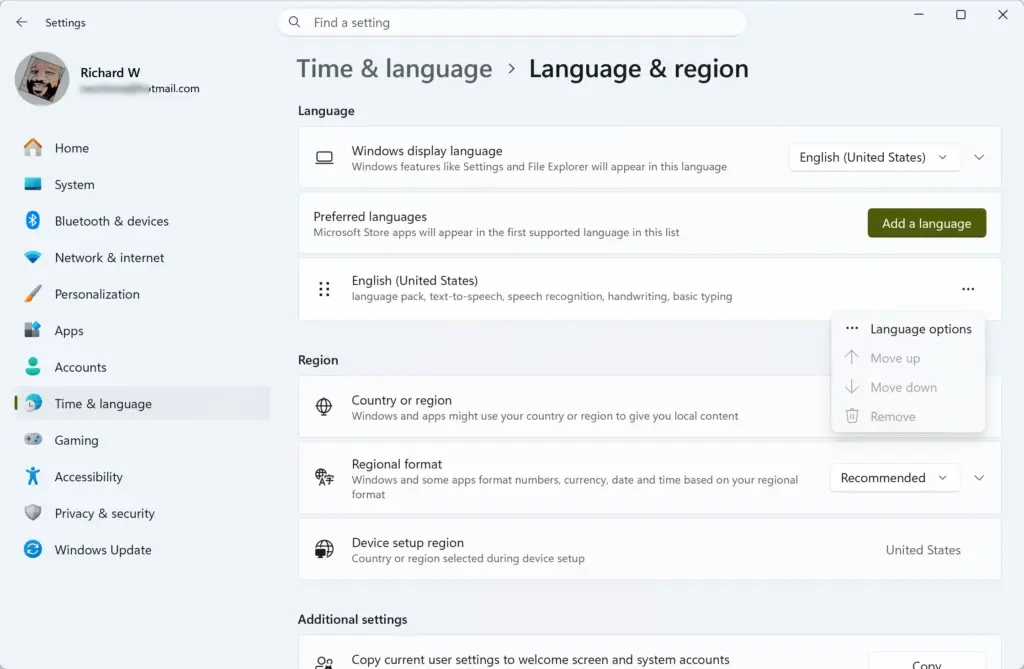
- Click and drag your languages into the exact order you prefer.
The language at the top has the highest priority. If dragging does not work, click the three dots next to a language and look for a move option in the menu.
Install Speech for a Language
Speech support gives a language built-in speech recognition and text-to-speech, so your computer can understand spoken commands in that language. It is a separate download for each language. Not every language offers it, so the option may be missing.
- Open Settings and go to Time & language Language & region.
- Click the three dots next to your chosen language in the Preferred languages list.
- Select Language options.
The options page for that language opens. - Look for the Speech section and click the Download button if it is available.
If there is no Download button, the speech pack is already installed or is not offered for that language.
Add a Keyboard Layout
A keyboard layout lets you type with a different key arrangement for the same base language. For example, you can switch between United States and United Kingdom layouts. Each layout you add becomes another option for your language shortcut to cycle through.
- Open the Settings app and go to Time & language Language & region.
- Click the three dots next to your preferred language.
- Select Language options.
- Scroll down to the Keyboards section and click Add a keyboard.
- Click the keyboard layout you want to add from the list.
The layout now appears under Keyboards and in the taskbar language menu.
Change the Keyboard Layout
You can switch layouts by hand from the taskbar, without opening Settings. This is handy for checking that your keyboard shortcut does what you expect.
- Look at the right side of your taskbar near the clock. You will see an abbreviation like ENG or SPA.
- Click that language abbreviation icon.
A small menu lists your installed languages and keyboard layouts. - Click the specific keyboard layout you want to use right now.
If you do not see the abbreviation, the indicator is hidden or you only have one keyboard installed. The section on the input indicator below covers this.
Remove a Language Pack
Windows will not let you remove your current display language until you switch to a different one.
- Open Settings and go to Time & language Language & region.
- Find the language you want to remove under Preferred languages.
- Click the three dots next to that language.
- Click Remove.
If Remove is greyed out or missing, the language is probably your current display language. Change your display language first, then try again.
To undo this, add the language again with Add a language.
Remove a Keyboard Layout
Removing a keyboard layout clears out typing tools you no longer use. It also keeps your taskbar language switcher short, so you cannot land on the wrong layout by accident.
- Open Settings and navigate to Time & language Language & region.
- Click the three dots next to the language that contains the keyboard layout.
- Select Language options.
- Find the keyboard you want to delete, click its three dots, and select Remove.
The keyboard disappears from the list and from the taskbar menu.
If the option is greyed out, it is usually the only keyboard left for that language. Windows needs at least one keyboard for each language you keep.
Display the Input Language Icon in the Taskbar
The input indicator shows your active typing language on the taskbar, so you can see at a glance which layout is in use. It is especially useful when you test a new shortcut. Windows normally shows the indicator only when you have more than one language or keyboard installed.
- Open the Settings app.
- Click Personalization and then select Taskbar.
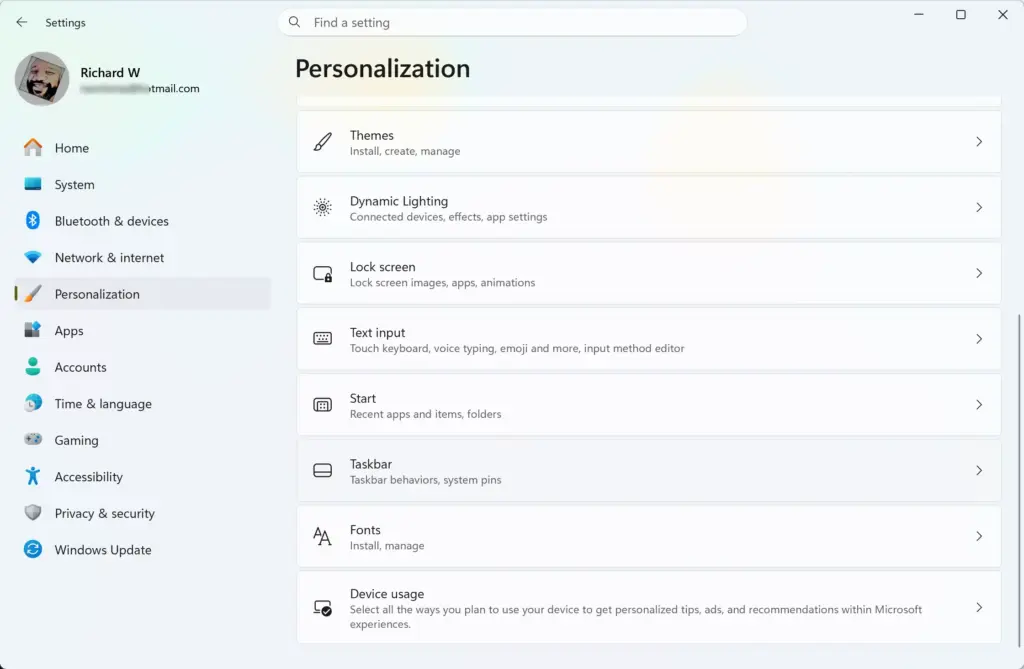
Settings › Personalization › Taskbar - Click Taskbar corner icons to expand the list.
- Make sure the toggle for the Input Indicator is turned on.
The language abbreviation should now appear near the clock. If the toggle is not listed on your build, check that you have at least two keyboards installed.
Using the Language bar to Switch Keyboard Layouts
The traditional Language bar is a floating desktop toolbar for managing and switching input languages. It lives in the legacy Control Panel, outside the Windows 11 Settings app. Some people prefer it as a visible alternative to the taskbar indicator.
- Click the Start button, type Control Panel, and open the app.
- Click Clock and Region and then select Language, or search for Language in the Control Panel search box.
- Click Advanced settings on the left side of the window.
- Look for the section titled "Switching input methods" and click Change language bar hotkeys.
A window opens named Text Services and Input Languages. - In the window that pops up, select the Language Bar tab.
- Choose either Floating or Docked in the taskbar, then click Apply and OK.
The bar appears on the desktop or in the taskbar straight away.
To undo this, return to the same tab and pick the Hidden option if it is shown.
How to Change Active Input Language Shortcuts in 🪟 Windows 11
This is the part most people came for. You can change the hotkey that switches between your typing languages so it matches what your fingers already know. The change applies to your user account and takes effect right away, with no restart.
Windows 11 uses the Windows Key + Spacebar to cycle through your installed keyboards, and that shortcut always works. Many users prefer the older Left Alt + Left Shift combination, and the steps below set it. The setting only does something if you have two or more languages or keyboards installed. Follow these steps to customize your hotkeys:
- Open the Settings app from your Start menu.
- Click Time & language and then select Typing.
- Click Advanced keyboard settings.
- Click Input language hotkeys.
A classic settings window appears on your screen. It is an older dialog, so it looks different from the rest of Settings. - Select the key sequence you want to change from the list, such as "Between input languages".
- Click the Change Key Sequence button near the bottom.
A smaller dialog opens with the available combinations. - Choose your preferred shortcut combination from the available options. For example, you can select Left Alt + Shift or choose to use no shortcut at all.
- Click OK to save your changes, and then click OK on the main window.
Test it by opening Notepad and pressing your new shortcut. The input indicator near the clock should change. To go back, repeat the steps and choose another combination. Setting the hotkey to none only removes the extra shortcut, and you can still switch with the Windows Key + Spacebar or the taskbar icon.
Summary
The Windows 11 language and region settings let you customize display text, add keyboard layouts and change your typing shortcuts. This guide covered how to check installed languages, install new language packs, update display options, show the input indicator and set a custom hotkey for fast switching. With these in place, your typing tools should match how you work every day.
How to change language key on keyboard 🪟 Windows 11?
Open Settings, go to Time & Language Language & Region, then scroll to Keyboard. Select Advanced keyboard settings, choose Input method hot keys, and pick Change Key Sequence. Pick your new key combination and save. You can set Left Alt + Shift, Windows Key + Space, or other pairs.
How do I change the input on my keyboard?
Press your active input language shortcut—by default Left Alt + Shift or Windows Key + Space in Windows 11. This cycles through installed keyboard layouts. To change the shortcut itself, go to Settings Time & Language Language & Region Keyboard Advanced keyboard settings Input method hot keys
How do I change the language in Windows?
Open Settings and go to Time & Language Language & Region Under Preferred Languages, select Add a language, find the one you want, and click Next. Choose whether to set it as display language or just for typing. Windows then downloads language files and adds it to your list.
How to remove keyboard layout in 🪟 Windows 11?
Open Settings, go to Time & Language Language & Region, find the language under Preferred Languages, click the three dots next to it, and select Remove. The keyboard layout is deleted. You cannot remove your system's primary display language, only additional ones you added.
Was this guide helpful?

About the Author
Richard
Tech Writer, IT Professional
Richard is a writer at Geek Rewind who turns complex IT tasks into clear, step-by-step guides. He draws on years of hands-on experience in system administration and enterprise IT operations, focusing on Windows, Linux and WordPress: the problems people actually run into, and the fixes that work. His server and WordPress guides come from systems he runs himself. Richard builds and maintains the platform behind Geek Rewind, from its Ubuntu servers and Nginx configuration to its custom WordPress plugins. Many new tutorials start with readers' questions, and he's always glad to answer them in the comments.
No comments yet — be the first to share your thoughts!