How to Check Language Support in Windows 11

- 20 steps
- Needs administrator rights
- Includes a restart or sign-out
Checking language support in Windows 11 means looking at three things. The first is the display language (the language Windows menus and apps use). The second is your input languages (the keyboards you can type with). The third is the language features installed for each, such as speech and handwriting. The fastest way is Settings Time & language Language & region, which lists every language on the PC.
The taskbar language indicator and one PowerShell command give you the same information in different forms.
To check language support in Windows 11, open Settings Time & language Language & region. The Windows display language box shows the language used for menus, and the Preferred languages list shows every installed language with its keyboards and features such as text-to-speech and handwriting. Select the three-dot button beside a language, then Language options, to see its language pack and feature status.
What Language Support Covers in 🪟 Windows 11
Windows treats a language as a bundle of parts, and each part can be installed or missing on its own. Knowing the parts tells you what to look for on screen.
- Display language: the language of menus, Settings, File Explorer and built-in apps. Windows uses one display language at a time.
- Input language and keyboard: the layout you type with. You can have several installed and switch between them.
- Language features: optional parts that depend on the language, such as text-to-speech (Windows reads text aloud), speech recognition (Windows understands what you say), handwriting recognition and basic typing support.
- Regional format: how Windows shows dates, times, numbers and currency. This setting is separate from the display language.
A language can be installed as a keyboard only, with no display language and no speech features. That is why a language you see in the taskbar may not appear as a display language option.
How to Check Language Support in 🪟 Windows 11 Using Settings
The Settings app is the most complete place to check language support in Windows 11, because it shows the display language, every installed language and the features attached to each one. When you finish, you know which languages are installed and what each can do.
- Press Win+I to open Settings. The Settings window opens with a list of categories on the left.
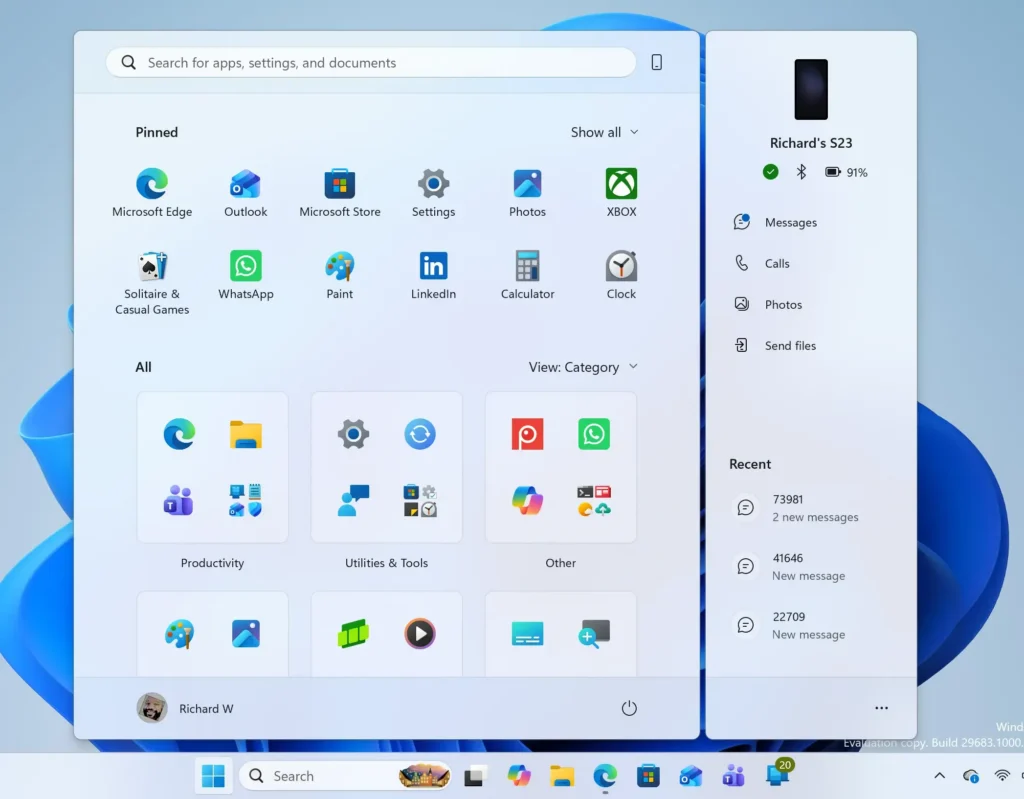
Windows 11 Start menu search panel for opening OpenSSH Client settings - Select Time & language in the left pane. The right side shows Date & time, Language & region, Typing and other options.
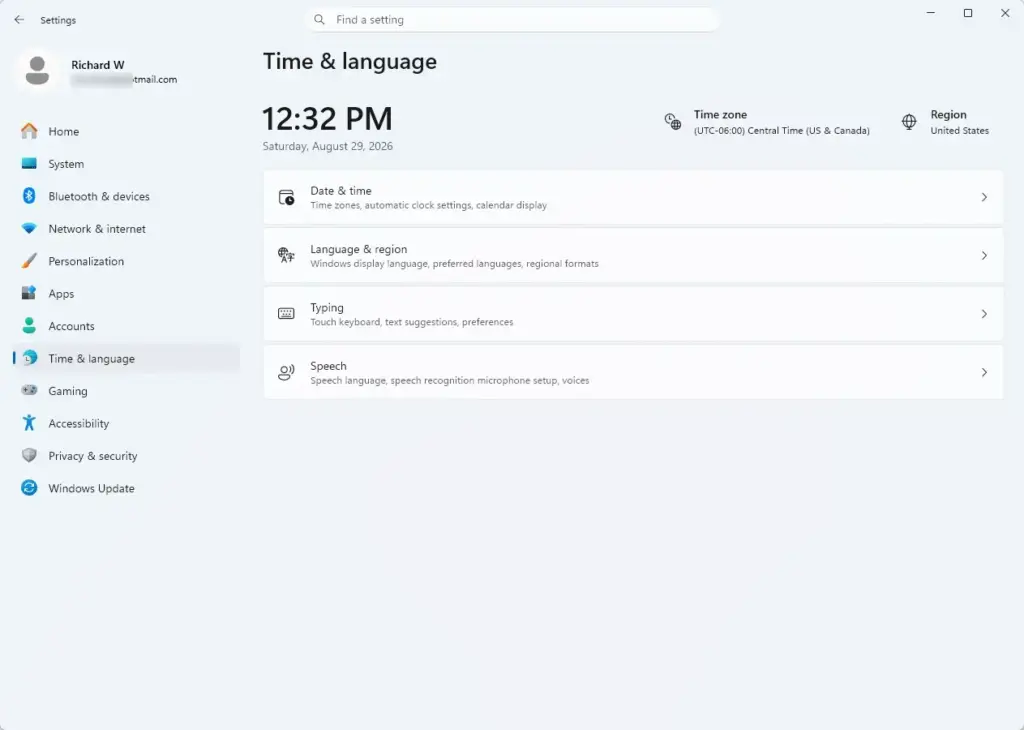
Settings › Time & language - Select Language & region. This page lists your languages and regional settings.
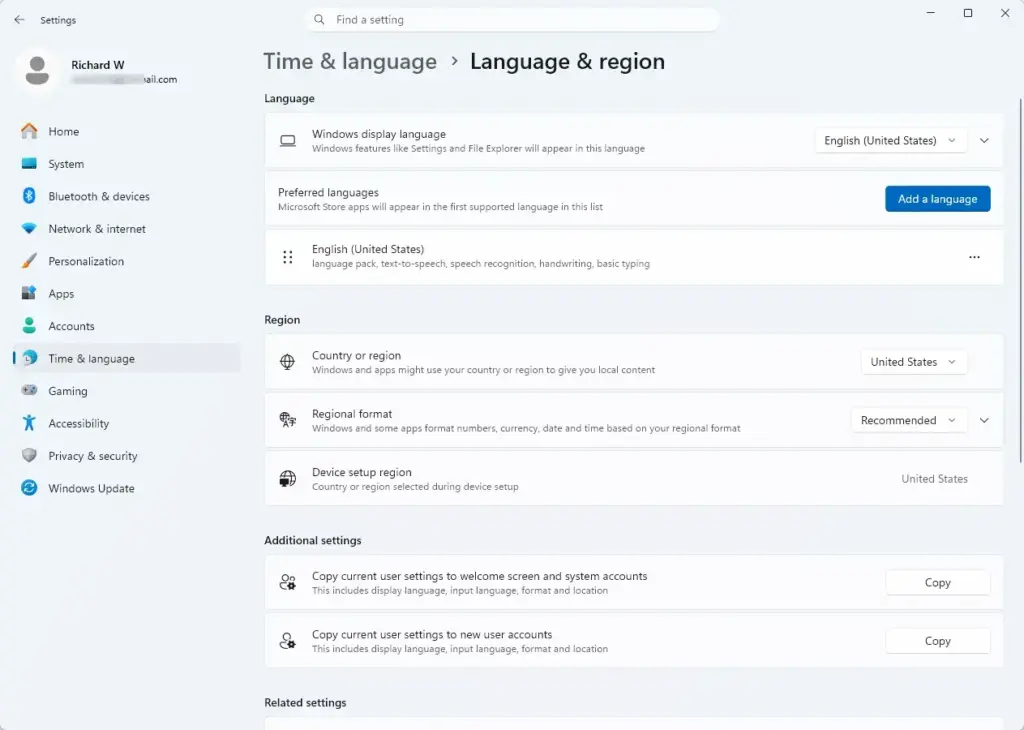
Settings › Time & language › Language & region - Read the Windows display language box. The language named there is the one Windows menus use now. Select the drop-down list to see every display language you can switch to without downloading anything.
- Find the Preferred languages list below it. Each row is a language installed on this PC for typing, display or both. The first language in the list takes priority for apps and websites that offer a choice.
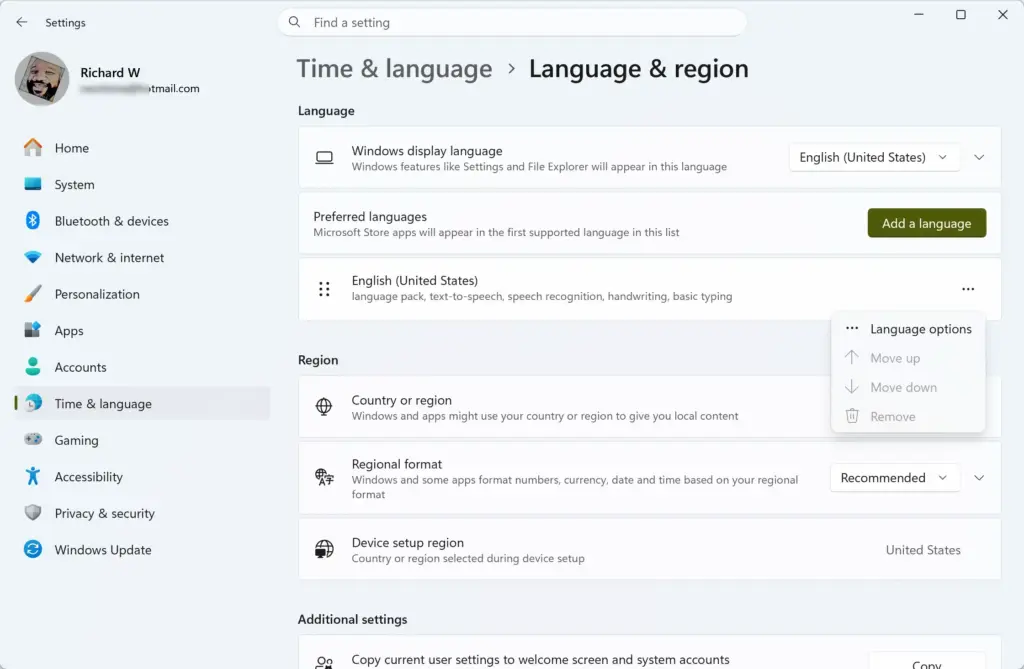
Settings › Time & language › Language & region › Preferred languages - Look under each language name for small feature labels or icons. They show which features are present, for example text-to-speech, speech recognition, handwriting and basic typing.
- Select the three-dot button (…) at the right end of a language row, then select Language options. The page for that language opens.
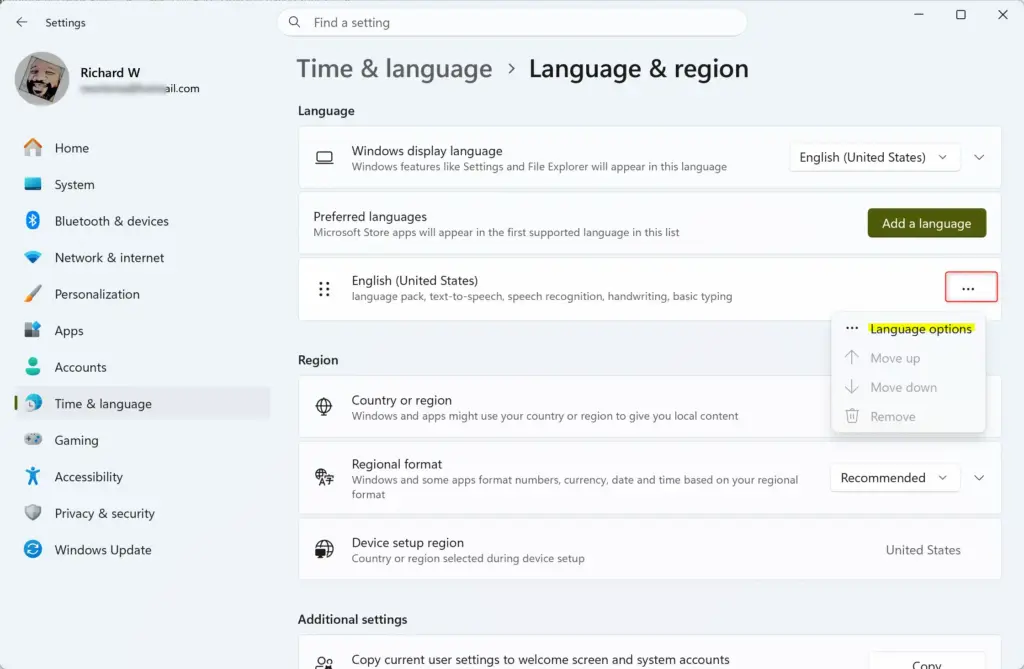
- Check the Language pack section at the top. If the display language pack is installed, it says so. If not, a Download button appears instead.
- Scroll to the language features section. Each feature shows as installed or offers a Download button. A feature that Microsoft does not offer for that language does not appear at all.
- Scroll to the Keyboards section. It lists the keyboard layouts installed for this language, such as US or UK English.
- Select the back arrow at the top left, or select Language & region in the breadcrumb (the path shown at the top of the page), to return to the list. Repeat steps 7 to 10 for each language you want to check.
Viewing an item changes nothing, and neither does opening Language options. A change happens only when you select Download, Add a keyboard, or another button that installs or removes something.
Read the Preferred Languages List
The list answers most “is this language installed?” questions at a glance. A language in the list is installed. A language not in the list is not.
If you see the same language twice with different regional names, such as English (United States) and English (United Kingdom), Windows is treating them as separate languages. Each has its own keyboards and its own set of features.
To add a missing language, select Add a language at the top of the Preferred languages section. This step downloads files, so it needs an internet connection. Removing a language later uses the same three-dot menu.
Check the Regional Format Separately
The Region section on the same page holds Country or region and Regional format. These control how dates, times and numbers look. They do not install languages, and they do not change the display language.
If dates look wrong but your display language is correct, check this section first.
Check Input Languages from the Taskbar
The taskbar shows which input language is active right now and lists the keyboards you can switch to. This is the quickest check when you only need to know what you can type in.
- Look at the right end of the taskbar, near the clock. A short code such as ENG shows the current input language.
- Select the language code. A small menu opens and lists every installed input language and keyboard layout, with a check mark beside the active one.
- Select a language in the list to switch to it. The code on the taskbar changes to match.
- Select More keyboard settings at the bottom of the menu if you want to see more details. Settings opens to the typing and language options.
The language code may not appear when only one input language and one keyboard are installed. If you cannot find the code, use the Settings method above instead. The taskbar menu lists only input methods (the ways you type each language), so it does not show display language packs or speech features.
Check Installed Languages with PowerShell
PowerShell prints the language list as text. This helps when you want to copy the list into a support ticket, or check several PCs the same way. Open Terminal from the Start menu, or search for PowerShell. A normal window is enough for the first command.
The command below lists the languages in your own user profile, along with their language tags and input methods.
Get-WinUserLanguageListEach entry shows a LanguageTag (a short code such as en-US) and the keyboards installed for it. The field that stores them is named InputMethodTips. The tips appear as codes, so they are harder to read than the Settings page.
To see the language packs and features installed on the PC itself, use this command on Windows 11.
Get-InstalledLanguageThis lists each installed language with the parts present, such as the language pack, text-to-speech and speech recognition. If PowerShell reports an access error, right-click Terminal and select Run as administrator. This step needs administrator rights. Then run the command again. Administrator rights are only needed in that case, and only to read the list.
Check Language Support for Live Captions and Speech
Speech features need their own language data, so a language you can type in may not work for dictation or captions. This is the part of language support most people miss.
For live captions, Microsoft documents that you add the language under Language & region with Enhanced speech recognition selected. If the language is not installed, the live captions window asks you to download it.
- Open Settings Time & language Language & region. The Preferred languages list appears.
- Select Add a language if the language you need is not listed. A window opens with a searchable list of languages.
- Choose the language and select Next. The optional features screen opens for that language.
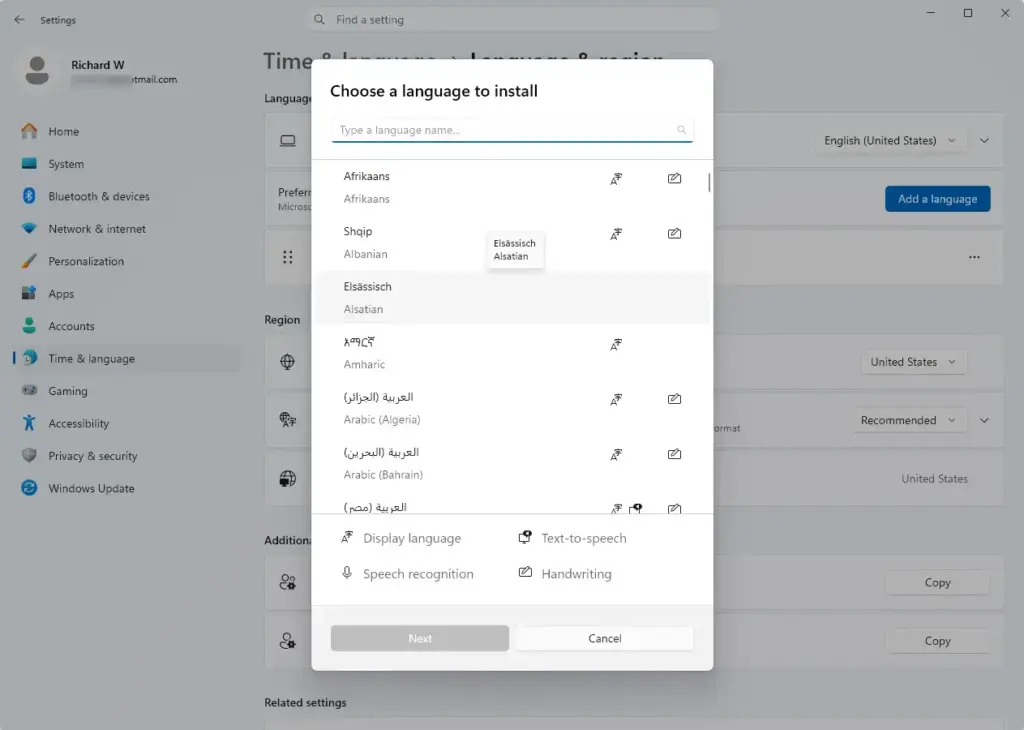
- Select Enhanced speech recognition if it is offered. Leave other features selected or cleared as you need them.
- Select Install. Windows downloads the files and the language appears in your Preferred languages list.
If you do not see Enhanced speech recognition, that language does not offer it. You can confirm this on the language’s Language options page, which lists only the features available for that language.
Why a Language or Feature Is Missing
When the list does not match what you expect, one of the causes below is usually responsible. Work through these causes in order. The first one that matches your PC is the most likely reason.
The Language Pack Is Not Downloaded
A keyboard can exist without a display language. On the language’s Language options page, a Download button under Language pack (the files Windows needs to show menus in that language) means Windows cannot use that language for menus yet. Select it, wait for the download to finish and then check the Windows display language drop-down again.
Your Edition Does Not Allow Extra Display Languages
Some PCs ship with Windows 11 Home Single Language. As the name says, that edition supports one display language. You can still add input languages and keyboards, but you cannot add a second display language without changing edition.
Your Organization Controls the Setting
On a work or school PC, an administrator can block language downloads or lock the display language. You may see a message that some settings are managed by your organization, or the buttons may be greyed out. Ask your IT team to allow the language.
Windows Cannot Download the Files
Language packs and features come from Microsoft’s servers, so the PC needs a working internet connection. A metered connection (one that Windows treats as limited data) can also pause large downloads. If a download stalls, check your connection and select Download again.
The Feature Is Not Offered for That Language
Not every language has every feature. A language may have a keyboard and a display pack but no speech recognition or handwriting. Windows hides options a language does not support. A missing feature usually means the language cannot use it, not that the install failed.
A Sign-In Change Needs Time to Apply
After you change the display language, Windows asks you to sign out and back in before it applies. Until you do, parts of the system keep the old language. The Settings page may show the new language while some menus still use the old one.
Related Support Checks
Language support covers text and speech. The same approach works for other PC features. Open the relevant settings page or run a short command to see what your PC supports.
If you work with text in several scripts, turning on Unicode UTF-8 support in Windows 11 (a setting that helps older apps handle text in many scripts) helps those apps read the characters you use. For hardware, you can check eSIM support in Windows 11, check USB4 support in Windows 11 and check Modern Standby support on Windows 11.
What to do next
To remove a language you no longer use, select the three-dot button (…) beside it and choose the remove option. Removing a language does not delete your files, so you can safely remove a language you no longer use.
If an installed language still does not appear in the taskbar after you sign out and back in, open its Language options page. Confirm that at least one keyboard is listed under Keyboards.
Frequently asked questions
How to remove installed language 🪟 Windows 11?
Open Settings Time & language Language & region. In the Preferred languages list, select the three-dot button (…) beside the language you want to remove, then choose the remove option. Removing a language does not delete your files, so it is safe to do.
How to check multiple language support in 🪟 Windows 11 site support.Microsoft.com?
Open Settings Time & language Language & region. The Preferred languages list shows every language installed on the PC, and the Windows display language box shows which one menus use now. Select the three-dot button (…) beside a language, then Language options, to see its language pack and features.
How to check multiple language support in 🪟 Windows 11 site support.Microsoft.com 143 305 70?
Go to Settings Time & language Language & region. Each language in the Preferred languages list is installed on the PC. Select the three-dot button (…) beside a language and choose Language options to check which features, such as speech recognition and handwriting, are installed for it.
Still have a question?
Answered by AI from this guide. Good questions may be added to this page — please don't include personal details.
Did this guide fix your problem?

About the Author
Richard
Tech Writer, IT Professional
Richard is a writer at Geek Rewind who turns complex IT tasks into clear, step-by-step guides. He draws on years of hands-on experience in system administration and enterprise IT operations, focusing on Windows, Linux and WordPress: the problems people actually run into, and the fixes that work. His server and WordPress guides come from systems he runs himself. Richard builds and maintains the platform behind Geek Rewind, from its Ubuntu servers and Nginx configuration to its custom WordPress plugins. Many new tutorials start with readers' questions, and he's always glad to answer them in the comments.
No comments yet — be the first to share your thoughts!