How to Change the Regional Format in Windows 11


Regional formats in Windows 11 control how dates, times, currencies, and numbers appear across your system. Changing this setting switches date styles from 12/31/2024 to 31/12/2024 or alters currency symbols to match local standards.
Open the Settings app to update your regional format whenever you need your PC to display information using a different country’s layout. You can also use the classic Control Panel , which is covered in the second method below.
Two things are easy to confuse with this setting. The regional format only changes how data is shown. It does not change the Windows display language, so menus and buttons stay in the same language. It is also separate from the Country or region setting on the same screen, which Windows and the Microsoft Store use for local content and services. Both methods work on Home and Pro, and neither needs an administrator account.
You can change the regional format in Windows 11 through Settings or Control Panel to adjust how dates, times, and numbers display. Open Settings , go to Time & language, then Language & region, and select your desired format from the Regional format drop-down. Alternatively, open Control Panel, click Region, and choose a format from the Formats tab.
Option 1Change Regional Format Using Settings
- Press Win+I on your keyboard to open Settings. The Settings window opens with a list of categories on the left.
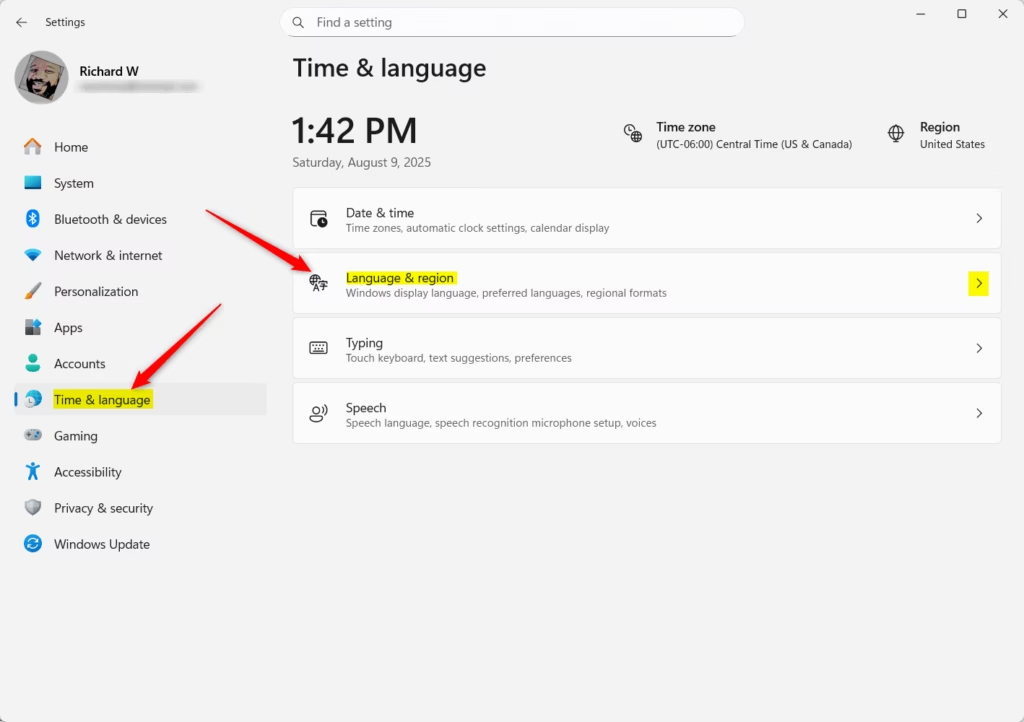
- On the left, click Time & language.
- On the right side, click Language & region. You should see your display language, your country or region, and the regional format on this page.
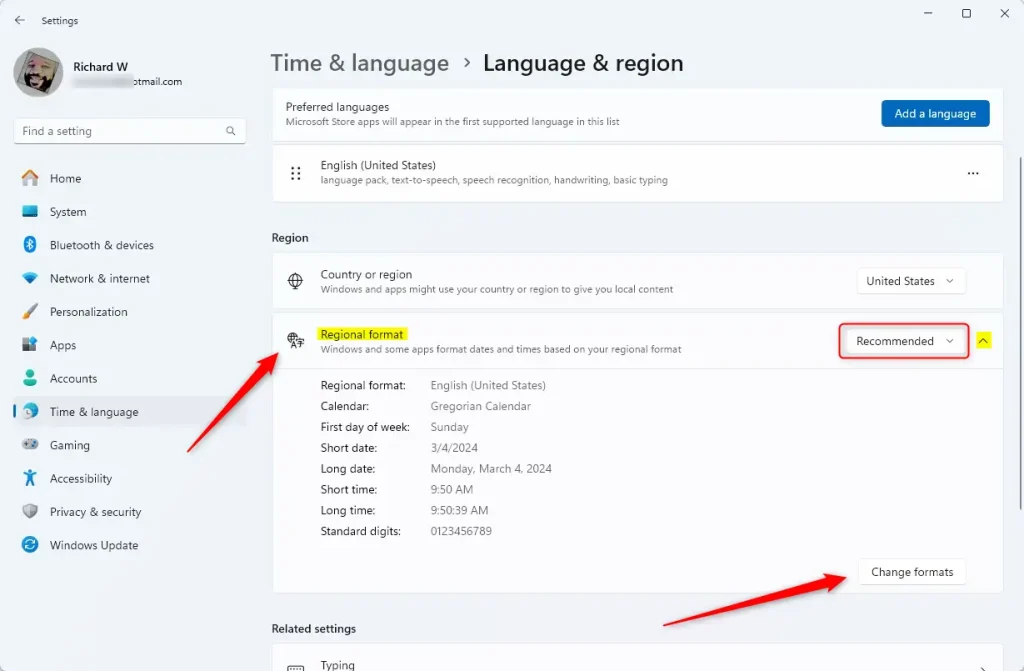
- Under Regional format, click the drop-down menu and select the language or region format you want. The menu is a long list, so scroll or start typing to find your country. The setting is saved as soon as you pick an entry.
- Click the arrow to the right of the Regional format drop-down to expand it. Check the sample dates and times shown there to confirm the new layout is what you expected.
- You can close Settings when done.
You do not need to restart the PC. Open apps such as Excel or Word may keep using the old format until you close and reopen them. If an app still shows the old layout after that, sign out of Windows and sign back in.
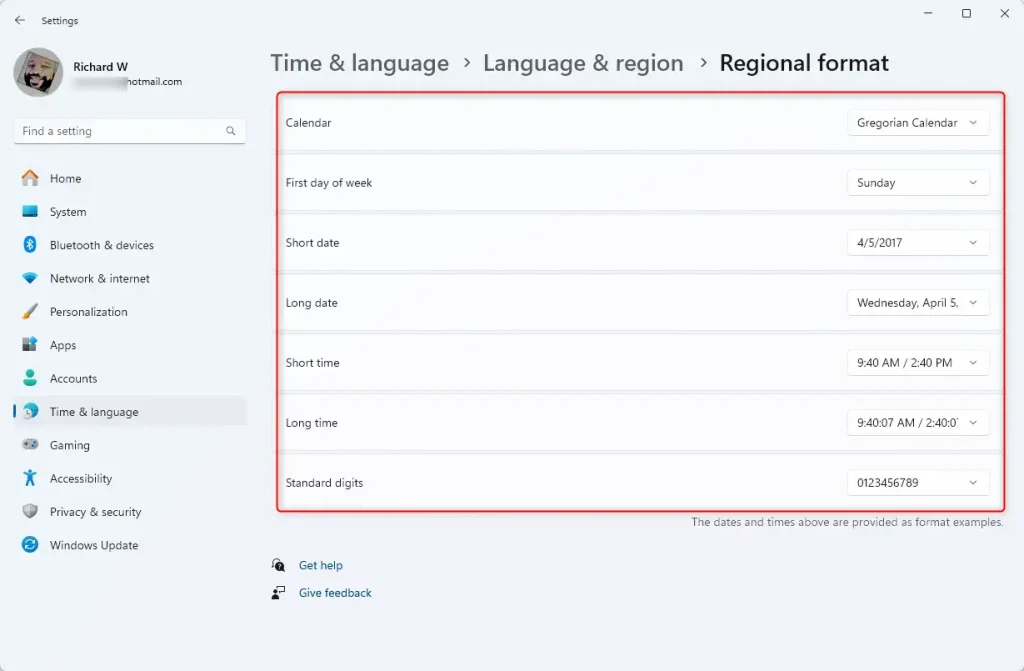
To fine-tune a format instead of switching it completely, expand the Regional format section and click Change formats. There you can set the calendar, the first day of the week, and the short and long date and time styles on their own. For example, you can keep the US layout but start the week on Monday.
To undo the change, return to the same drop-down and select your previous format. If the list offers a Recommended entry that matches your Windows display language, choosing it also restores the default.
You can change your Windows 11 regional format quickly through the main Settings app without opening older system tools. This built-in method lets you update how dates, times, and numbers appear across your whole computer by choosing your preferred country or language format from a simple drop-down menu in the language and region settings screen.
Option 2Change Regional Format Using Control Panel
- Open the Control Panel. You can do this by typing Control Panel in the search box on the taskbar and clicking it.
- Make sure your view is set to Small icons or Large icons (not Category view). Use the View by drop-down in the top right corner of the window to switch. In Category view, the Region option is hidden under Clock and Region.
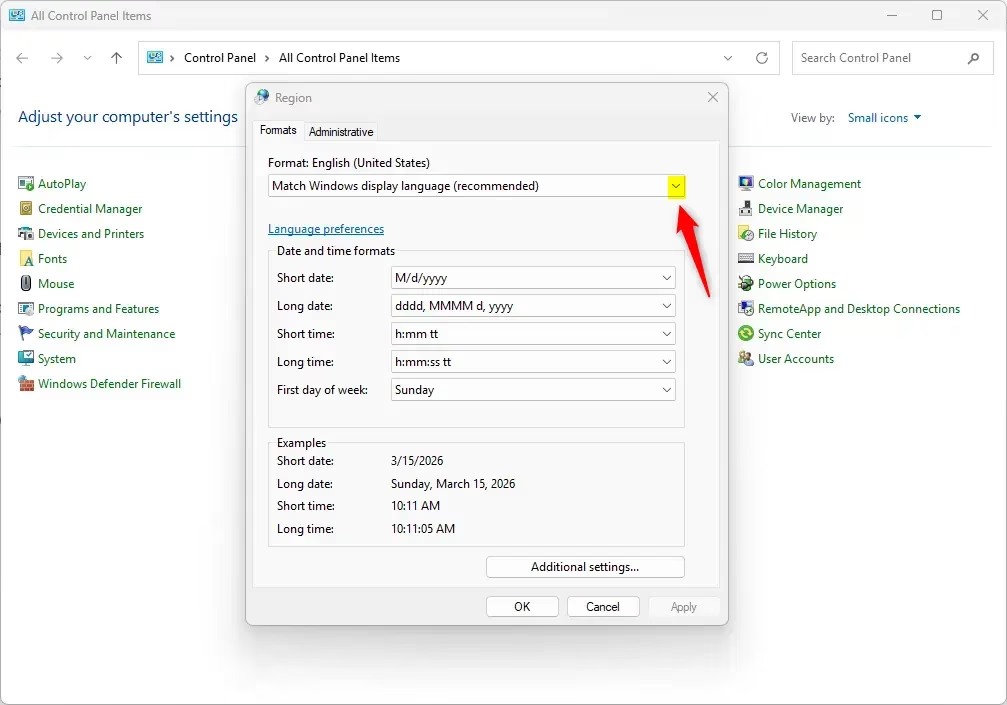
- Click on Region. A small Region window opens.
- In the Formats tab, click the drop-down menu and choose the language or region format you want. The Date and time formats section below it updates to show examples of the new format.
- If you want to adjust individual details, such as the decimal symbol or currency symbol, click Additional settings. Make your changes in the window that opens and click OK to return to the Region window.
- Click OK to save your changes. The window closes and the new format applies right away.
The classic Control Panel offers another reliable way to update your Windows 11 regional format if you prefer using traditional menus. Opening the region settings tool lets you modify date, time, and number styles directly and apply those custom settings across your entire operating system with just a couple of clicks.
The Region window also has an Administrative tab. Its Copy settings button applies your format to the welcome screen and to new user accounts, and it needs administrator rights. You can skip it if you only want to change the format for your own account.
To undo a change, open the same window, choose your previous format from the Formats drop-down, and click OK. If you changed values under Additional settings, click Reset in that window to return to the defaults for the selected format.
Important Tips
Certain apps need a quick restart after you update your Windows 11 regional format so they display the new date, time, or number styles correctly. Matching your regional format to your display language also helps keep things consistent across your PC and prevents weird formatting mix-ups in your daily apps.- Some apps may need to be closed and opened again to see the changes.
- It’s usually best to keep the regional format matching your Windows display language for consistency.
- If you want to learn more or troubleshoot, Microsoft’s official guide is here: Microsoft Support - Change Windows regional settings.
Summary
- Changing the regional format changes how dates, times, and numbers look on your PC.
- You can do this either in Settings or Control Panel.
- Make sure to restart apps to see the changes.
- If you want advanced info, these settings are saved in your system’s registry at
HKEY_CURRENT_USER\Control Panel\International.
Changing your Windows 11 regional format controls how dates, times, and numbers look across your entire computer. You can update this setting easily using either the main Settings app or the classic Control Panel, and you just need to restart your open apps to make sure the new styles take effect right away.
Was this guide helpful?

About the Author
Richard
Tech Writer, IT Professional
Richard is a writer at Geek Rewind who turns complex IT tasks into clear, step-by-step guides. He draws on years of hands-on experience in system administration and enterprise IT operations, focusing on Windows, Linux and WordPress: the problems people actually run into, and the fixes that work. His server and WordPress guides come from systems he runs himself. Richard builds and maintains the platform behind Geek Rewind, from its Ubuntu servers and Nginx configuration to its custom WordPress plugins. Many new tutorials start with readers' questions, and he's always glad to answer them in the comments.



No comments yet — be the first to share your thoughts!