How to Check USB4 Support in Windows 11

USB4 is a fast hardware connection standard that moves files and powers external screens at speeds up to 40 Gbps in Windows 11. Most Windows 11 computers built after 2020 include this technology, but older machines lack the necessary physical wiring.
You can check if your PC supports USB4 by opening Device Manager and looking for a “USB4 host controller” in your hardware list. Finding this item confirms your computer works with the latest high-speed drives and accessories. This guide covers two checks: Device Manager and the USB page in Settings. Both work on Windows 11 Home and Pro.
Hardware Requirements and Windows Build
Confirming USB4 support in Windows 11 requires more than standard software updates. Your motherboard (the main circuit board connecting all parts) needs native USB4 support. Windows can only use what the hardware provides, so no update or driver can add USB4 to a PC that was not built with it.
You must run Windows 11 version 22H2 (build 22621.1778) or newer. To see which version you have, open Settings System About and read the Version and OS build lines under Windows specifications. If you are on an older build, run Windows Update first, then come back to the checks below.
A USB-C port alone does not mean USB4. Many USB-C ports only run at USB 3.2 or slower speeds. Look for a USB4 or Thunderbolt logo next to the port, or check your PC’s specification sheet from the manufacturer.
How to check your USB support
Device Manager is the quickest built-in tool to check USB4 support on a Windows 11 computer. It lists every piece of hardware Windows has detected, so you can see whether your motherboard and ports expose a USB4 controller without installing extra software. The steps below reach it through the Settings app . The quickest alternative is to right-click the Start button and choose Device Manager.
- Open the Windows Settings app. You can do this by clicking the Start menu and selecting Settings, or by pressing Windows key + I on your keyboard. The Settings window opens with a list of categories on the left.
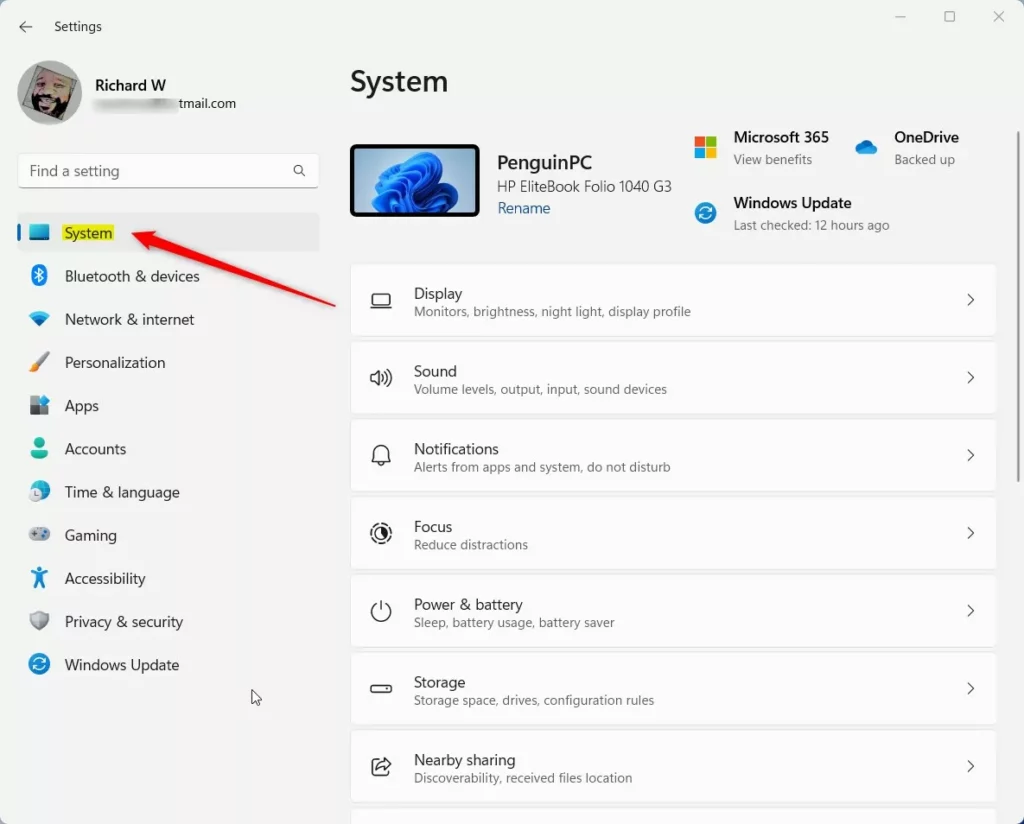
- Click on System in the left-hand menu. The System page opens on the right, showing display, sound and other options.
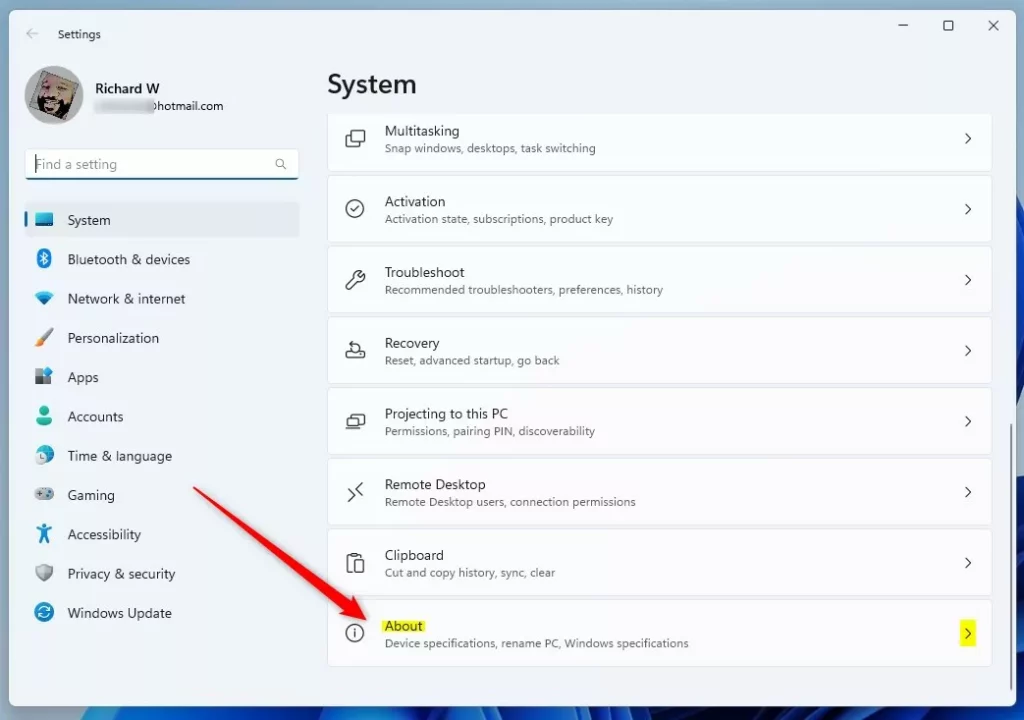
- Scroll down and select the About tile. It is near the bottom of the System page. You should now see your device name, processor and Windows version.
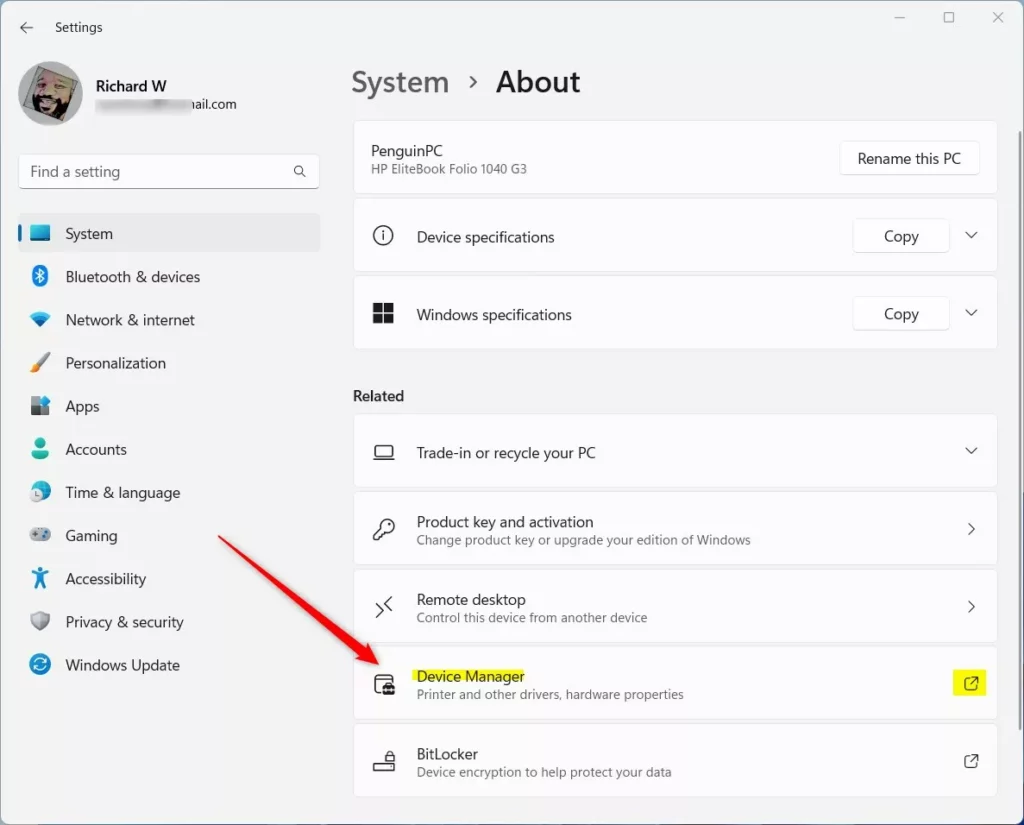
- Look under the Related section and click on the Device Manager tile. Note: This step may require admin privileges. If you are signed in with a standard account, Windows asks for an administrator password. Device Manager then opens in its own window.
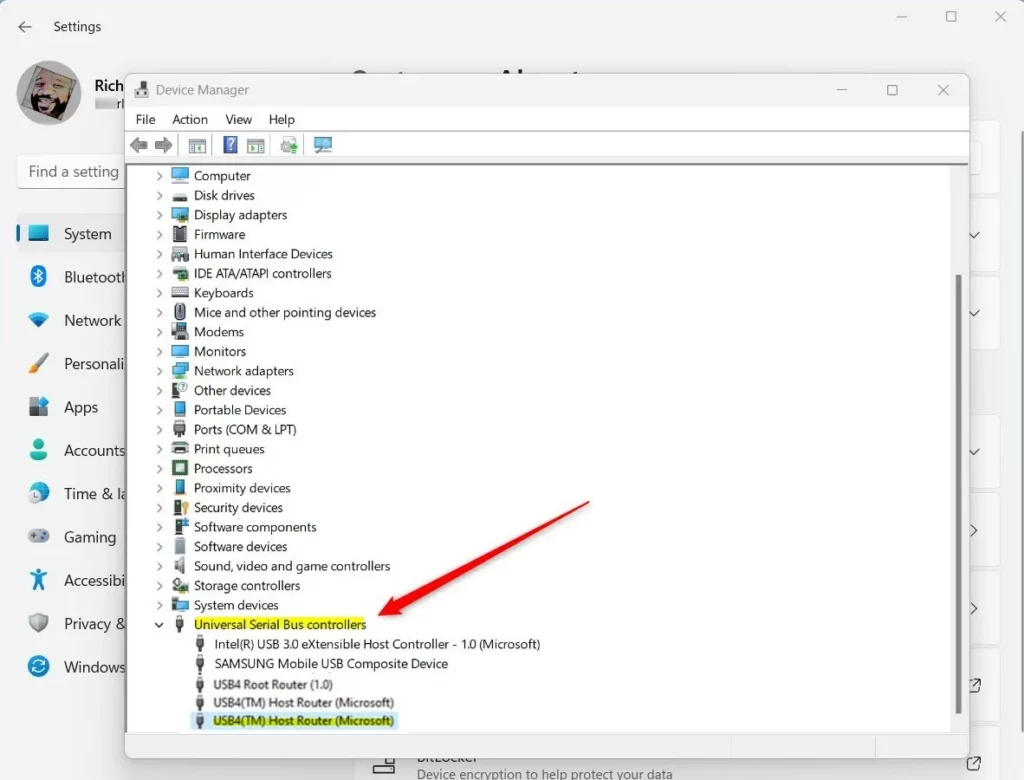
- In the Device Manager window, look for the section called Universal Serial Bus controllers and click the arrow to expand it. The list below it shows every USB controller and hub Windows has found.
- Look through the list to see if you find any entries labeled USB4. The exact name can vary by manufacturer, for example a USB4 host controller or host router. If you see one, your PC has USB4 hardware. If you only see entries such as USB xHCI or Generic USB Hub, your PC most likely does not support USB4. A missing entry can also mean the chipset drivers are not installed, so install the latest ones from your PC or motherboard maker and check again.
How to find USB4 settings
The Bluetooth & devices settings show your USB4 capabilities and connected hardware if your PC supports the standard. You can view these details by opening the Settings app and going to the USB page. This page needs Windows 11 22H2 or newer, which is why the build check at the start matters.
- Open the Settings app. The Settings window opens with the category list on the left.
- Select Bluetooth & devices from the left menu. The page lists your paired devices, printers and other connected hardware.
- Click on the USB tile. The USB page opens with settings such as notifications and battery saver for USB devices.
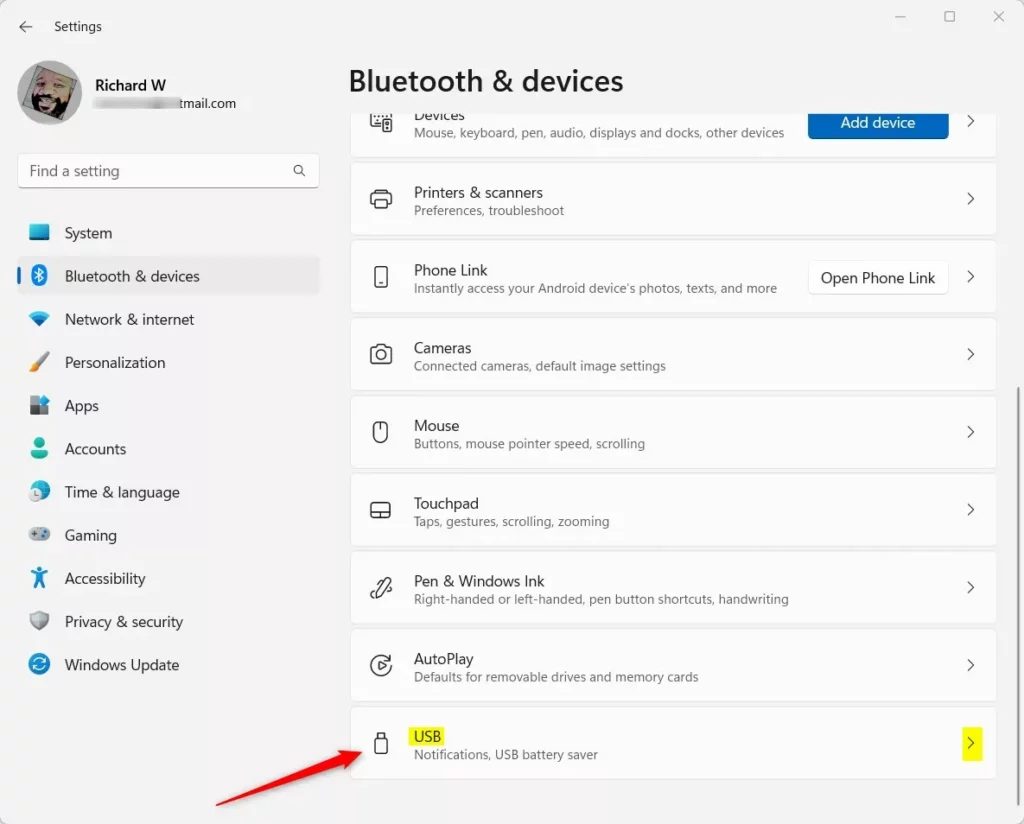
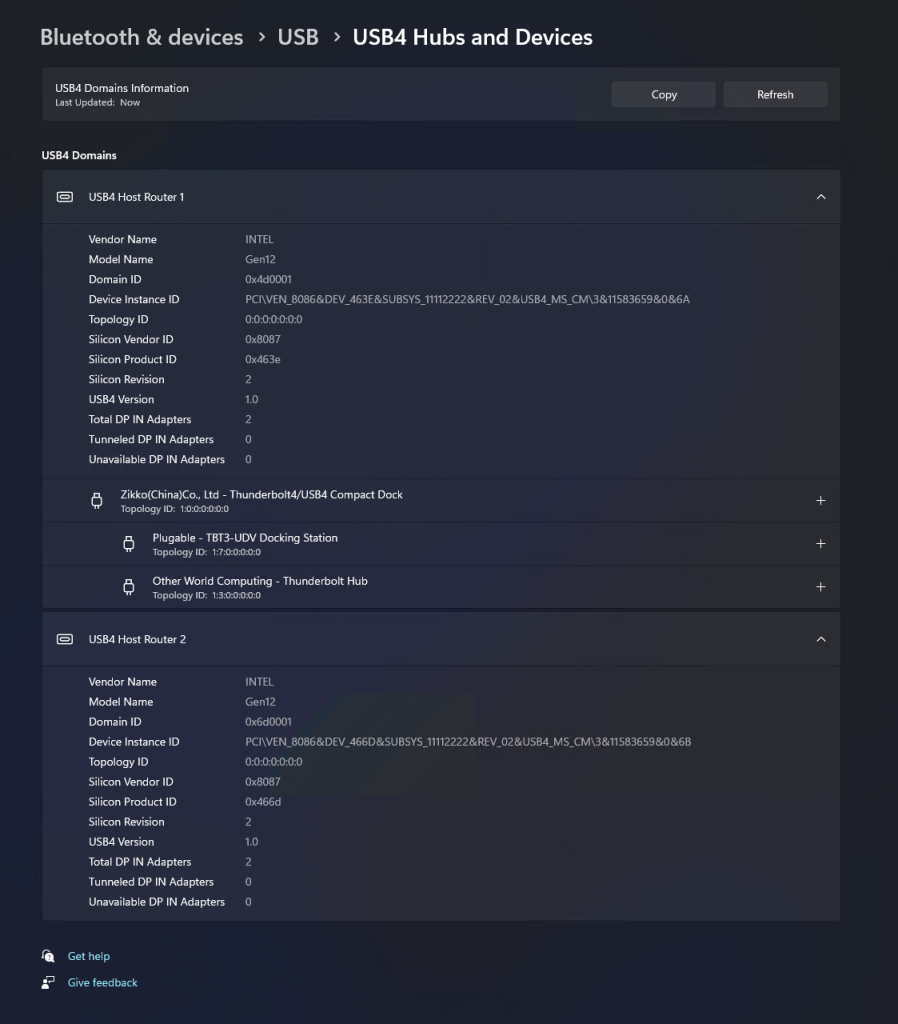
- Click on USB4 Hubs and Devices. This page shows your system's USB4 capabilities and any connected devices. If your computer does not support USB4, this option will not appear. If it is missing but Device Manager showed a USB4 entry, check your Windows version and run Windows Update.
Troubleshooting USB4 Connection Issues
Unrecognized USB4 hardware usually points to cable limitations, requiring a certified USB4 cable instead of standard wiring. A basic USB-C charging cable often carries only USB 2.0 data and will not run at USB4 speeds. Try a cable marked for USB4 or 40 Gbps before you suspect the PC.
System drivers also need regular updates through Device Manager to maintain proper communication. To update one, right-click the controller entry, choose Update driver, then Search automatically for drivers. For USB4 and chipset drivers, your PC maker's support page is often more current than Windows Update.
Summary
Validating hardware and the active Windows build speeds up the entire USB4 verification process. Start with your Windows version, then look for a USB4 entry in Device Manager. Finally, open Settings Bluetooth & devices USB to see whether USB4 Hubs and Devices appears. If both checks show USB4, your PC supports it. Use a certified cable and current drivers to get the full speed.
Was this guide helpful?
0% of readers found this helpful (1 votes)

About the Author
Richard
Tech Writer, IT Professional
Richard is a writer at Geek Rewind who turns complex IT tasks into clear, step-by-step guides. He draws on years of hands-on experience in system administration and enterprise IT operations, focusing on Windows, Linux and WordPress: the problems people actually run into, and the fixes that work. His server and WordPress guides come from systems he runs himself. Richard builds and maintains the platform behind Geek Rewind, from its Ubuntu servers and Nginx configuration to its custom WordPress plugins. Many new tutorials start with readers' questions, and he's always glad to answer them in the comments.


No comments yet — be the first to share your thoughts!