How to Check eSIM Support in Windows 11

An eSIM is a digital SIM card built into your hardware. It lets your Windows 11 PC connect to 4G or 5G cellular networks without a physical card. Many laptops built within the last 3 years include this chip, which gives you mobile internet access anywhere you have a signal.
The check takes about a minute. Open Settings and look under Network & internet. If you see a Cellular option on Windows 11 version 22H2 or newer, your PC has cellular hardware and is ready to use an eSIM. Home and Pro editions behave the same way here, so the edition doesn’t matter.
To check Windows 11 eSIM support, press Win+I to open Settings , then click Network & internet. If you see a Cellular option, your PC has cellular hardware and can use an eSIM. Open Cellular and check the “Use this SIM for cellular data” drop-down for an eSIM entry. Cellular requires version 22H2 or newer.
Checking Your 🪟 Windows 11 Computer for eSIM Support
Ready to see if your Windows 11 device can use cellular data? We’ll use the Settings app, which is where Windows handles everything related to cellular connections. You don’t need to install anything or open a command window. The steps below work on both Home and Pro.
Step 1Open Windows Settings
To check Windows 11 eSIM support, you first need the main Settings app . There are two quick ways to open it.
- The quickest way for most people is to press the Win and the I key on your keyboard at the same time. This is the Win+I shortcut.
- You can also click the Start button (the Windows icon, usually in the bottom-left corner) and then click the gear icon labeled “Settings”. If the gear isn’t on the Start menu , type Settings in the search box and open the app from the results.
Either way, you should now see the Settings window with a list of categories down the left side. If it doesn’t appear, try the other method.

The Win+I shortcut is a useful way to open the Settings app, which you need for many configuration tasks. It lets you reach the Windows 11 Settings menu without touching the mouse, and it works from almost anywhere in Windows. If nothing happens when you press it, check that you are holding both keys together and that the keyboard’s Win isn’t disabled, as it is on some gaming keyboards.
Step 2Go to Network & Internet Settings
Next, open the Network & internet page.
- In the left sidebar of Settings, click Network & internet.
- Look at the list of options on the right side of the window. You should see entries such as Wi-Fi, Ethernet and VPN.
- If Cellular is in the list, click it to view your mobile data hardware details.
If Cellular isn't in the list, don't worry yet. The next section explains what that means.
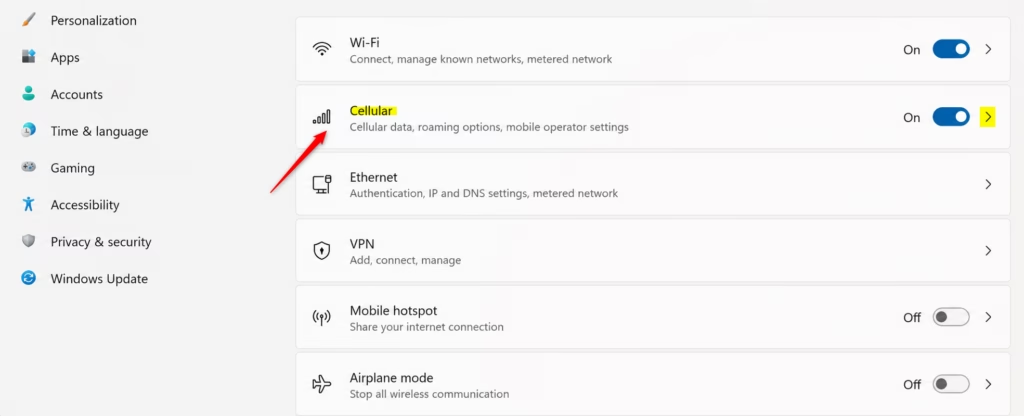
This is where Windows handles everything related to cellular connections. If your device has the necessary hardware and software for cellular data, you'll find the settings here.
However, let's continue to the next step to be completely sure.
Two other things can hide the Cellular page even on a PC that has a modem. The first is an out-of-date Windows version. Check Settings System About and make sure you are on 22H2 or newer. The second is a missing modem driver, so run Windows Update and restart before you decide the hardware isn't there.
Step 3Look for SIM Options
To verify eSIM support on your device, look at the SIM options on the Cellular screen.
- On the Cellular page, find the drop-down menu labeled Use this SIM for cellular data.
- Click the drop-down to open the list. You should see every SIM the PC knows about.
- Look through the entries for one that mentions eSIM directly, or one that refers to a SIM card slot if your device also has a physical SIM tray.
If your device supports eSIM, an entry might say something like "eSIM" or "SIM 2 (eSIM)". The exact wording varies by manufacturer and modem.
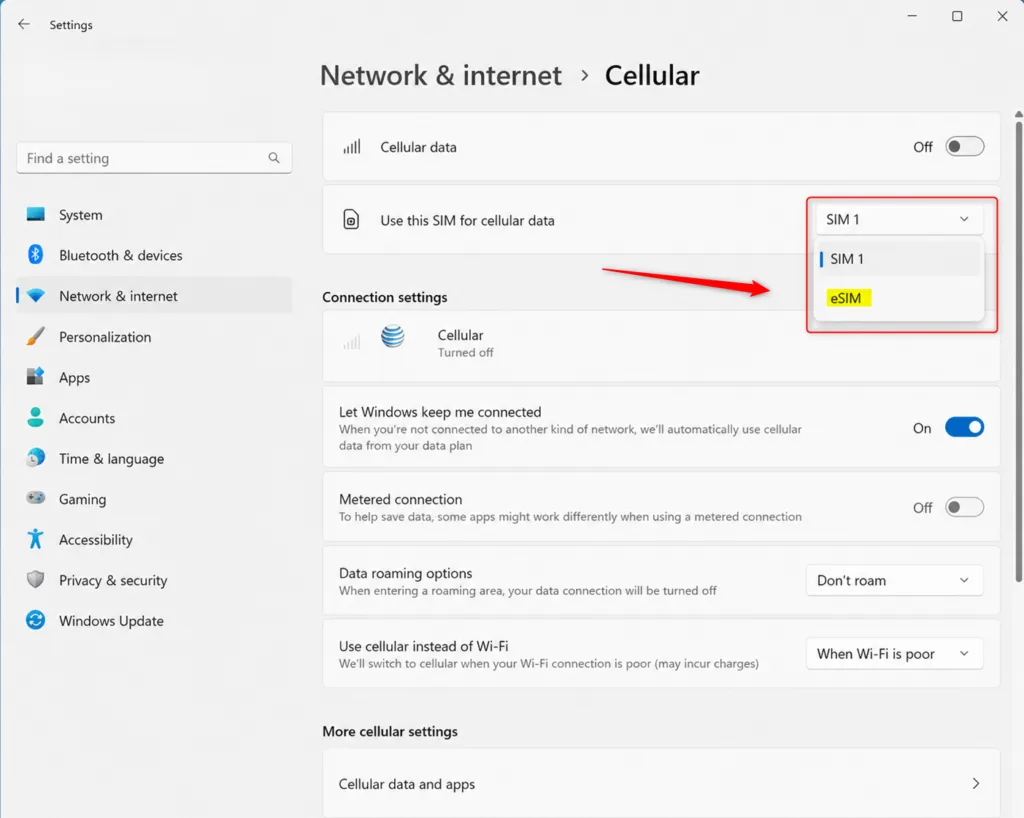
If you saw an eSIM option in this drop-down, that's great news. Your Windows 11 device supports eSIM technology, so it can use a cellular data connection. Your device might also show an option for a physical SIM card if it supports both. You don't need to change anything here. Pressing Esc or clicking elsewhere closes the list without selecting anything.
Step 4Understand What You See (or Don't See)
Now put the results together. Seeing an eSIM option means your computer hardware supports mobile data plans. If the Cellular page is missing, or it opens but shows no eSIM entry, the device most likely lacks built-in eSIM capability. A PC with a physical SIM slot only will list a SIM but no eSIM.
If you are unsure, check your manufacturer's spec sheet for the model. Look for words like "LTE", "4G", "5G" or "eSIM".
If You Saw an eSIM Option:
If you see an eSIM option, your computer's hardware supports eSIMs, which connect to cellular networks. To use the eSIM, you need a data plan from a mobile provider that offers eSIMs. Your provider's instructions will tell you how to add the eSIM profile to your Windows 11 computer. This usually means scanning a QR code or entering the information the provider gives you. Once it's set up, you can manage your cellular data connection from the "Cellular" settings page.
Many providers allow a code to be used only once. An internet connection, such as Wi-Fi, is normally needed to download the profile.
If You Didn't See an eSIM Option:
If your device doesn't support eSIM, you can still get cellular data in other ways. Many laptops and desktops rely on Wi-Fi for internet access, and that works well for most people. If you need cellular data on a device without eSIM capability, you have two main options.
- Mobile Hotspot: Use your smartphone as a Wi-Fi hotspot. Most smartphones can share their cellular data connection with other devices. You can then connect your computer to your phone's Wi-Fi network. Check your phone plan first, because some carriers limit or charge extra for hotspot data.
- USB Cellular Modem: You can buy a separate USB device (sometimes called a "dongle") that provides cellular internet access. You will need a separate data plan for this device.
Either method gives you internet access on the go, even if your computer doesn't have built-in eSIM hardware. This is useful for frequent travelers and for people without a traditional cellular plan for their PC.
Summary
To check if your Windows 11 computer supports eSIM, open Settings, go to Network & internet, then Cellular, and look at the SIM options. This quick check tells you if your device can use cellular data via eSIM. If Cellular is missing, update Windows and your drivers once, and check again before you conclude the hardware isn't there.
Have a question about this guide?
Answered by AI from this guide. Good questions may be added to this page — please don't include personal details.
Did this guide fix your problem?

About the Author
Richard
Tech Writer, IT Professional
Richard is a writer at Geek Rewind who turns complex IT tasks into clear, step-by-step guides. He draws on years of hands-on experience in system administration and enterprise IT operations, focusing on Windows, Linux and WordPress: the problems people actually run into, and the fixes that work. His server and WordPress guides come from systems he runs himself. Richard builds and maintains the platform behind Geek Rewind, from its Ubuntu servers and Nginx configuration to its custom WordPress plugins. Many new tutorials start with readers' questions, and he's always glad to answer them in the comments.
No comments yet — be the first to share your thoughts!