How to Install a Language Pack in Windows 11

A language pack changes the display language for the whole of Windows 11, including menus, buttons and settings. You can download official language packs from the Settings app in Windows 11 Home and Pro. With a working internet connection the download usually takes less than five minutes.
Open Settings Time & language Language & region, click Add a language, search for and select your language, tick Install language pack, then click Install. Windows downloads the pack and you sign out and back in to apply it.
What is a Language Pack?
A language pack contains localized system files that let Windows 11 show text in the language you choose. Core features such as Settings and File Explorer pick up the new language once installation finishes. Windows will ask you to sign out and back in. Some apps and the sign-in screen only change after that.
To install a pack:
- Open Settings Time & language Language & region You should see a Preferred languages list.
- Click Add a language. A window opens with a searchable list of languages.
- Type the language name in the search box and select it.
- Click Next. You will see a list of optional features for that language.
- Tick Install language pack. If you want the new language right away, also tick Set as my Windows display language.
- Click Install. Windows downloads the pack, and you can follow its progress next to the language in the list.
- If you did not tick the display language option, pick the new language from the Windows display language drop-down on the same page.
- Sign out when Windows prompts you, then sign back in. Menus, Settings and File Explorer should now appear in the new language.
To go back, choose your old language in the Windows display language drop-down and sign out and in again. You can then remove the unused pack from the Preferred languages list. You do not need to restart the PC.
Language packs come through Windows Update . You may also need an administrator account to install a display language.
Important Note
Upgrading to Windows 11 Home or Pro is necessary to add more.
If Add a language is missing or the display language drop-down is greyed out, check your edition first. Open Settings System About and look under Windows specifications. If it says Single Language, you cannot add display languages.
How to Install a Language Pack
Option 1Install When You Add a New Language
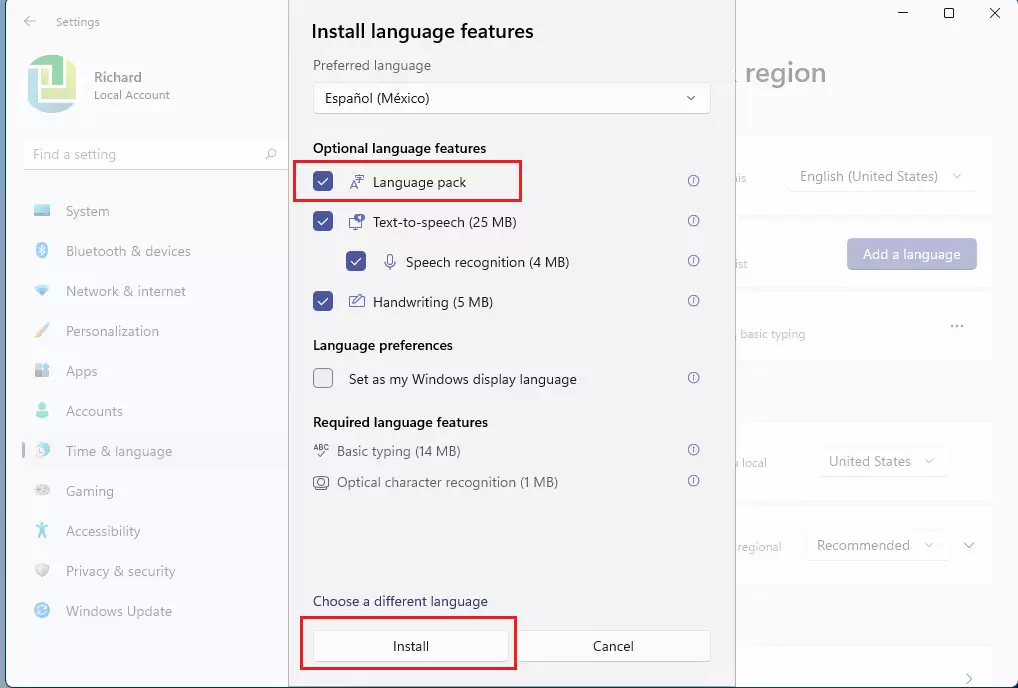
You can install a language pack in Windows 11 right when you add a new language to your computer. A prompt asks you to install extra language features after you pick your new language from the list. Just check the box next to 'Language pack' in the 'Install language features' window, and click 'Install' to start downloading the files.- Open Settings by pressing Win + I.
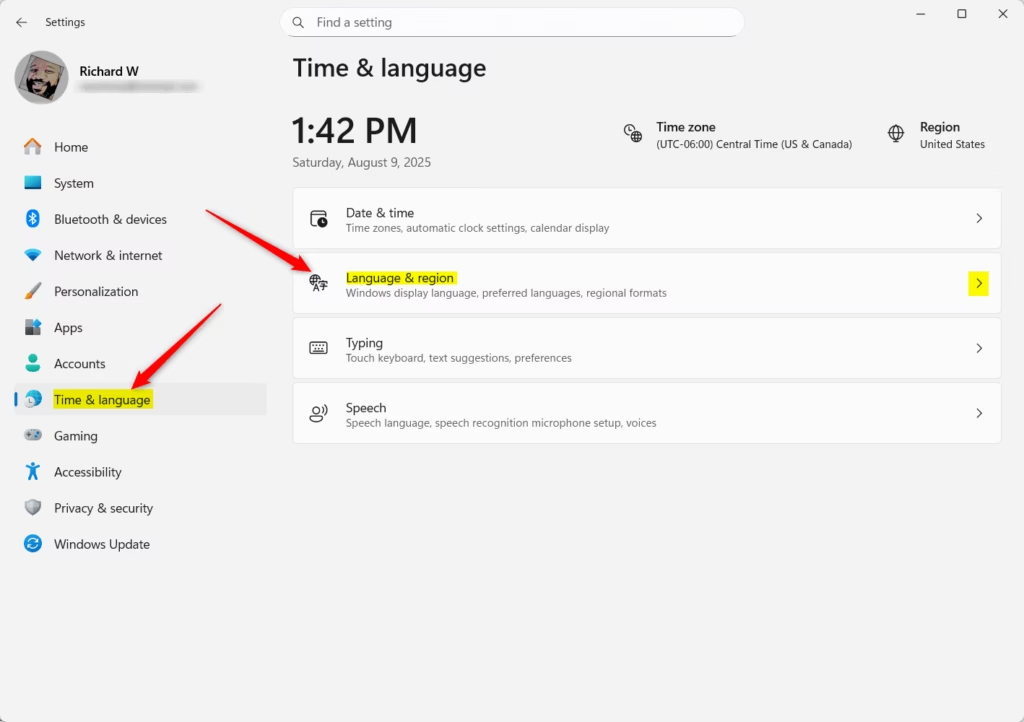
- Go to Time & language Language & region.
- Click Add a language.
- Search for the language you want and select it.
- When the Install language features window appears, check the box for Language pack if it’s available.
- Click Install.
Option 2Install a Language Pack After Adding a Language
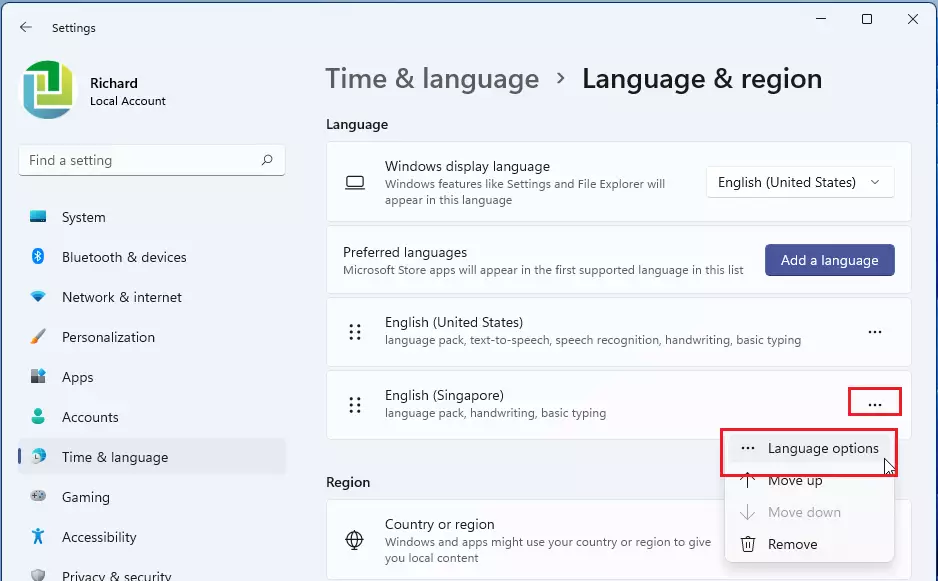
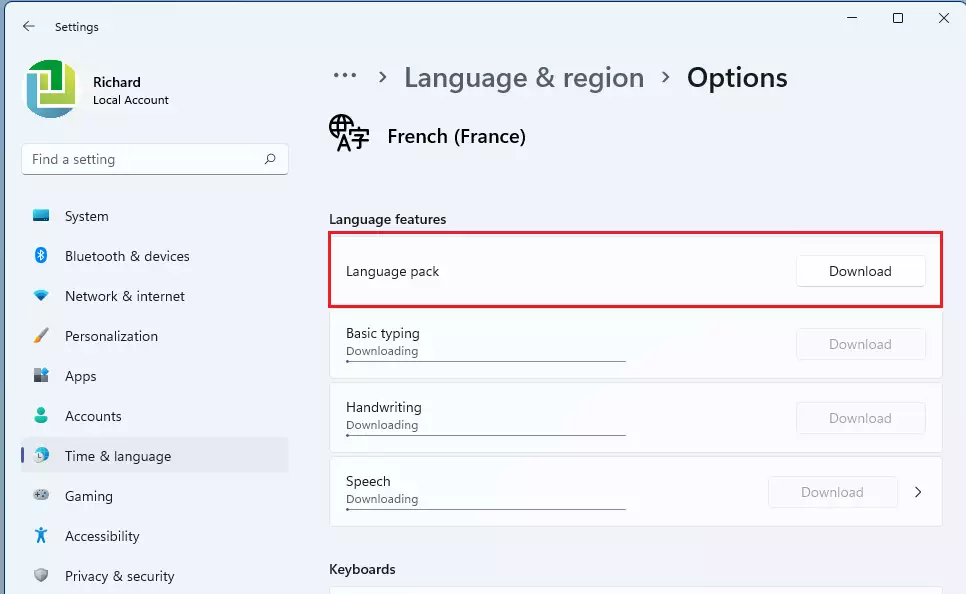
You can install a language pack in Windows 11 later through the Settings app if you missed it during the initial setup. Open Settings by pressing Win + I, go to Time & language, and choose Language & region. Find your added language in the list, click the three dots next to it, and pick Language options to download the missing files.
- Open Settings (Win + I).
- Click Time & language on the left, then choose Language & region on the right.
- Under Preferred languages, find the language you want.
- Click the three dots ⋮ next to that language, then pick Language options.
- Look for Language pack in the list. If it’s not installed, you’ll see a Download button next to it.
- Click Download to install the language pack.
Closing the Settings window completes the process.
Summary
- A language pack lets you use Windows 11 in a language you like.
- It changes text in Windows apps like Settings and File Explorer.
- If you have a Single Language Edition, you can’t add new languages without upgrading.
- You can install language packs while adding a language or later through Settings.
- Always look for the “Language pack” option when installing a new language.
A language pack lets you change the display text in Windows apps like Settings and File Explorer to a language you prefer. You can install language packs while adding a new language or download them later through the Settings app. Note that if you use a Single Language Edition of Windows, you cannot add new languages without upgrading your operating system first.
Helpful Links
Was this guide helpful?

About the Author
Richard
Tech Writer, IT Professional
Richard is a writer at Geek Rewind who turns complex IT tasks into clear, step-by-step guides. He draws on years of hands-on experience in system administration and enterprise IT operations, focusing on Windows, Linux and WordPress: the problems people actually run into, and the fixes that work. His server and WordPress guides come from systems he runs himself. Richard builds and maintains the platform behind Geek Rewind, from its Ubuntu servers and Nginx configuration to its custom WordPress plugins. Many new tutorials start with readers' questions, and he's always glad to answer them in the comments.



No comments yet — be the first to share your thoughts!