Add or Remove Languages in Microsoft Edge Browser

Managing languages in Microsoft Edge lets you read web pages in any of the 80-plus supported languages without changing your main Windows display settings. Edge checks your preferred languages list in order. When a page is in a language that is not on the list, it offers to translate the page into one that is.
Removing old or unneeded languages keeps the settings menu clean and stops Edge from offering translations you do not want. You can add, reorder, or delete languages at any time from the browser settings. The steps are the same on Windows 11 Home and Pro, because this is a browser setting and not a Windows one.
To add or remove languages in Microsoft Edge, open the browser, click the three dots in the top-right corner, select Settings, then click Languages in the left panel. Under Preferred languages, click Add languages to add new ones or click the three dots next to a language and select Remove to delete it.
Add or remove supported languages in Edge
You can add a language when you want a new translation option, spell check in another language, or a different display language for the browser menus. You do not need to reinstall Edge or change your Windows display language.
- Open Microsoft Edge.
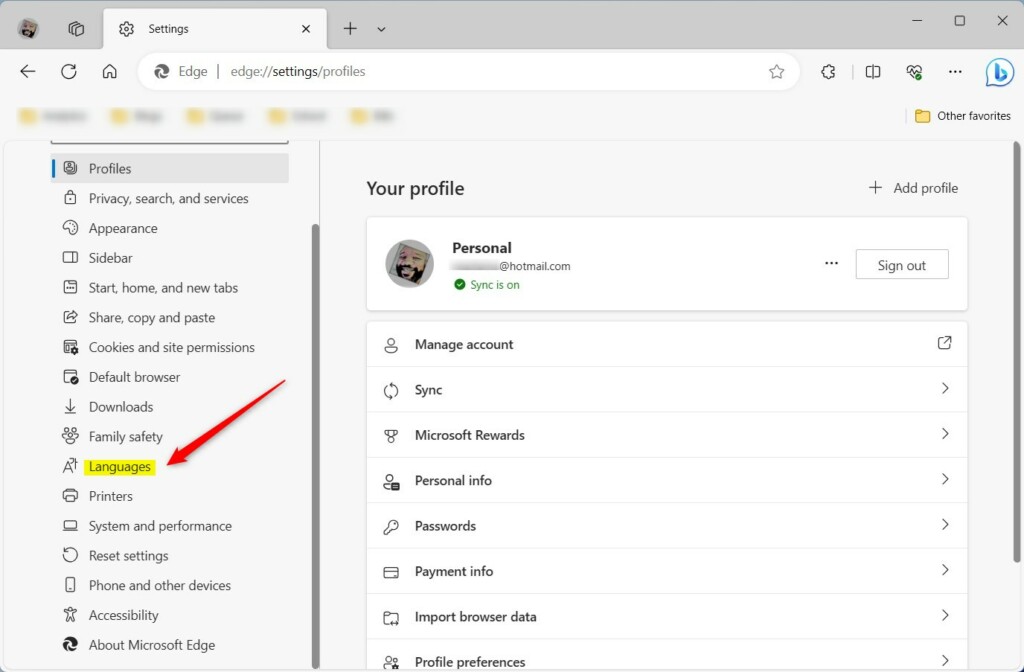
- Click the three dots (…) in the top-right corner, or press Alt+F, then select Settings. The Settings page opens in a new tab with a list of categories on the left.

- Locate the Settings page and click the
Languagesbutton in the left-hand panel. If the left panel is hidden because the window is narrow, widen the window or click the menu icon at the top left of the Settings page to bring it back.
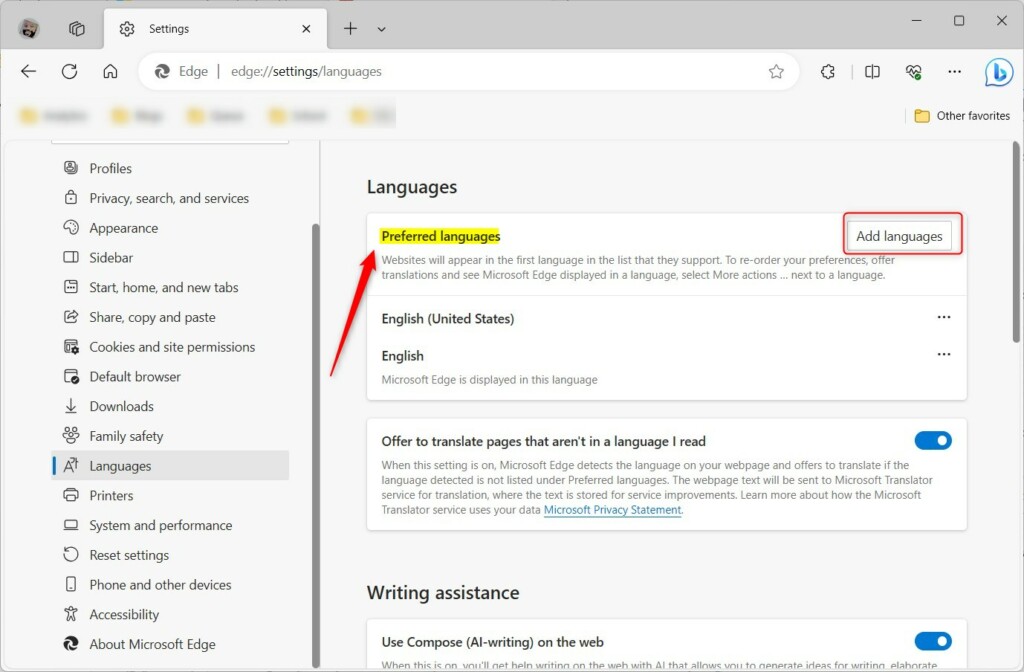
- In the right-hand pane under Languages, find the Preferred languages tile.
- Click the Add languages button. A window opens with a search box and a list of languages.
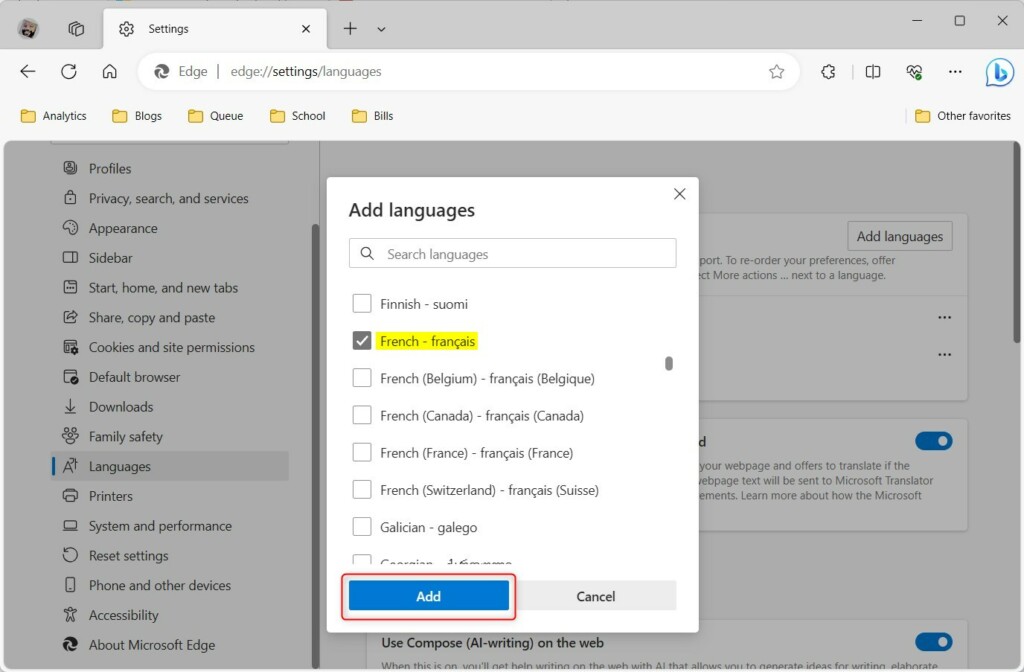
- Check the box next to each language you want to add. Use the search box if the language is not easy to find.
- Click Add.
The new language appears in your Preferred languages list immediately, and you do not need to restart Edge for it to be added. Each language has a three-dot menu. Use it to move the language up or down, since the order of the list matters, or to turn on options such as offering translation for that language. If you choose to display Edge in the new language, Edge asks you to restart before the menus change.
Remove preferred language from Microsoft Edge
Remove a language you no longer need so that Edge stops offering spell check and translation for it. If you change your mind later, add it back with the steps above.
- Go to Settings Languages
- In the Preferred languages section, find the language you want to remove.
- Click the three dots next to that language to open its menu.
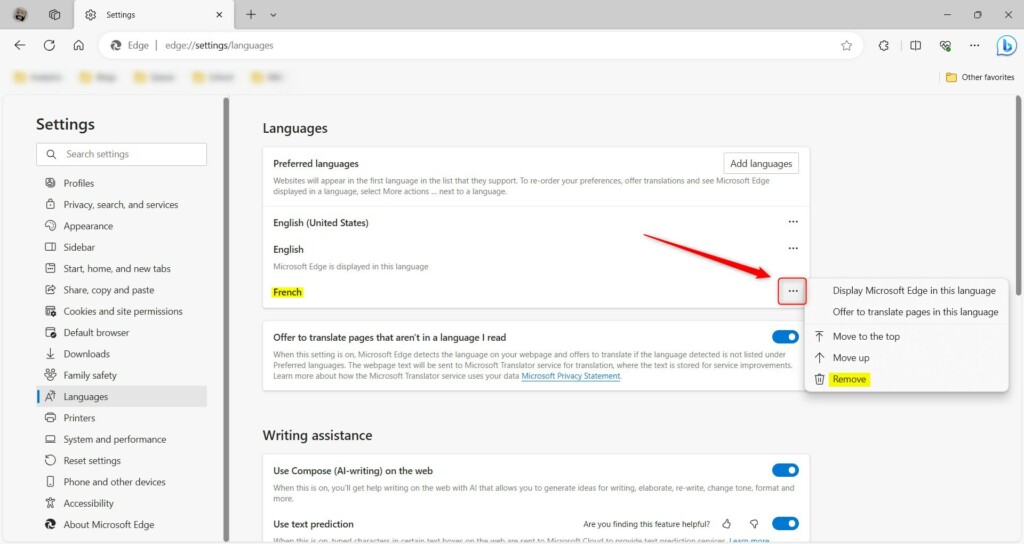
- Select Remove from the menu. The language disappears from the list right away.
Pick a different display language first, restart Edge, and then try again.
Configuration finishes here.
Reference:
Conclusion:
- This guide provided clear steps for adding or removing supported languages in the Microsoft Edge browser.
- Users now have the knowledge to customize their language preferences for a more tailored browsing experience.
- If any discrepancies were identified or if there is additional information to share, feel free to utilize the comment section below the article.
Have a question about this guide?
Answered by AI from this guide. Good questions may be added to this page — please don't include personal details.
Did this guide fix your problem?

About the Author
Richard
Tech Writer, IT Professional
Richard is a writer at Geek Rewind who turns complex IT tasks into clear, step-by-step guides. He draws on years of hands-on experience in system administration and enterprise IT operations, focusing on Windows, Linux and WordPress: the problems people actually run into, and the fixes that work. His server and WordPress guides come from systems he runs himself. Richard builds and maintains the platform behind Geek Rewind, from its Ubuntu servers and Nginx configuration to its custom WordPress plugins. Many new tutorials start with readers' questions, and he's always glad to answer them in the comments.
[…] When you use the Microsoft Edge browser, you can reorder your language preferences, get Microsoft Edge to offer translations, and see Microsoft Edge in a specific language. […]
[…] Edge uses your device’s display language by default. You can add more languages to help the browser understand your needs. When you add a new display language to Microsoft Edge, […]