How to Turn On Unicode UTF-8 Support in Windows 11
Learn how to turn Unicode UTF-8 support on or off in Windows 11 with this guide. This feature helps your computer accurately display text from languages used around the world.
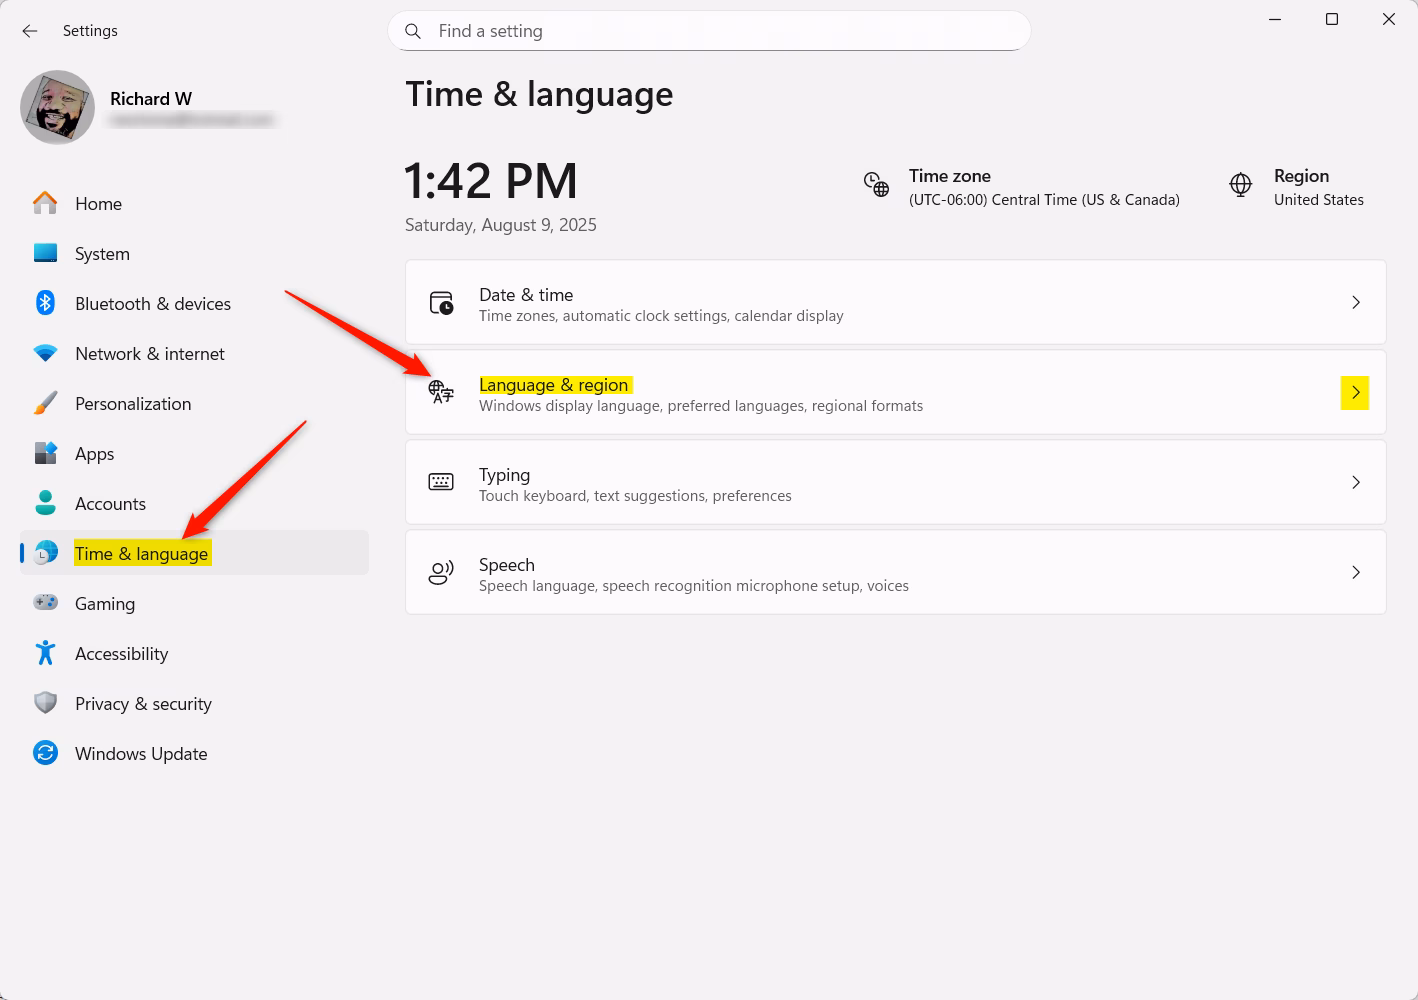
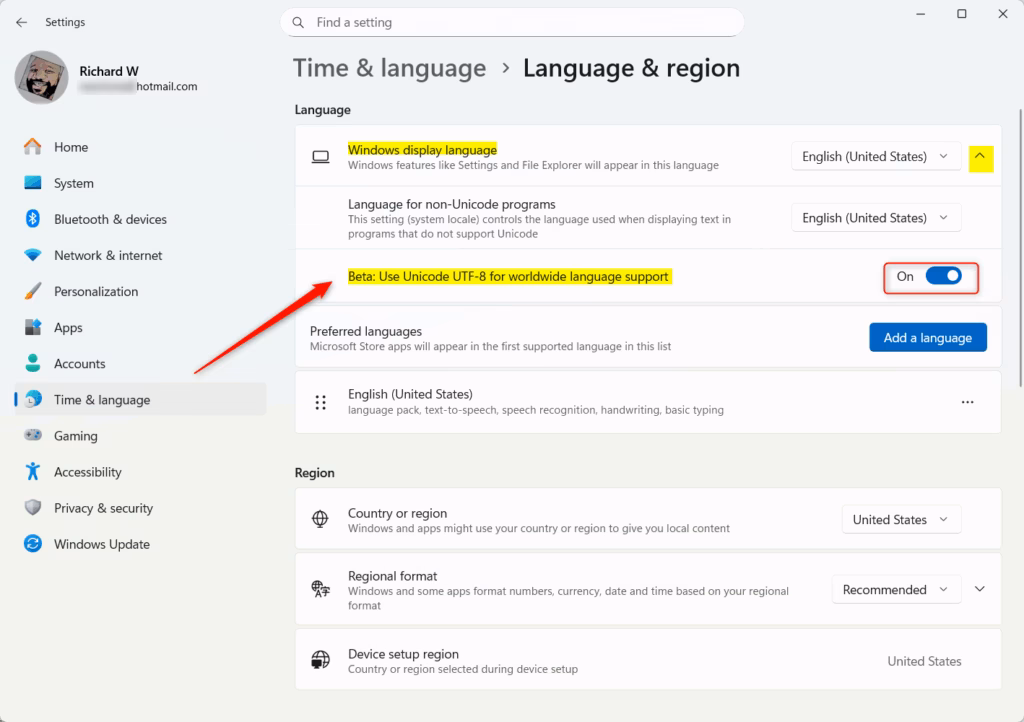
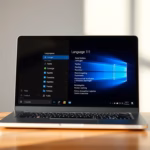
Open Settings, navigate to Time & language, then Language & region. Under Windows display language, toggle on “Use Unicode UTF-8 for worldwide language support.” This enables better display of international characters.
What is Display Language?
The display language is the language used in Windows menus, buttons, and messages. You can change it to a language you prefer.
Sometimes, when you change the display language, some programs might not show text properly because they don’t support Unicode. Turning on Unicode UTF-8 can fix this issue.
Why Turn On Unicode UTF-8?
Unicode UTF-8 helps your computer understand and display text from many different languages correctly. Once enabled, programs handle international characters and symbols much better.
How to Turn On Unicode UTF-8 Using Windows Settings
You can turn on Unicode UTF-8 support in Windows 11 using the Settings app to ensure your computer shows text from many languages correctly. This fixes problems where some characters might appear as boxes or question marks. It’s a way to help your PC display international text properly.
- Open Settings: Click on the Start menu and select Settings, or press Windows key + I on your keyboard.
- In the Settings window, click on Time & language on the left side.
- Click on Language & region on the right side.
- Under Windows display language, look for the option Use Unicode UTF-8 for worldwide language support.
- Turn the switch On to enable it or Off to disable it .
How to Enable Unicode UTF-8 Using the Registry Editor (Advanced)
For advanced users, enabling Unicode UTF-8 support in Windows 11 involves carefully editing the Registry Editor. This method allows for deeper changes to system settings and requires administrator permissions. It’s crucial to back up your system before you begin. Editing the registry incorrectly can cause problems, so proceed with caution.
⚠️ You’ll need administrator permissions to proceed with these steps:
- Open the Registry Editor. You can find how to do this here: Open Registry Editor.
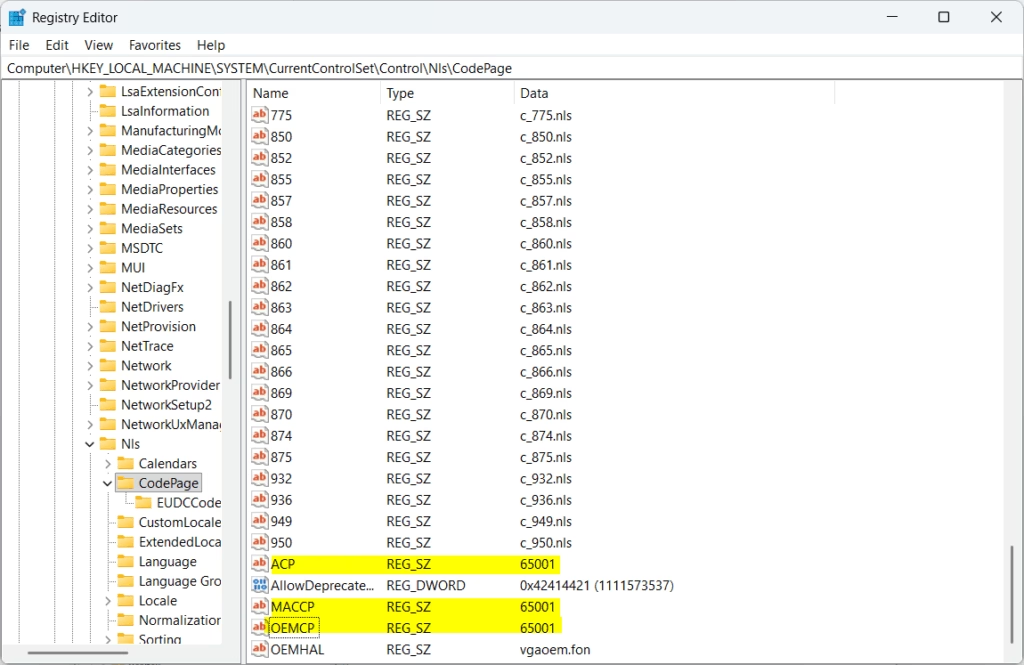
- Go to this folder path:
Computer\HKEY_LOCAL_MACHINE\SYSTEM\CurrentControlSet\Control\Nls\CodePage - Find the entries named ACP, MACCP, and OEMCP.
- Double-click each one and change their values to
65001to turn Unicode UTF-8 support on.
To disable Unicode UTF-8 support, set the values back to:
- ACP = 1252
- MACCP = 10000
- OEMCP = 437
You’ll need to restart your computer for these changes to take effect.
Summary
- Unicode UTF-8 support helps Windows display different languages correctly on your computer.
- You can use the easy Settings app method or the advanced Registry Editor method.
- Always back up your system before editing the registry to stay safe.
- Restart your PC after changes to make sure they take effect.
- Turning on UTF-8 can fix problems where some programs don’t show your language properly.
Unicode UTF-8 support in Windows 11 helps your computer correctly display text from many different languages. You can turn this on using the Settings app or the more advanced Registry Editor. Remember to back up your system before making registry changes and restart your PC afterward for the changes to work.
How do I enable Unicode UTF-8 in 🪟 Windows 11?
Open Control Panel, then go to Clock and Region > Region > Administrative tab. Click the ‘Change system locale’ button and enable ‘Beta: Use Unicode UTF-8 for worldwide language support.’
How to enable Unicode UTF-8?
At the top, select “View by: Large icons.” Find and click on “Region.” Then, switch to the Administrative tab.
Was this guide helpful?

About the Author
Richard
Tech Writer, IT Professional
Richard, a writer for Geek Rewind, is a tech enthusiast who loves breaking down complex IT topics into simple, easy-to-understand ideas. With years of hands-on experience in system administration and enterprise IT operations, he’s developed a knack for offering practical tips and solutions. Richard aims to make technology more accessible and actionable. He's deeply committed to the Geek Rewind community, always ready to answer questions and engage in discussions.


No comments yet — be the first to share your thoughts!