How to Configure Widgets Language and Region in Windows 11

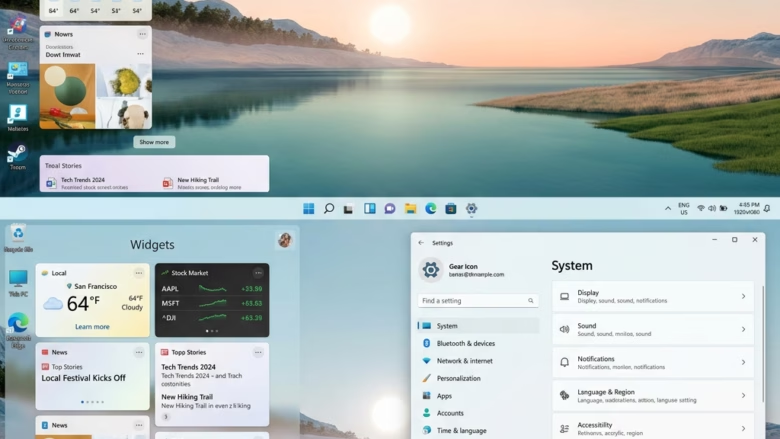
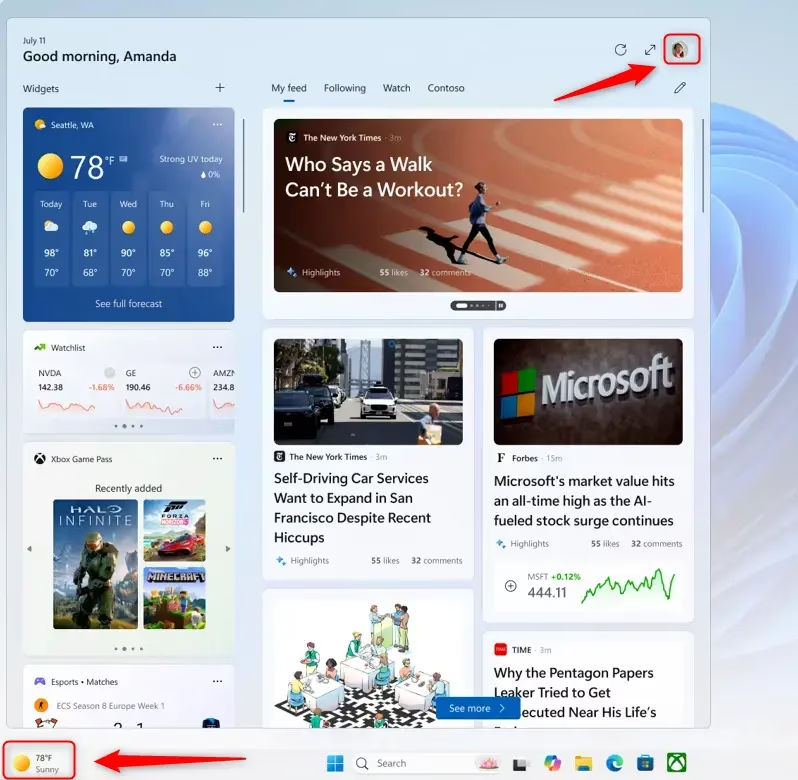
Widgets language and region settings in Windows 11 control the news, weather, and local stories that appear on your taskbar panel. The widgets board is the slide-out screen you open by clicking the weather icon on the left side of your taskbar .
Change these preferences to read news in a different language or follow updates from another city. You only need a few clicks in your Microsoft account settings to make your daily feed match what you want to see. The steps below also cover the main Windows region settings, which feed into the same content, and what to do if the board still shows the wrong language.
Adjust your system’s language and region settings in Windows 11. Open the Widgets board by clicking the taskbar icon or pressing Win+W. Click your user account button, then select “Language and content” to choose your preferred language and region.
1Open the Widgets Board
You can open the Widgets board in two ways. Click the Widgets icon on the taskbar , or press the Win+W. The board slides in from the left edge of the screen.
If the icon is missing from the taskbar , the Widgets switch is probably turned off. Turn it back on like this:
- Right-click an empty spot on the taskbar .
- Select Taskbar settings. The Personalization Taskbar page opens
- Under the taskbar items, find Widgets and move the switch to On. The icon should appear on the taskbar right away.
If the switch is greyed out or missing, your PC is probably managed by an organization that controls the feature through policy. In that case you need to ask your administrator. To hide the icon again later, move the same switch to Off.
2Access Your Account Settings
Once the Widgets board is open, look for your account button in the top corner of the panel. It is usually your profile picture, or a small generic icon if you have not set a picture. Click it to open the menu you need for the next step.
If you see a Sign in button instead of a picture, you are not signed in to Widgets. Sign in with your Microsoft account first. Language and content choices are tied to that account, so they will not stick without it.
3Find the Language and Content Options
To open the language and content settings for your Windows 11 widgets, follow these steps:
- Open the Widgets board.
- Click your user account icon in the top corner of the board.
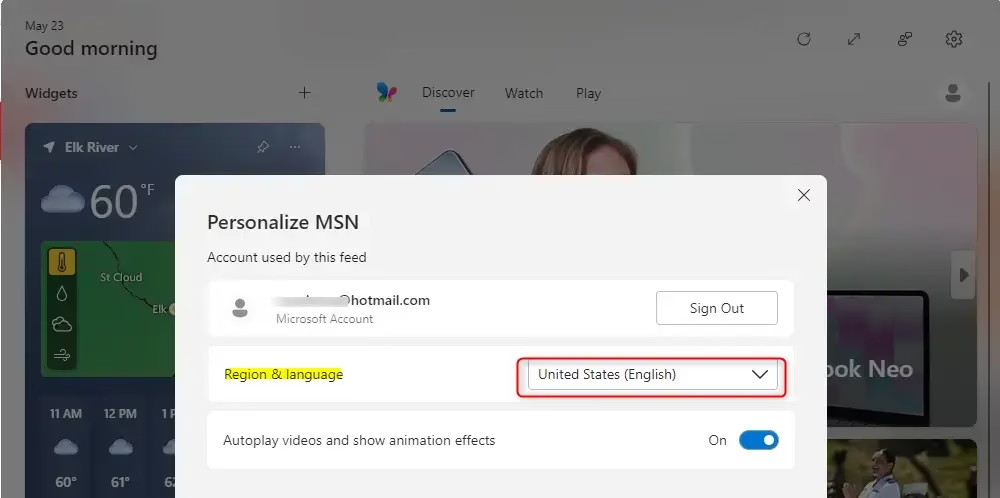
- Choose the entry for Language and content if your build lists it. You should now see the settings panel where you can change the language and region for your news and weather feeds.
Menu wording and layout change between Windows 11 builds, because Microsoft updates the Widgets board through the Store and Windows Update. If you do not see a language entry in your build, the board follows your main Windows display language and region settings instead. Those are covered later in this tutorial.
Incorrect configuration in the primary Windows settings causes unexpected widget behavior, such as a feed in the wrong language or weather for the wrong place.
4Select Your Preferred Language
Pick the language for your Windows 11 widgets from the dropdown list of available languages inside the Language and content menu:
- In the Language and content menu, open the language dropdown.
- Select the language you want for news and other feed content.
- If the menu offers a region or content location, set it to the place you want updates from.
- Save or apply the change if the menu shows a button for it, then close the menu.
If the language you want is not in the list, it is not installed on the system yet. Add it first through Windows Settings (Settings Time & language > Language & region). Use Add a language there to download the missing language pack, then return to the Widgets board and select it.
Practical Tip: Uninstalled system languages require manual addition before selection works. Download the language pack in Settings Time & language > Language & region before you try to apply it to the feed.
5Confirm and Close
Updates normally take effect right after you close the settings menu, so checking the result is quick. Give the Widgets board a minute to refresh after any language or region adjustment.
Then reopen the board and look for these signs:
- News headlines appear in the language you chose.
- The weather widget shows your selected location.
- Stock data and other widgets have refreshed.
If nothing has changed after a few minutes, close the board, open it again, and wait a little longer. If the feed is still wrong, go on to the troubleshooting steps below.
What to Expect: Allow the Widgets board a minute to refresh following language and region adjustments. Updated news headlines, alternate weather locations, and refreshed stock data will appear shortly. Some widgets update faster than others, so do not worry if the weather changes before the news does.
Troubleshooting Common Issues
If the widgets language or content is still wrong, check your main system region settings in the Settings app first. Computer region settings feed critical data into Windows 11 widgets. When the region is set correctly, local news and weather match your actual location.
Check Your Windows Region Settings
Flawed region settings generate irrelevant or inaccurate widget content. Setting the region correctly, such as to the United States if that is where you are, shapes the local news and weather feeds. To check it:
- Open the Settings app. You can search for it in the Start menu.
- Go to Time & language.
- Click Language & region. On Windows 11 the region options sit on this page. Older builds may label the page differently.
- Find Country or region and open the dropdown. Select your actual location. This helps Windows and your Widgets provide the most relevant local information.
While you are on this page, also check that Windows display language is the language you expect, since the widgets use it too.
Widget content region settings influence services beyond the Widgets panel. Changing the country or region affects the Microsoft Store and other geographic features, such as which apps and prices you see. Frequent travelers rely on this flexibility to tailor their Windows 11 environment, but it is worth switching back when you return home.
Sign Out and Back In
Refreshing the account connection often resolves minor display glitches. Signing out and back in to the Microsoft account linked to Widgets fixes sync errors:
- Open the Widgets board.
- Click your user account button.
- Select Sign Out.
- Once signed out, you should see a Sign in option. Click it and sign back in with your Microsoft account.
Re-pinning or re-configuring certain widgets becomes necessary afterward, so note which widgets you use before you sign out.
Restart Your PC
Restart your computer to apply the new language and region changes across Windows 11. A restart also clears lingering glitches caused by modified settings or account sign-outs. It is required if you installed a new display language, because that language only applies after you sign out and back in or restart.
Action: Save any open documents, then go to Start Power Restart
After the restart, open the Widgets board and confirm the language, news, and weather are what you set. User preferences dictate the Widgets board content in Windows 11, so a few minutes of setup gives you a feed in the right language and region every day.
Reference:
Summary
In short, you change Widgets language and region in the Widgets board Language and content menu or through the main Windows display language and region settings. If the board looks wrong, check Settings Time & language > Language & region first, then sign out of Widgets and back in, and restart if needed.
Have a question about this guide?
Answered by AI from this guide. Good questions may be added to this page — please don't include personal details.
Did this guide fix your problem?

About the Author
Richard
Tech Writer, IT Professional
Richard is a writer at Geek Rewind who turns complex IT tasks into clear, step-by-step guides. He draws on years of hands-on experience in system administration and enterprise IT operations, focusing on Windows, Linux and WordPress: the problems people actually run into, and the fixes that work. His server and WordPress guides come from systems he runs himself. Richard builds and maintains the platform behind Geek Rewind, from its Ubuntu servers and Nginx configuration to its custom WordPress plugins. Many new tutorials start with readers' questions, and he's always glad to answer them in the comments.
No comments yet — be the first to share your thoughts!