How to Change Android Nearby Share File Location on Windows 11

The Android Nearby Share download folder on Windows 11 controls where files sent from your phone are saved on your PC. By default, Windows 11 puts these incoming files in your standard Downloads folder.
You can change this in the Nearby Share app’s settings, so received files go to a folder you choose on your PC’s internal storage. The change takes a minute and does not need a restart.
Note: Google has been merging Nearby Share into the app now called Quick Share, so the app name and some labels may differ slightly on your PC. The steps below follow the Nearby Share wording. If your version looks a little different, look for the same setting under a similar name.
To change the Nearby Share location on Windows 11, open the Nearby Share app from the Start menu , click the Settings gear icon, and select Change next to Save received files to. Pick a folder such as Pictures or Documents, then click Select Folder. The new location applies to future transfers only; files already received stay where they were saved.
Why change your file location?
When you use Nearby Share, the files you receive end up mixed in with browser downloads, installers and everything else in Downloads. That makes them hard to find later.
If you change the save location, you can send photos straight to a Pictures folder and documents to a Work folder. Your Downloads folder stays cleaner, and you spend less time hunting for files.
What happens when you are done?
Once you save the new setting, every future transfer goes to the folder you chose. You no longer need to move files by hand out of Downloads.
Files you received earlier stay where they were saved, so move those yourself if you want them in the new folder.
How to Change Nearby Share Location
To change the Nearby Share location on Windows 11, open the app, go to its settings, and pick a new folder for incoming files. This stops shared files from piling up in your standard Downloads folder and keeps your photos and documents easier to find.
Before you start, create the destination folder in File Explorer if it does not exist yet. It is easier to pick an existing folder than to build one in the picker.
- Open the Nearby Share app from your Start menu. The app window should open and show its main screen. If you can't find it, type the app name into the Start menu search box.

Android Nearby Share change device name - Click the Settings gear icon in the top right corner. The settings screen should open with the app's options listed.

Change Android Nearby Share received files location on Windows 11 - Find the section labeled Save received files to. It shows the folder currently in use, which is normally your Downloads folder.
- Click the Change link. A File Explorer folder picker should open.

Android Nearby Share change device name - Use the File Explorer window to select your preferred folder. Browse to it and click it once so it is highlighted. Choose a folder on a local drive that you have write access to.
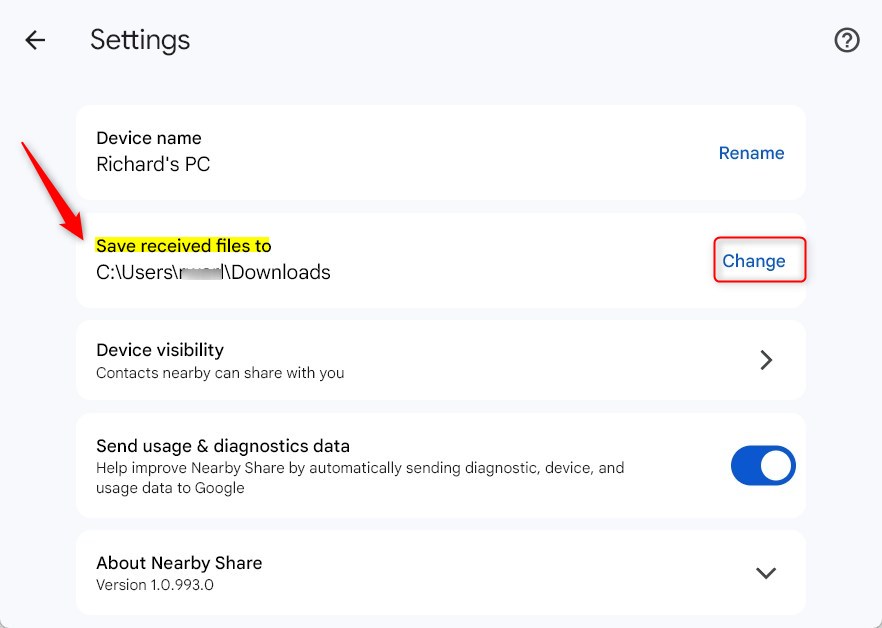
Change Android Nearby Share received files location on Windows 11 - Click Select Folder to confirm. The picker should close and the Save received files to section should now show your new folder path.
To check that it worked, send a small file or photo from your phone to the PC and look in the new folder. To undo the change, repeat the steps and choose your Downloads folder again.
Troubleshooting Save Folder Errors
If you can't change the save folder, the most likely cause is permissions. Your account may not be allowed to write to the folder you picked, or Windows may protect it.
Work or school PCs can also have rules that block this setting, and only an administrator can lift those. Try these checks:
- Pick a folder inside your own user profile, such as Documents or Pictures, and see if it saves.
- Avoid system locations such as the Windows or Program Files folders, which are protected.
- Make sure the destination drive is connected and has free space. An unplugged USB drive or a disconnected network share will cause problems.
- If the PC is managed by your employer or school, ask your IT team whether the setting is locked.
Enterprise and Group Policy Management
In a business setting, administrators can manage Nearby Share settings with policy. The original guidance points to the registry path HKEY_LOCAL_MACHINE\SOFTWARE\Policies\Google\NearbyShare, where admins can enforce specific download paths for all users on a device. This keeps the setting consistent across a fleet of computers.
Test on a single PC first, and confirm the path and value names against Google's documentation for the app version you deploy. Back up the registry or export the key before you change anything, so you can roll back if the setting doesn't behave as expected.
Summary
- Nearby Share simplifies sending files from Android to Windows 11.
- Default downloads go to your user folder, but you can change this in the app settings with Save received files to and Change.
- Always ensure your target folder has enough space and correct permissions.
- For more technical details, visit the official Microsoft Support page.
Have a question about this guide?
Answered by AI from this guide. Good questions may be added to this page — please don't include personal details.
Did this guide fix your problem?

About the Author
Richard
Tech Writer, IT Professional
Richard is a writer at Geek Rewind who turns complex IT tasks into clear, step-by-step guides. He draws on years of hands-on experience in system administration and enterprise IT operations, focusing on Windows, Linux and WordPress: the problems people actually run into, and the fixes that work. His server and WordPress guides come from systems he runs himself. Richard builds and maintains the platform behind Geek Rewind, from its Ubuntu servers and Nginx configuration to its custom WordPress plugins. Many new tutorials start with readers' questions, and he's always glad to answer them in the comments.
No comments yet — be the first to share your thoughts!