How to Share Pictures Between Nearby PCs in Windows 11

Nearby sharing in Windows 11 lets you easily send pictures to another nearby PC wirelessly.
This built-in Windows feature allows you to transfer files, such as your photos, between two or more Windows devices that are close to each other. It uses your computer’s Bluetooth or Wi-Fi to create a direct connection, much like AirDrop on Apple devices.
With Windows 11’s Nearby Sharing, you can quickly send photos from your laptop to your desktop or share holiday snaps with a friend. This method doesn’t need extra storage or cloud accounts.
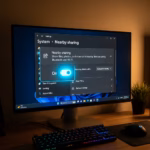
For Nearby Sharing to work, both computers need to have the feature turned on and set up. You usually find this setting in the Windows 11 Settings app, under System, then Nearby sharing.
Use the built-in Nearby sharing feature. Enable it in Settings > System > Nearby sharing on both PCs. Ensure Bluetooth and Wi-Fi are on, then select your sharing preference (My devices only or Everyone nearby).
How it Works: Bluetooth vs. Wi-Fi
Windows Nearby Sharing uses the fastest connection available, usually Wi-Fi Direct (a technology that allows devices to connect directly to each other without an intermediary network) if both computers support it, or Bluetooth if Wi-Fi isn’t an option.
Requirements for Nearby Sharing
For Windows nearby sharing to work, both computers need to be running Windows 10 (version 1803 or newer) or Windows 11. Make sure Bluetooth is turned on and discoverable on both. Wi-Fi on the same network and Wi-Fi Direct support will speed things up. Keep the devices within Bluetooth or Wi-Fi range.- Both PCs must be running Windows 10 (version 1803 or newer) or Windows 11.
- Bluetooth must be turned on and set to be discoverable on both devices.
- For Wi-Fi sharing, both devices should ideally be on the same network and support Wi-Fi Direct.
- The devices need to be close to each other, within the normal range of Bluetooth or Wi-Fi.
Setting Up Nearby Sharing on Both Devices
Before you share anything, turn on Nearby sharing on both the computer you’re sending from and the one you’re sending to. This is a very important first step!
Step 1Open Windows Settings
On both computers, click the Start button. The Start button is typically in the bottom-left corner of your screen. Then, click the Settings gear icon.
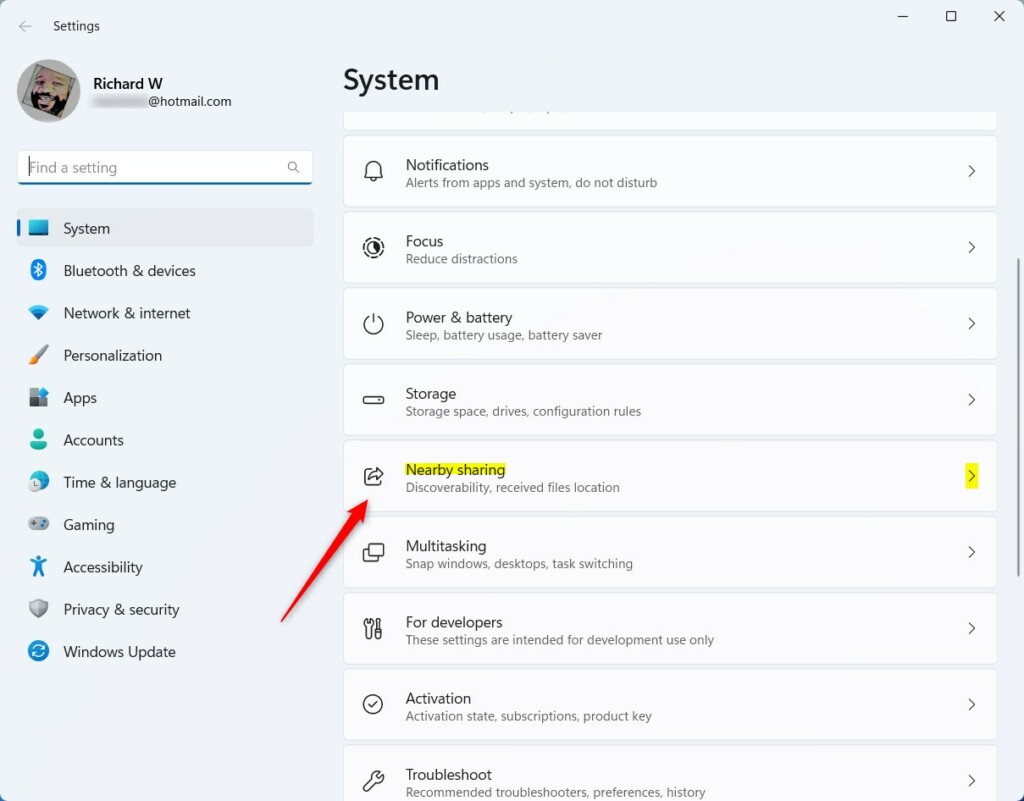
Step 2Go to System Settings
In the Settings window, click on System. This is where you’ll find options for your computer’s hardware and main functions.
Step 3Find Nearby Sharing
On Windows 11: Scroll down the menu on the left side and click on Nearby sharing.
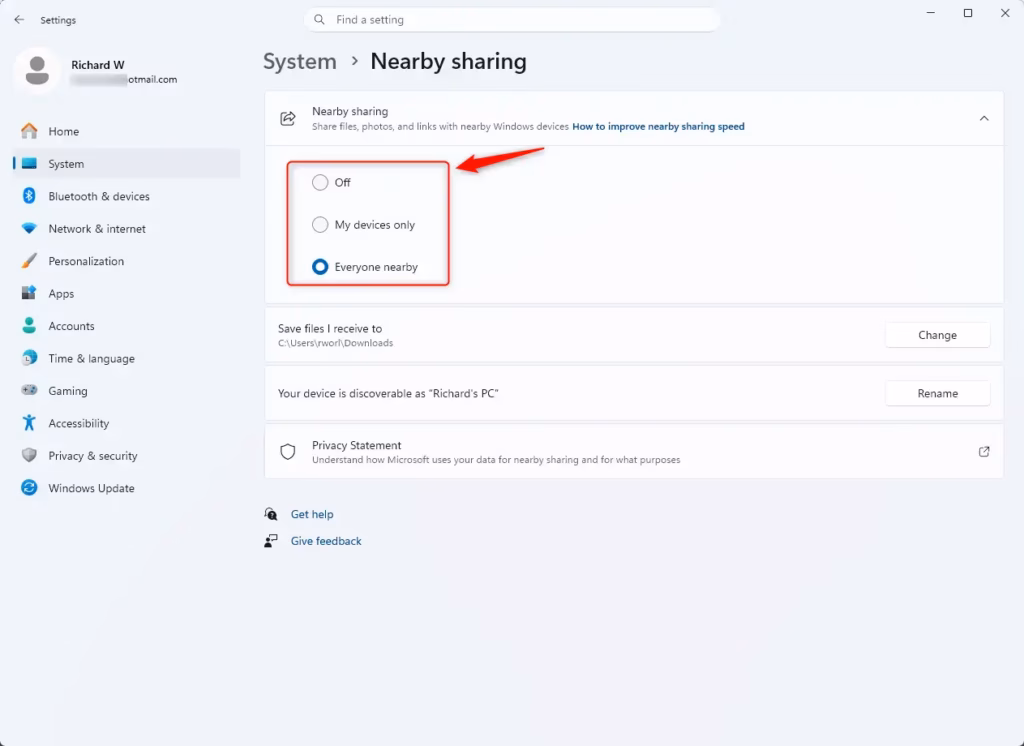
Step 4Set Your Sharing Choices
Control who shares files with your PC using Windows nearby sharing by choosing between ‘My devices only’ or ‘Everyone nearby’. ‘My devices only’ is more private and only lets your signed-in Microsoft accounts share with each other, which is ideal when sharing between your own computers. ‘Everyone nearby’ lets any computer close to you send files.
- My devices only: This is more private. Your PC can only share with or receive from other Windows devices where you are signed in with the same Microsoft account. This is great if you are sharing between your own computers.
- Everyone nearby: This lets any Windows PC nearby that also has Nearby sharing turned on (and is set to “Everyone nearby”) send files to your computer.
Step 5Turn on Bluetooth and Wi-Fi
To use Windows nearby sharing, you must turn on Bluetooth on both computers and set it to be discoverable. Having Wi-Fi turned on also helps send files more quickly. Be aware that if you pick ‘Everyone nearby’, your PC’s Bluetooth name will be visible to others, which might affect your privacy.
Step 6Choose Where to Save Received Files
Sharing a Picture: Step-by-Step
Sharing a photo between nearby Windows 11 computers becomes a streamlined process after both machines have Nearby sharing set up. The Photos app, which is the most common tool for viewing and managing pictures on Windows, serves as the primary method for this transfer.
Step 1Open the Photo You Want to Share
On the computer that has the picture you want to send, open the Photos app. You can find this by typing “Photos” in the Windows search bar and selecting it.
Step 2Select the Picture
Look through your photo library in the Photos app. Click on the specific picture you want to share. This opens the photo larger.
Step 3Find the Share Button
The Share icon, which depicts a box with an upward-pointing arrow, appears in the toolbar of the Photos app. On Windows 11, this icon is usually at the top of the application window. Windows 10 also places the Share icon in the top toolbar.
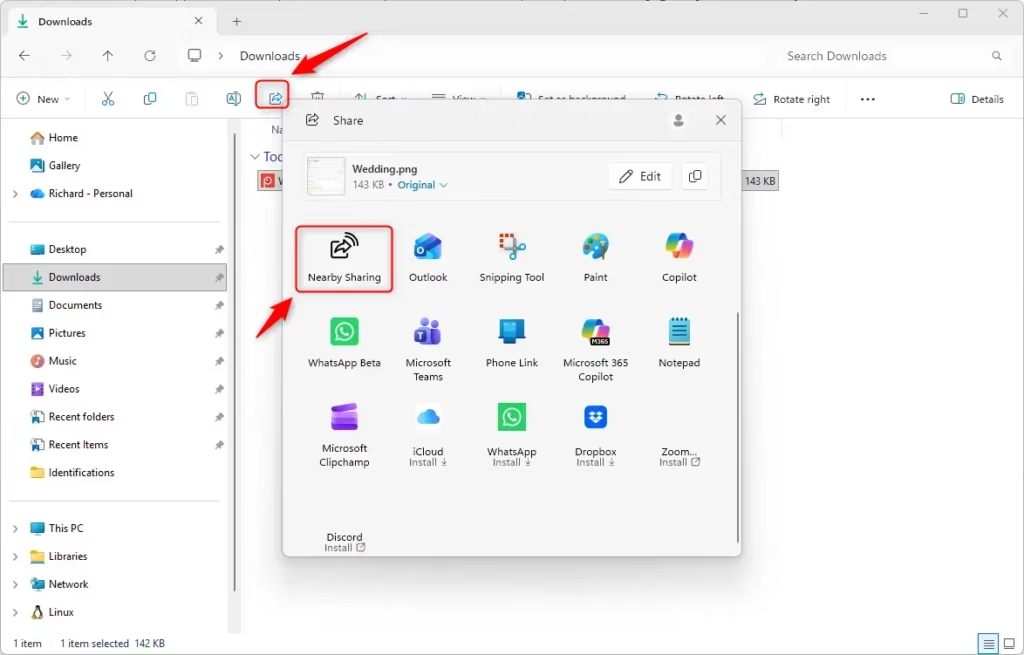
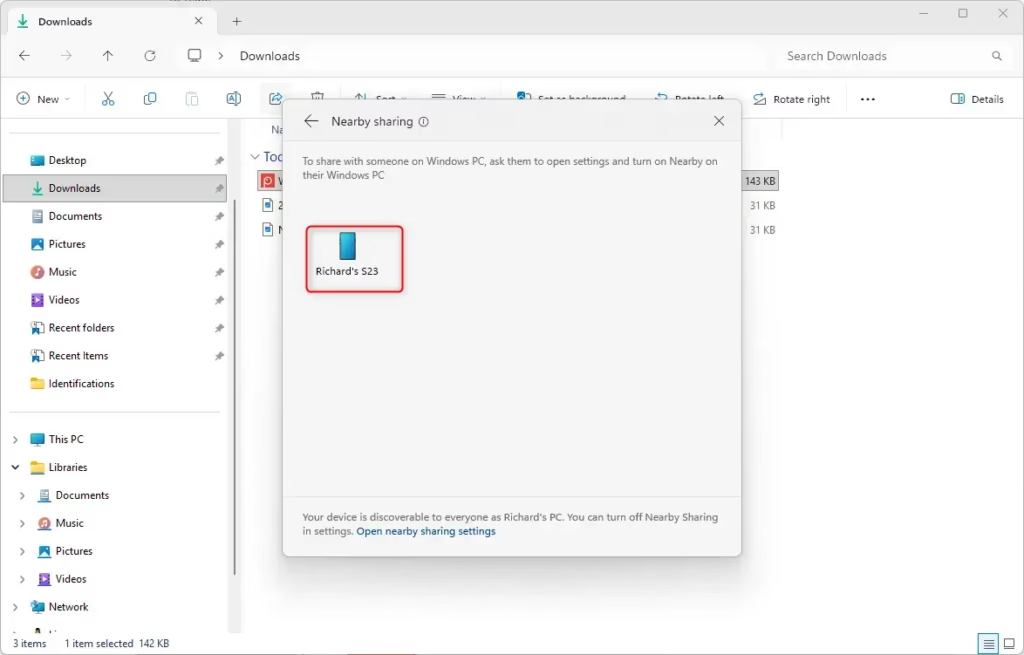
Step 4Choose the Target Device
After clicking the Share icon, a sharing panel or window will show up. This panel will list the devices that Nearby sharing can find. You should see the name of the other Windows PC you want to send the photo to. Click the name of that device.
Step 5Accept the Transfer on the Receiving PC
When someone sends you a file using Windows nearby sharing, a message will pop up asking if you want to ‘Save & open’ or just ‘Save’ the file. Choosing ‘Save & open’ puts the file in your chosen folder and opens the file right away using the Photos app. Choosing ‘Save’ puts the file in the folder without opening the file.
- Save & open: This will save the photo to your chosen folder and then open it right away in the Photos app.
- Save: This will save the photo to your chosen folder without opening it automatically.
Click the option that works best for you. The photo will then be sent and saved to the PC.
Reference:
Summary
Nearby sharing is a powerful tool in Windows that many people overlook. By following these steps, you can easily share your photos and other files between your nearby PCs without any extra hassle. Give it a try the next time you need to move a picture! [Your PC Name]
How do I use Nearby Sharing on Windows?
To use Nearby Sharing, ensure it’s enabled on both PCs. Open File Explorer, select the picture, click the ‘Share’ button, choose ‘Nearby sharing’, and select the target PC. The recipient will get a notification to accept or decline the transfer.
Is Windows Nearby Sharing fast?
Windows Nearby Sharing is designed to be fast, using Bluetooth or Wi-Fi for direct transfers. While performance can vary based on signal strength and device capabilities, it’s generally quicker than uploading to cloud services for local file sharing.
Why is Nearby Sharing not showing up in 🪟 Windows 10?
Nearby Sharing might not show up in Windows 10 if your PC’s Bluetooth or Wi-Fi drivers are outdated, or if the feature is disabled in Group Policy or Registry settings. Ensure your Windows 10 is updated and Bluetooth/Wi-Fi are enabled.
How do I turn on Nearby Share?
To turn on Nearby Share, go to Settings > System > Nearby sharing. Choose ‘Everyone nearby’ or ‘My devices only’ for sharing options. Ensure Bluetooth and Wi-Fi are enabled on both devices for the feature to function correctly.
Was this guide helpful?

About the Author
Richard
Tech Writer, IT Professional
Richard, a writer for Geek Rewind, is a tech enthusiast who loves breaking down complex IT topics into simple, easy-to-understand ideas. With years of hands-on experience in system administration and enterprise IT operations, he’s developed a knack for offering practical tips and solutions. Richard aims to make technology more accessible and actionable. He's deeply committed to the Geek Rewind community, always ready to answer questions and engage in discussions.

No comments yet — be the first to share your thoughts!