How to Share File to Nearby Devices in Windows 11

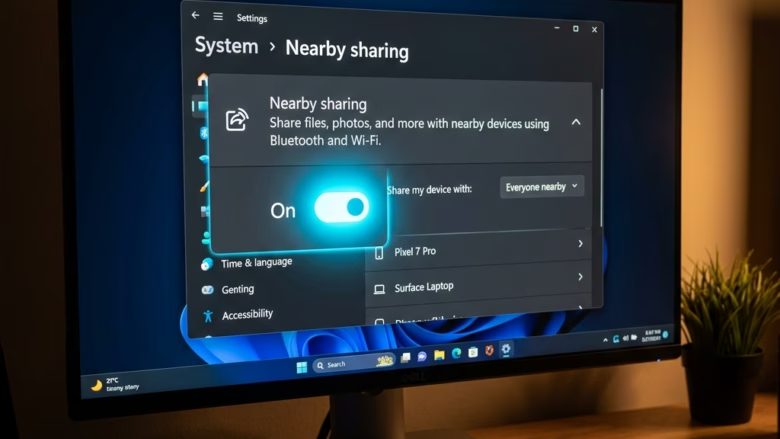
Nearby Sharing in Windows 11 lets you send photos, documents, and links to computers around you without using email or USB drives. The feature connects two PCs directly using Bluetooth or Wi-Fi over a range of about 30 feet (10 meters).
Both computers need Nearby sharing turned on and Bluetooth active for the transfer to work. Both PCs also need Bluetooth hardware that supports Bluetooth 4.0 or later with Low Energy. Most PCs from the last several years do, but some older desktops and USB adapters don’t. If a PC doesn’t, it won’t show up as a target.
Open Settings System Nearby sharing and turn on the toggle. Ensure both PCs have Bluetooth and Wi-Fi enabled. In File Explorer , right-click the file, select Share, then choose the target device from the nearby devices list.
Setting Up Nearby Sharing
Getting your devices ready
Do this on the sending PC and on the receiving PC. Both computers must have Bluetooth active and Nearby Sharing turned on.
- Open Settings and go to Settings System Nearby sharing You should see a list of sharing options and a setting for where received files are saved.
- Choose how visible this PC should be. Off turns the feature off. My devices only shares only with PCs signed in to your own Microsoft account. Everyone nearby lets any nearby PC with Nearby sharing see yours.
- Open Settings Bluetooth & devices and check that the Bluetooth toggle is On.
- Check that Wi-Fi is on, using Settings Network & internet The PCs don’t need to be on the same network, but Wi-Fi gives faster transfers for larger files.
- Repeat these steps on the other PC.
If Nearby sharing is missing or greyed out, the PC is usually missing Bluetooth hardware or the Bluetooth driver. It can also be an older Windows build. Update Windows and the Bluetooth driver, then check again. The feature is available in both Home and Pro. “My devices only” is a good default on a shared or public network, and “Everyone nearby” is easier when the other PC uses a different account.
How to Share a File or Link Using Nearby Sharing
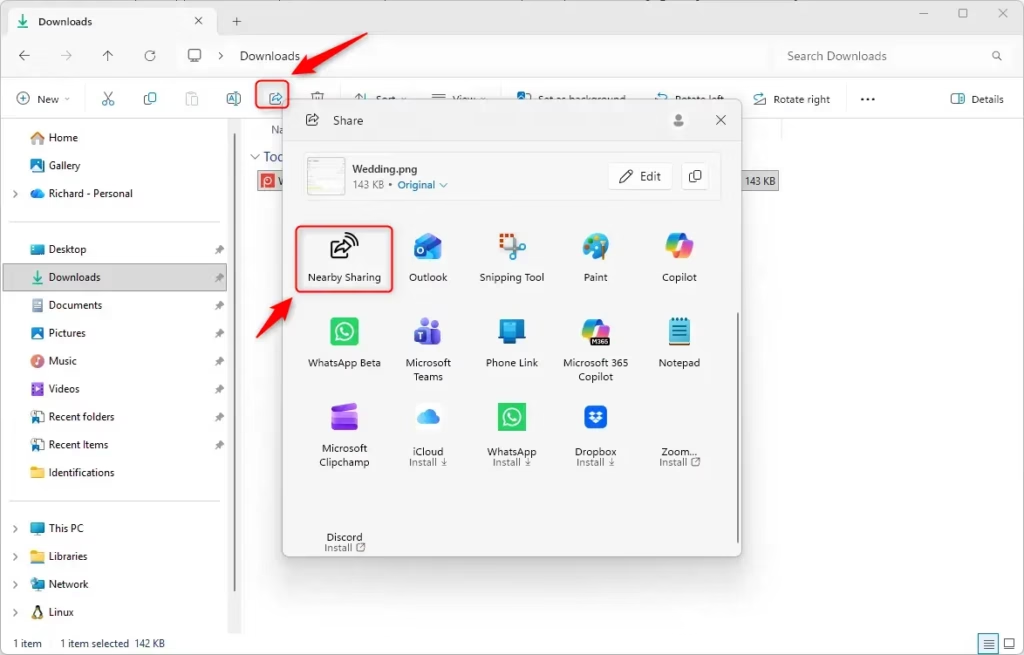
To send a file or web link to another computer nearby, first select the item in File Explorer , or open the page in your web browser. In File Explorer, right-click the file and choose Share. In Windows 11 this is the Share icon in the row of icons in the context menu . If you only see the full list of commands, choose Show more options first. The Windows Share window opens.
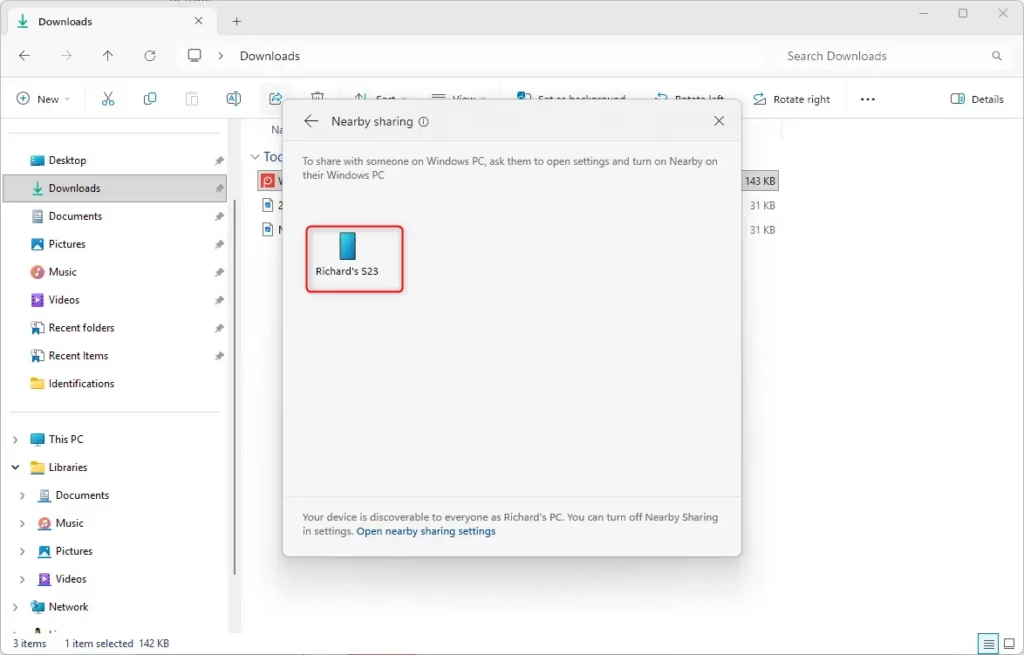
Pick the name of the other computer from the list of nearby devices. The other PC needs a moment to appear, so give it a few seconds. If it doesn't show, check that both PCs have Wi-Fi and Bluetooth turned on and that they are within range. The steps below show the process.
- Select the Item You Want to Share
Go to the file you want to send using File Explorer. If it's a webpage, make sure that page is open and active in your browser. - Start the Share Action
Here are a few ways to do this:💡TipIf you're sharing a link from a browser, you might see other options like sharing via email.Nearby sharing will be one of them.
- From File Explorer:
- Option 1 (Ribbon): Select the file. Look at the top of the File Explorer window for the ribbon menu. Click the Share button.
- Option 2 (Right-Click): Right-click on the file. In the menu that pops up, choose Share.
- From a Web Browser (like Microsoft Edge): Look for a "Share" icon. It might look like a box with an arrow pointing up, or it could be in the browser's menu (often three dots or lines). Click it.
- From File Explorer:
- Choose 'Nearby sharing'
A "Share" window will open. Look for the Nearby sharing icon or option. It usually shows a symbol for closeness or connection. - Select the Target Device
Your PC will look for other Windows devices with Nearby sharing turned on and nearby. The devices will show up in the Share window. Click the name of the device you want to send the file to.Warning: Make sure you pick the right device! It's easy to send a file to the wrong person or device if many are available. Check the device name carefully.
- Confirm on the Receiving Device
On the device getting the file, a message will pop up asking if you want to accept it. You'll usually see the file name or link and the sender's PC name. Click Save and open or Save to accept the transfer.Sharing files to a nearby device in Windows 11 requires both devices to be signed in with a Microsoft account. If a sender chooses "My device only" and the recipient's device is not signed in, the recipient will be prompted to sign in. This sign-in requirement acts as a security measure.
- Check Your Received Files Folder
Once accepted, the file will transfer. It will be saved in the folder you chose earlier on the receiving device. You can then go to that folder to open your new file.
On the receiving PC, a notification appears asking whether to accept the file. Click Save to accept it, or Decline to refuse it. Once the transfer finishes, you can open the file or its folder from the notification. By default, received files go to the Downloads folder. You can change that in Settings System Nearby sharing, under the option for where to save the files you receive.
If the transfer stalls or the device never appears, try these checks:
- Move the two PCs closer together and remove obstacles between them.
- Turn Bluetooth off and on again on both PCs.
- Make sure neither PC is set to Off in Nearby sharing settings.
- If you use My devices only, confirm both PCs are signed in to the same Microsoft account. Otherwise switch to Everyone nearby.
- Restart both PCs if the list still stays empty.
Keep Nearby Sharing turned on to quickly move files between machines whenever you need to. If you'd rather not leave your PC visible to others, set it back to My devices only or Off in Settings System Nearby sharing. No restart is needed for the change to take effect.
Reference:
Summary
Nearby sharing is a handy Windows feature for sending files, photos, or links to other Windows computers nearby using Bluetooth or Wi-Fi. It needs no cables, accounts, or cloud uploads for quick transfers. Once both PCs have it enabled, a file only takes a right-click and a choice of device.
Have a question about this guide?
Answered by AI from this guide. Good questions may be added to this page — please don't include personal details.
Did this guide fix your problem?

About the Author
Richard
Tech Writer, IT Professional
Richard is a writer at Geek Rewind who turns complex IT tasks into clear, step-by-step guides. He draws on years of hands-on experience in system administration and enterprise IT operations, focusing on Windows, Linux and WordPress: the problems people actually run into, and the fixes that work. His server and WordPress guides come from systems he runs himself. Richard builds and maintains the platform behind Geek Rewind, from its Ubuntu servers and Nginx configuration to its custom WordPress plugins. Many new tutorials start with readers' questions, and he's always glad to answer them in the comments.
No comments yet — be the first to share your thoughts!