How to Customize Quick Settings in Windows 11

Quick Settings in Windows 11 is a pop-up panel that puts everyday controls like Wi-Fi , Bluetooth , and screen brightness in one place. Press the Win+A to open it, and you can manage your PC without opening the full Settings app .
You can add, remove, or rearrange the shortcut buttons to fit the way you work. The changes take effect as soon as you save them. You don’t need to restart, and you can undo any change by editing the panel again.
Press Win+A to open Quick Settings, click the pencil icon at the bottom, then click Add or the Unpin icon on existing buttons to customize which shortcuts appear. Click Done to save your changes. The panel updates immediately without restarting.
What Is the Quick Settings Panel?
The Quick Settings panel lets you change common settings like Wi-Fi , Bluetooth , volume, and screen brightness. To open it, click the network, sound, or battery icons at the right end of the taskbar , or press the Win+A. It gives you quick access to everyday tools without sending you into the full Settings app .
- Volume control, shown as a slider you can drag
- Screen brightness, also a slider (it only appears on devices with a built-in display, such as laptops and tablets)
- Wi-Fi and Bluetooth
- Airplane mode
- Night light (makes your screen warmer at night)
- Battery saver (you will only see this on a device with a battery)
- And more, such as Cast, Accessibility, and Nearby sharing. What is on offer depends on your PC and its hardware.
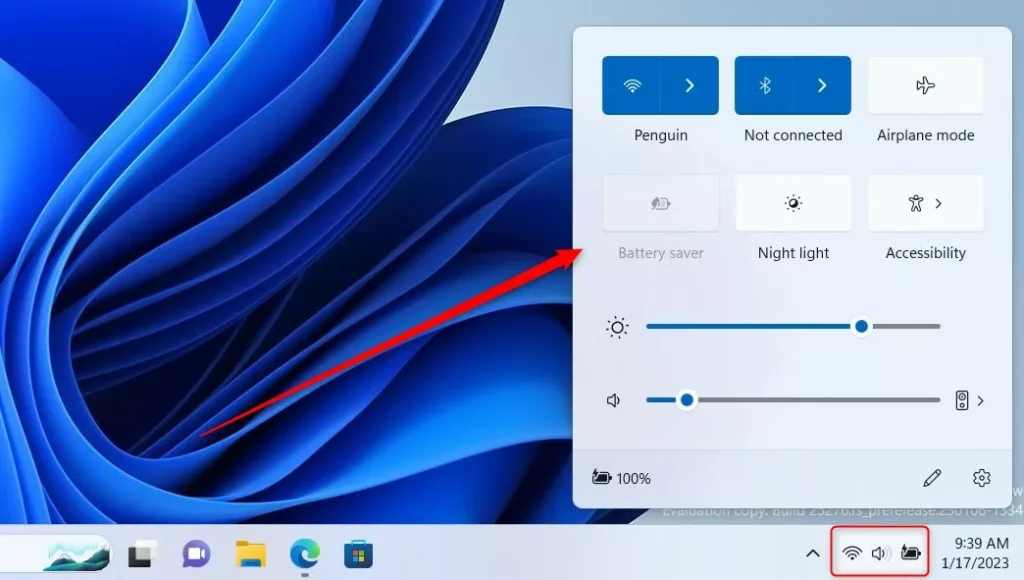
The panel works the same way on Windows 11 Home and Pro. If a button you expect is missing, your hardware probably doesn’t support it. A desktop PC with no battery, for example, won’t offer Battery saver.
How to Add or Remove Buttons in Quick Settings
You make these changes straight from the flyout. Open the panel, click the pencil icon, then pin or unpin features like Cast, Accessibility, or Nearby sharing to match your habits.
What happens? Your Quick Settings panel will only show the buttons you want, in the order you choose.
Follow these steps:
- Press
Windows key + Aon your keyboard to open the Quick Settings panel. Or click the battery, sound, or network icon at the bottom right of your screen. The panel slides up above the taskbar. - In the Quick Settings panel, click the pencil icon that says Edit quick settings. If you don't see the pencil, look at the bottom edge of the panel, next to the battery indicator.
- Check that the panel has switched to edit mode. Here is what you should see:
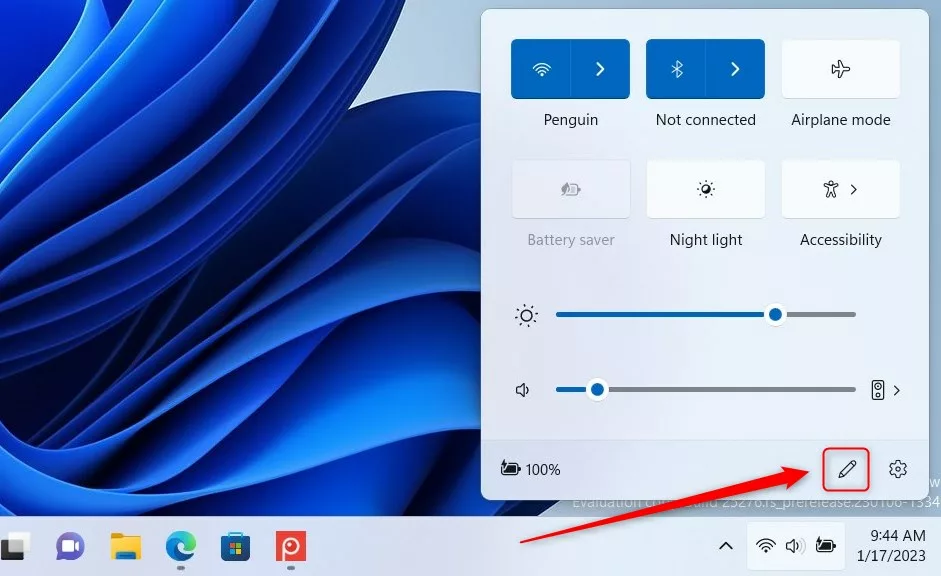
windows quick settings edit button - Look at the buttons already in the panel. In edit mode, each one shows a small Unpin icon. The Add and Done buttons appear at the bottom of the panel.
- To add a new button, click the Add button.
- A list of buttons you can add now opens:
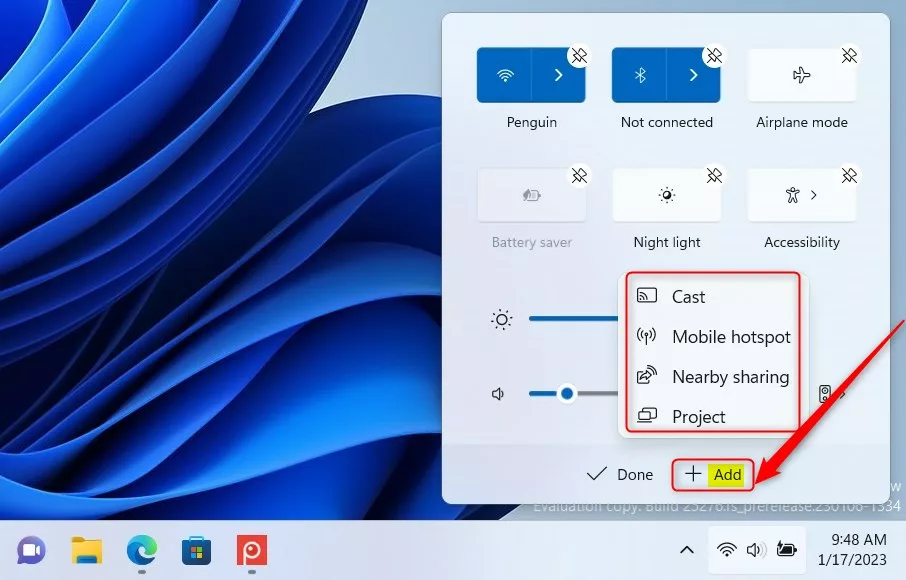
windows add quick settings button on window updated - Scroll through the list if you need to. It only shows buttons that are not already in your panel. If the list is short or empty, you have probably pinned everything your PC supports.
- Pick the buttons you want to add by clicking on them. Each one is added to the panel straight away.
- To remove a button, click the Unpin icon on the button you want to remove.
- The button disappears from the panel, and the others move up to fill the gap:
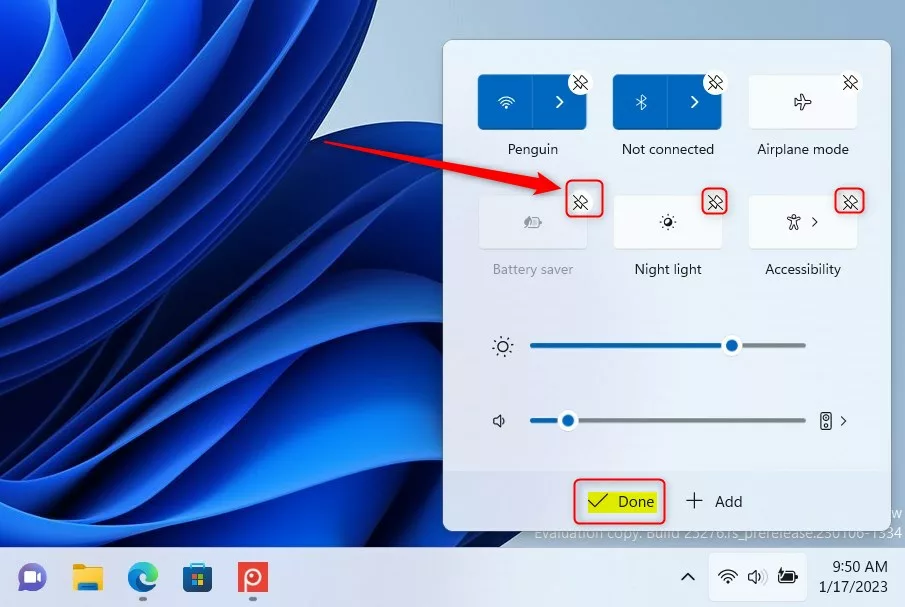
windows remove quick settings buttons - If you unpin something by mistake, click Add and pick it again. Unpinning only hides the button. It doesn't turn off or uninstall the feature.
- You can also rearrange buttons by clicking and holding a button and dragging it to where you want it. Release the mouse button to drop it in place.
- When you're done, click the Done button to save your changes. If you close the panel without clicking Done, your edits may not be kept.
The Quick Settings panel now displays only the buttons you chose, in your preferred order. This makes the features you use most, such as Wi-Fi, Bluetooth, or Volume, faster to reach. To check, press the Windows key + A again and look over the layout.
Extra Tip
If you want to stop other people from changing your Quick Settings buttons, you can disable editing of Quick Settings. This is mainly useful on shared or managed PCs.
Summary
Customizing the Windows 11 Quick Settings panel is simple. You can add, remove, or rearrange buttons for faster access to your most-used features, and you can change the layout again whenever your needs change.
Have a question about this guide?
Answered by AI from this guide. Good questions may be added to this page — please don't include personal details.
Did this guide fix your problem?

About the Author
Richard
Tech Writer, IT Professional
Richard is a writer at Geek Rewind who turns complex IT tasks into clear, step-by-step guides. He draws on years of hands-on experience in system administration and enterprise IT operations, focusing on Windows, Linux and WordPress: the problems people actually run into, and the fixes that work. His server and WordPress guides come from systems he runs himself. Richard builds and maintains the platform behind Geek Rewind, from its Ubuntu servers and Nginx configuration to its custom WordPress plugins. Many new tutorials start with readers' questions, and he's always glad to answer them in the comments.
No comments yet — be the first to share your thoughts!