How to Customize Notification Banner Timeout Duration in Windows 11 Notifications Settings

The notification banner timeout in Windows 11 controls how long a pop-up message stays on screen before it fades away. By default, Windows shows these alerts in the bottom-right corner for just 5 seconds, which is often too short for a long message.
You can raise the timeout from the built-in Settings app . The choices run from 5 seconds up to 5 minutes. A longer timeout gives you time to read an alert without opening the notification center. This guide also covers Do Not Disturb and focus sessions, for when you want fewer banners instead of longer ones.
Open Settings , go to Accessibility Visual effects, then click the dropdown next to Dismiss notifications after this amount of time and select your preferred duration from 5 seconds to 5 minutes. Windows saves the change immediately without requiring a restart.
Method 1Change Alert Display Time Through Accessibility Settings
To keep banners on screen longer than the default five seconds, open Settings , go to Accessibility, then Visual effects. Pick a longer time in the Dismiss notifications after this amount of time dropdown. The steps are below.
- Open the Start menu from your taskbar and select Settings. You can also press Win+I to open it directly. The Settings window opens with a list of categories down the left side.

- In the left sidebar, click Accessibility. The right side now shows accessibility options.
- Scroll down on the right and click Visual effects.
- Find the setting called Dismiss notifications after this amount of time.
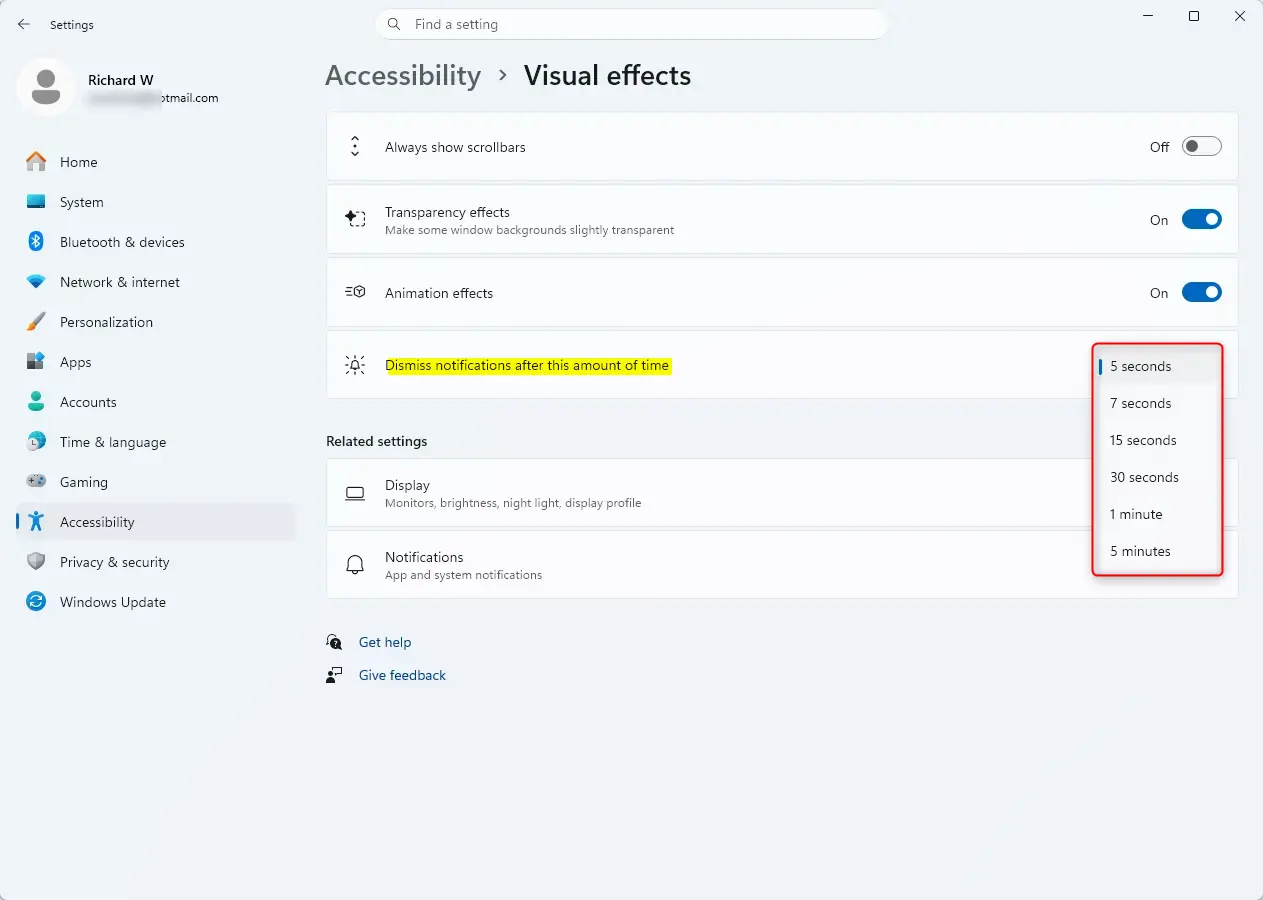
- Click the dropdown menu next to this setting. The choices range from 5 seconds up to 5 minutes.
- Select the amount of time that suits you. Windows saves the choice right away. There is no Apply button and you do not need to restart.
If the setting seems to have no effect, remember that it only applies to banners. Alerts that are set to stay until you act on them, such as some calendar reminders, follow their own rules.
Method 2Fine-Tuning Individual App Alerts
Fine-tuning individual app alerts in Windows 11 lets you turn off pop-up banners for specific programs while keeping them turned on for others. Open Settings , click System, and select Notifications. Scroll through your app list and click any app name to change whether it shows banners, plays sounds, or sends alerts straight to your Notification Center.
Click on System in the left sidebar, then click on Notifications on the right.
At the top, make sure notifications are turned on.
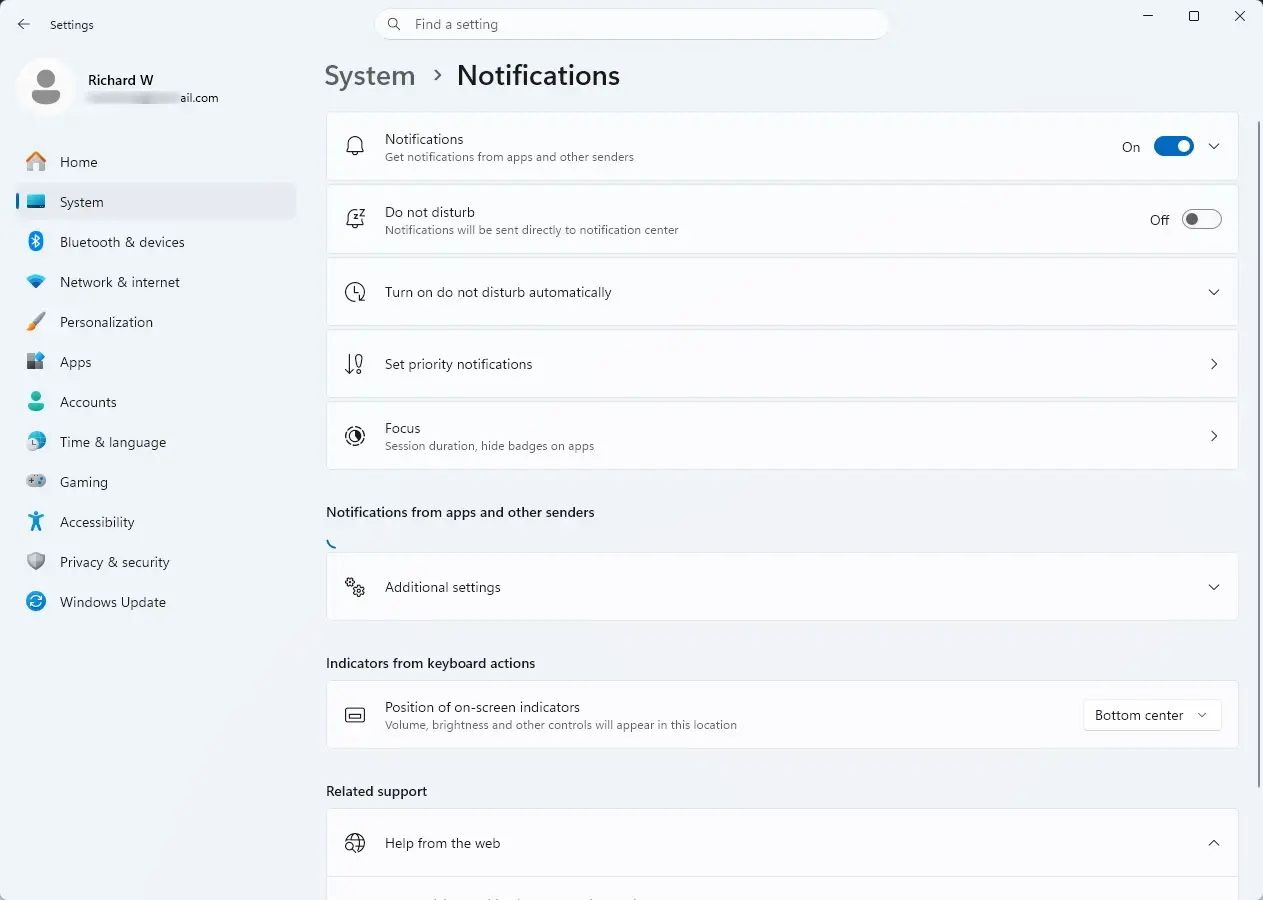
Scroll down to the list labeled Notifications from apps and other senders.
To stop a specific app from showing too many pop-ups on your screen, you must first open the Windows 11 Settings app, click on System, and then select Notifications. In the notifications list, find the app that bothers you and click the small arrow next to that app name. Expanding this app menu lets you change settings like banner timeout duration so notifications disappear faster and stop interrupting your work.
Uncheck the box for Show notification banners.
When you turn off banners for an app, its messages will still go straight to your Action Center without popping up and blocking your screen.

Unique Angle: Managing Focus Sessions and Do Not Disturb
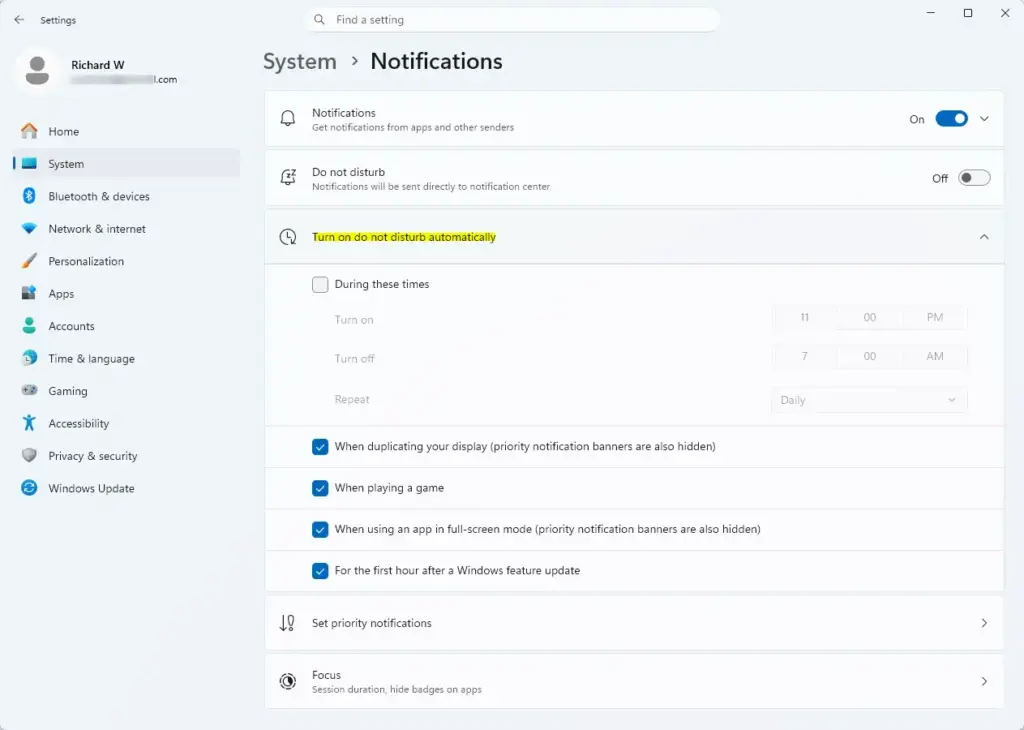
Do Not Disturb hides pop-up banners so you can work without interruptions. While it is on, incoming alerts go straight to the notification center without a banner or a sound. You can read them later.
- Click the clock and date in the bottom-right corner of the taskbar. The notification center opens, with your notifications above a calendar.
- Click the bell icon at the top of the flyout to switch Do Not Disturb on. Click it again to switch it off.
The exact layout of this flyout varies a little between Windows 11 versions. On older builds, the Do Not Disturb toggle sits in Quick Settings or in the notifications settings instead of the calendar flyout.
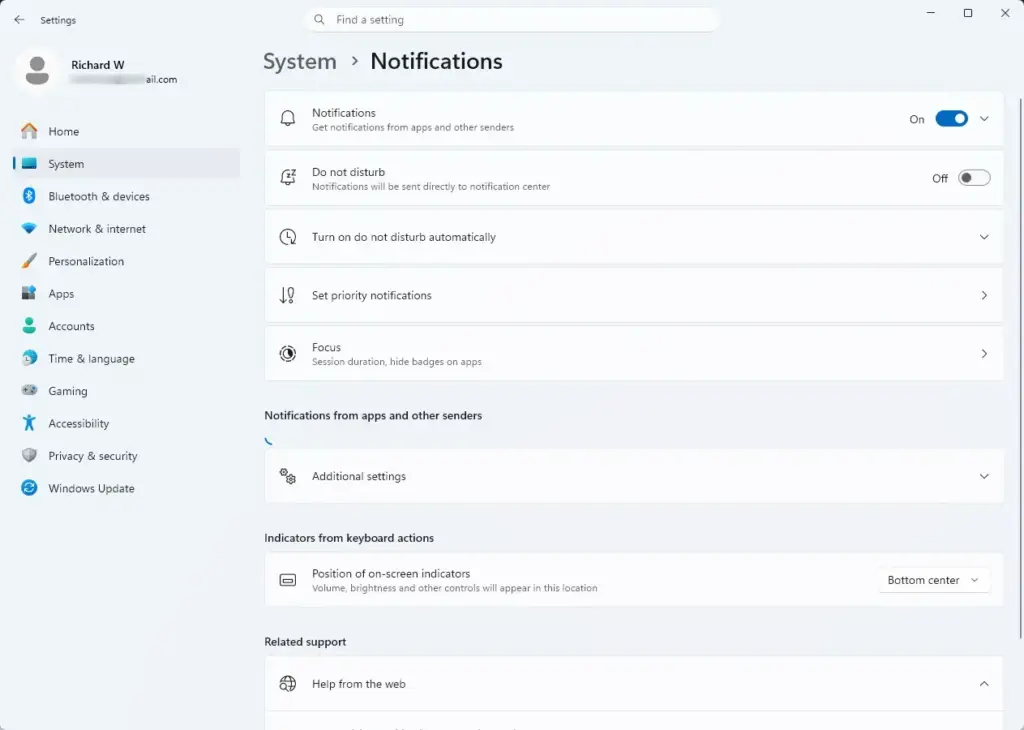
You can also have Do Not Disturb switch on by itself. Go to Settings, then System, then Notifications. Look for the automatic rules, such as turning it on when you play a game or duplicate your display. The exact list of rules depends on your Windows 11 version. Windows has no built-in clock schedule for Do Not Disturb. If you want quiet hours at a set time, start a focus session instead (see below).
To silence a single app instead of everything, stay on the Notifications page and turn off the toggle next to that app in the list. This is the way to stop alerts from one noisy app without losing the rest.
Unique Angle: Using Focus Assist Rules for Better Productivity
Focus sessions hide distractions for a set time. They suit tasks like watching videos or writing documents. Open Settings, click System, and select Focus.
- Open Settings and go to System, then Focus.
- Set how long you want the session to last with the plus and minus buttons. The time on screen changes as you click.
- Turn on the options you want for the session. These include hiding taskbar badges and flashing taskbar icons, and turning on Do Not Disturb.
- Start the session. Focus sessions are tied to the Clock app, so if the option is missing, check that the Clock app is installed and up to date from the Microsoft Store.
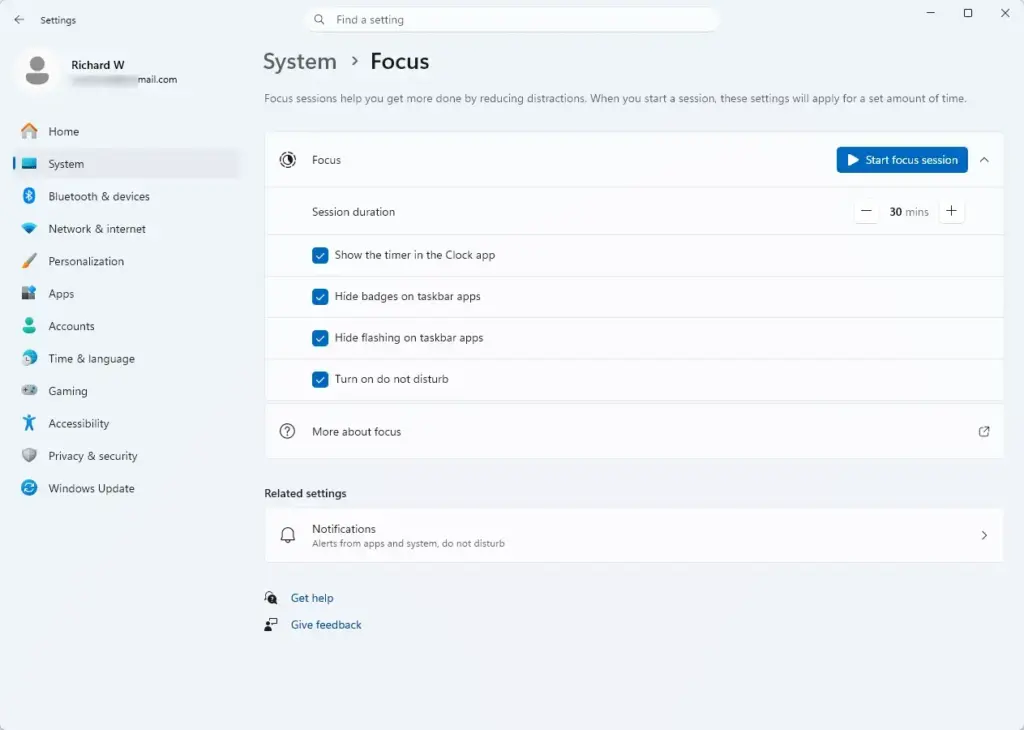
Once the session starts, Windows does the rest. It turns on Do Not Disturb, hides flashing taskbar badges, and clears pop-ups. You can end the session early from the Clock app or the notification center, and your normal notification behavior returns.
This keeps the screen quiet while you work, and you can catch up on missed messages afterwards at your own pace.
Summary
You can now change how long Windows 11 notification banners stay on screen, from five seconds up to five minutes, using the Accessibility settings. You have also seen how to turn off alerts for specific apps, use Do Not Disturb, and set up focus sessions to cut down on interruptions.
Have a question about this guide?
Answered by AI from this guide. Good questions may be added to this page — please don't include personal details.
Did this guide fix your problem?

About the Author
Richard
Tech Writer, IT Professional
Richard is a writer at Geek Rewind who turns complex IT tasks into clear, step-by-step guides. He draws on years of hands-on experience in system administration and enterprise IT operations, focusing on Windows, Linux and WordPress: the problems people actually run into, and the fixes that work. His server and WordPress guides come from systems he runs himself. Richard builds and maintains the platform behind Geek Rewind, from its Ubuntu servers and Nginx configuration to its custom WordPress plugins. Many new tutorials start with readers' questions, and he's always glad to answer them in the comments.
No comments yet — be the first to share your thoughts!