How to block notification banner popups in Windows 11 Privacy and security Notifications
Notification banners are the alerts that slide in at the bottom right of your screen when an app, a website or Windows itself has something to tell you. In Windows 11 you can stop these popups from the Settings app and still keep a record of past alerts in the notification center. You can block everything at once, or only the apps and sites that annoy you.
Advertisement
To review your alerts, press Win+N or click the date and time at the far right of the taskbar 🖥️. This opens the notification center. Click the X on an alert to dismiss it, or use the clear all option to empty the list. Dismissing an alert does not change any setting, so the same app can still show new banners later.
⚡ Quick Answer
Open Settings›System›Notifications and set the main Notifications switch to Off to disable all notification banners. To silence only specific apps, scroll to Notifications from apps and other senders, expand an app, and uncheck Show notification banners. Changes take effect immediately.
Advertisement
Configure notifications
The settings ⚙️ below stop banners from appearing while apps keep running normally in the background. Nothing is uninstalled, and you can reverse any change by switching the same setting back on. Every option here is under Settings›System›Notifications, except the pop-up ad and browser sections near the end.
Turn notifications on or off
💡TipThe quickest fix is the main toggle switch for notifications.
It stops all banners and sound alerts from every app at once, so you get a clean desktop without configuring each app. The catch is that you will also miss alerts you may want, such as calendar reminders or security warnings. If that worries you, use the per-app method in the next section instead.
Press Win+I to open Settings. Windows 11 Start menu with Settings gear icon highlighted.
Select System from the left sidebar.
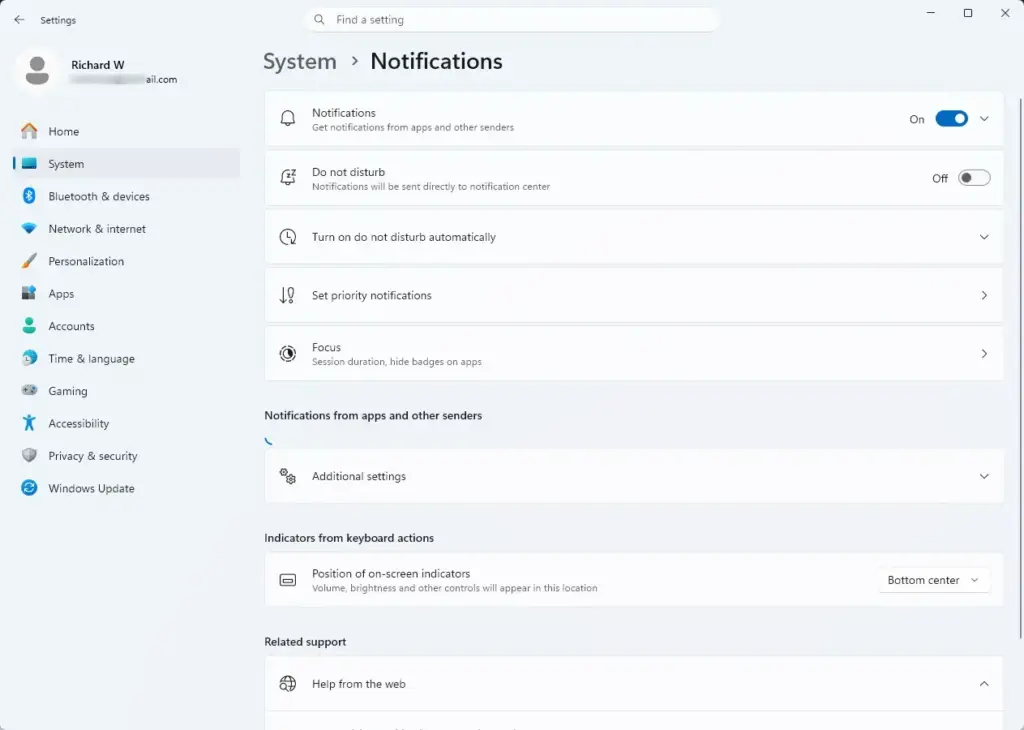
Click Notifications. Settings › System › Notifications You should see the main Notifications switch at the top of the page, with your app list below it.
Set the main Notifications switch to Off to disable alerts completely.
If you would rather keep the switch on, click the small arrow next to it. This expands extra options, including those for showing notification banners and playing sounds. Uncheck the ones you don’t want. The exact list of options can differ a little between Windows 11 versions.
No restart is needed, and the change takes effect straight away. To undo it, set the switch back to On. Your per-app settings are kept while the main switch is off.
Configure notification settings for each app
If only a few apps are the problem, silence those and leave the rest alone. When you turn off banners for an app, it can still log its messages in the notification center, so you can check them when it suits you.
Advertisement
Open Settings.
Select System.
Click Notifications. Settings › System › Notifications
Scroll down to the Notifications from apps and other senders section. Only apps that have sent a notification at least once appear here, so a new app may not be listed yet.
Find the app you want to silence in the list.
Click the arrow next to the app name to expand its options.
Uncheck Show notification banners. The popups stop, but the app can still log messages in your notification center.
If you want an app to be completely silent, switch off the toggle beside its name instead. To undo either change, switch it back on or tick the box again.
Additional Settings
Windows also shows some alerts of its own, such as the welcome screen after an update and tips on getting more out of Windows. They are easy to switch off, and doing so cuts a good deal of clutter.
Open Settings.
Select System.
Click Notifications. Settings › System › Notifications
Scroll to the bottom of the page and expand the Additional settings dropdown.
Uncheck the options for showing the welcome experience after updates and for suggesting ways to get the most out of Windows.
These changes also apply immediately. To bring the tips back, tick the same boxes again.
Do not disturb
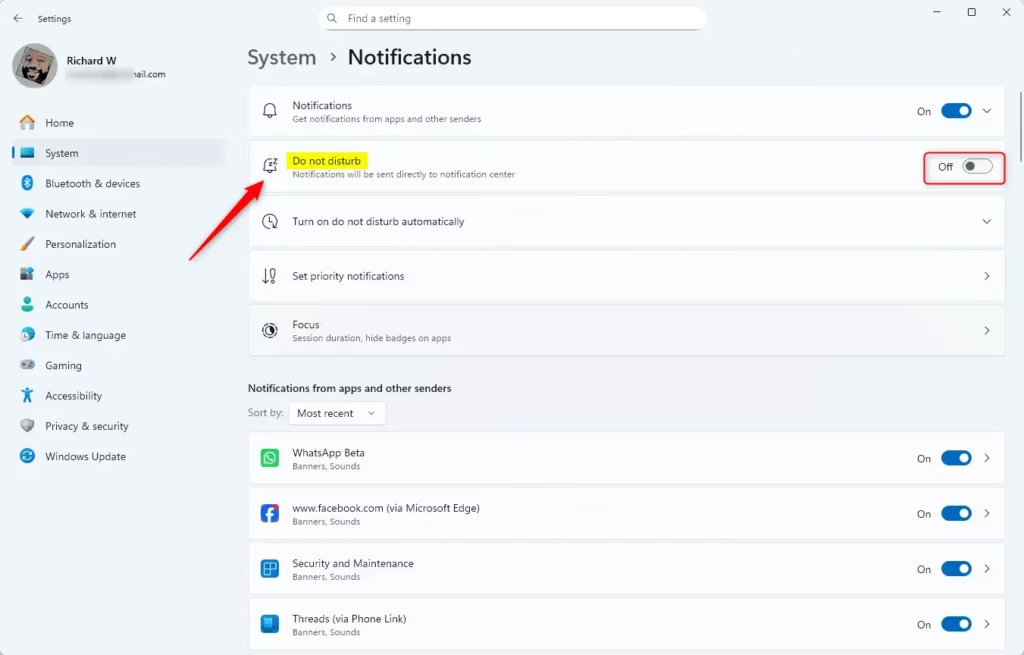
Do Not Disturb is a quick mode that silences notification banners so they don't flash on your screen. Alerts that arrive while it is on still go to the notification center, so you can read them later.
Advertisement
Configure do not disturb
You can switch Do Not Disturb on and off by hand from the notification center, or set rules so it turns on by itself when you need it. Use the manual switch for short, one-off breaks such as a meeting or a presentation. Use the rules below for situations that come up regularly.
Turn on do not disturb automatically
Automatic rules keep your screen clear without you having to remember to turn Do Not Disturb on. You can have Windows enable it when you duplicate your display, play a game, or use an app in full-screen mode. The last of these covers most videos and slideshows.
Open Settings.
Select System.
Click Notifications.
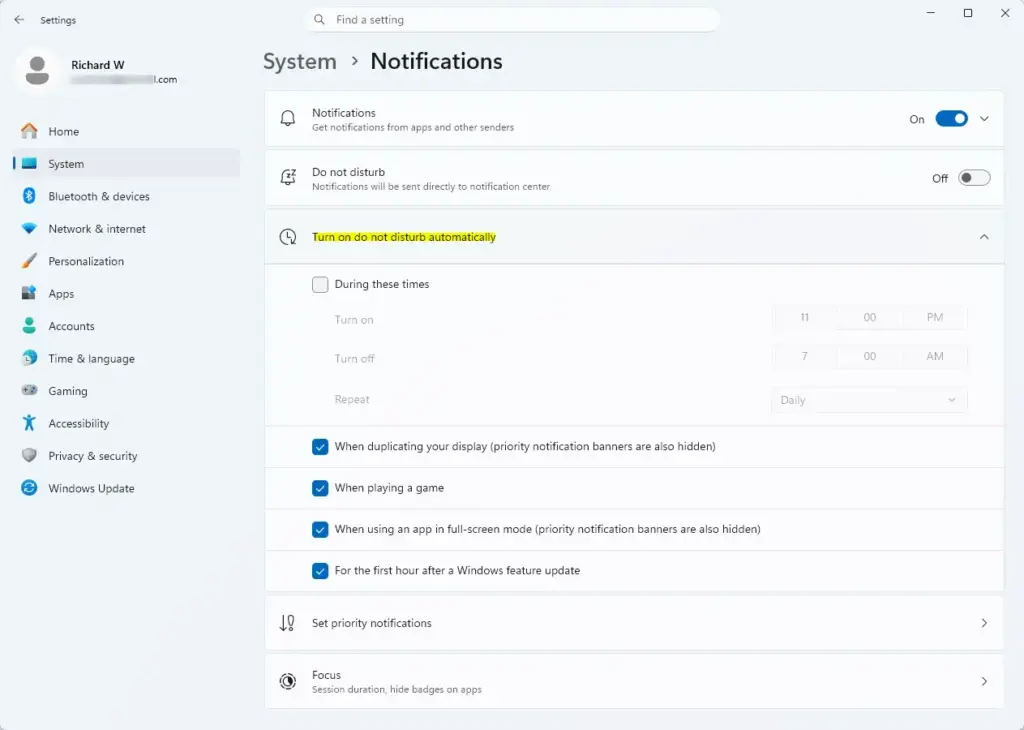
Click Do not disturb to expand its settings. Settings › System › Notifications › Turn on do not disturb automatically
Under Turn on do not disturb automatically, check the boxes for the situations you want: duplicating your display, playing a game, or using an app in full-screen mode.
📝Good to KnowDo Not Disturb switches off again on its own when the situation ends.
If a rule is missing from your Settings page, your Windows 11 build may be older. Run Windows Update, as Do Not Disturb replaced Focus assist in newer releases. To undo any rule, untick its box.
Set priority notifications
Priority notifications let important alerts through even while Do Not Disturb is on. You choose the apps and people allowed to bypass it, so urgent messages and calls still reach you.
Advertisement
Open Settings.
Select System.
Click Notifications.
Click Do not disturb.
Expand the Set priority notifications section.
Add the apps or people whose alerts should get through. Keep the list short, since every app you add can interrupt you again.
To remove an entry later, return to this section and take it off the list.
how do I stop pop up ads on 🪟 Windows 11
Pop-up ads that look like Windows messages usually don't come from Windows. They often come from a program you installed recently, sometimes bundled with other software, or from a website you allowed to send notifications. Start by checking your installed apps. The browser steps follow in the next sections.
Press Windows Key + I to open Settings.
Select Apps from the left sidebar.
Click Installed apps. You should see a list of everything on the PC. If you want to find recent additions quickly, sort the list by install date.
Look for software you don't recognise or don't remember installing. Search for the name online if you are unsure, and leave anything that looks like a Windows or driver component alone.
Click the three dots next to the suspicious app and select Uninstall, then confirm any prompt.
Check whether the ads stop afterwards. If they continue, the source is probably a website in your browser, so continue with the next sections.
Manage website notifications in Microsoft Edge
Some websites trick people into clicking Allow on a notification prompt, then send banners that mimic system alerts or virus warnings. Real Windows and antivirus alerts never need a website's permission. You can block these sites inside the browser.
Advertisement
How to stop website notifications in Microsoft Edge
To stop web pages from pushing notifications to your desktop, change the permissions in your browser. The steps below are for Microsoft Edge. Other browsers have a similar notification permission in their own settings.
Remove or block notifications in Edge settings
Edge keeps a list of the sites you have allowed or blocked. Removing a site from the allow list is the quickest way to clear out annoying alerts you agreed to by mistake.
Open Microsoft Edge.
Click the Settings and more button (three horizontal dots) in the upper right corner of the window.
Click Settings in the drop-down menu.
Select Cookies and site permissions from the left sidebar.
Under All permissions, click Notifications. You should see lists of allowed and blocked sites.
Review the Allow list. Click the three dots next to any unwanted website and select Remove or Block. Block is the safer choice, because it stops the site from asking again.
If you choose Remove, the site can ask for permission the next time you visit it. To undo a block, open the same list and remove the site from the Block list.
Manage notifications from your browser address bar
If you are already on the site that is sending alerts, you can block it directly from the address bar without opening the full settings page.
Advertisement
Open Microsoft Edge and go to the website sending the alerts.
Click the View site information icon to the left of the web address. It may look like a padlock, tuning sliders, or a warning symbol.
Click Permissions for this site.
Find Notifications in the list and change its drop-down menu to Block.
The site can no longer send banners to your desktop. To allow it again, return to the same menu and change the setting back.
How do I stop notification banner popups from appearing in 🪟 Windows 11?
To block notification banner popups, open Settings, go to System and select Notifications. Turn off the main switch to stop all alerts. Or expand individual app listings and uncheck Show notification banners, which stops the popups while keeping your notification center history. For ads that look like system messages, also check your installed apps and your browser's notification permissions.
Was this guide helpful?
100% of readers found this helpful (1 votes)
📬 Get new Windows tips in your inbox
One email when we publish something worth your time. No spam, unsubscribe anytime.
Richard is a writer at Geek Rewind who turns complex IT tasks into clear, step-by-step guides. He draws on years of hands-on experience in system administration and enterprise IT operations, focusing on Windows, Linux and WordPress: the problems people actually run into, and the fixes that work.
His server and WordPress guides come from systems he runs himself. Richard builds and maintains the platform behind Geek Rewind, from its Ubuntu servers and Nginx configuration to its custom WordPress plugins.
Many new tutorials start with readers' questions, and he's always glad to answer them in the comments.
One email when we publish a guide worth your time — new Windows features, the fixes that actually
work, and a heads-up when Microsoft breaks something. Unsubscribe in one click.
📬 Get new Windows tips in your inbox
One email when we publish something worth your time. No spam, unsubscribe anytime.



No comments yet — be the first to share your thoughts!