How to Disable the Bluetooth Power Saving Feature in Windows 11

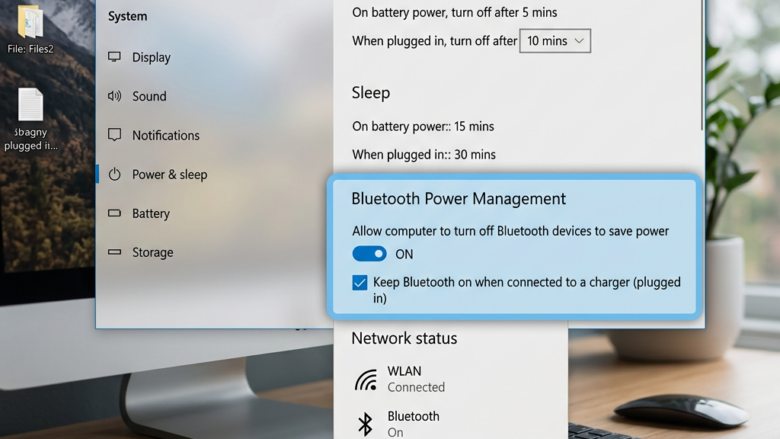
Open Device Manager, find your Bluetooth adapter under the Bluetooth category, right-click it and click Properties, then go to the Power Management tab and uncheck Allow the computer to turn off this device to save power. Bluetooth stays powered and connected devices no longer drop out.
Stop Bluetooth Dropouts by Changing Power Settings
Windows 11 can turn off your Bluetooth adapter to save power. When it does, connected devices such as mice, keyboards and headphones drop out. The mouse stops moving, or audio cuts off until the adapter wakes up again.
The fix is one power setting in Device Manager. Once you turn it off, Windows keeps the adapter powered and your devices stay connected. On a laptop, battery life may drop slightly. You can reverse the change at any time.
Device Manager lists the hardware installed in your PC. You can use it to check a device’s status, update or roll back its driver, or disable it. Here you will use it to find your Bluetooth adapter and open its power settings.
If you are not, Windows may ask for an administrator password before it lets you save changes.
Step 1Open Device Manager
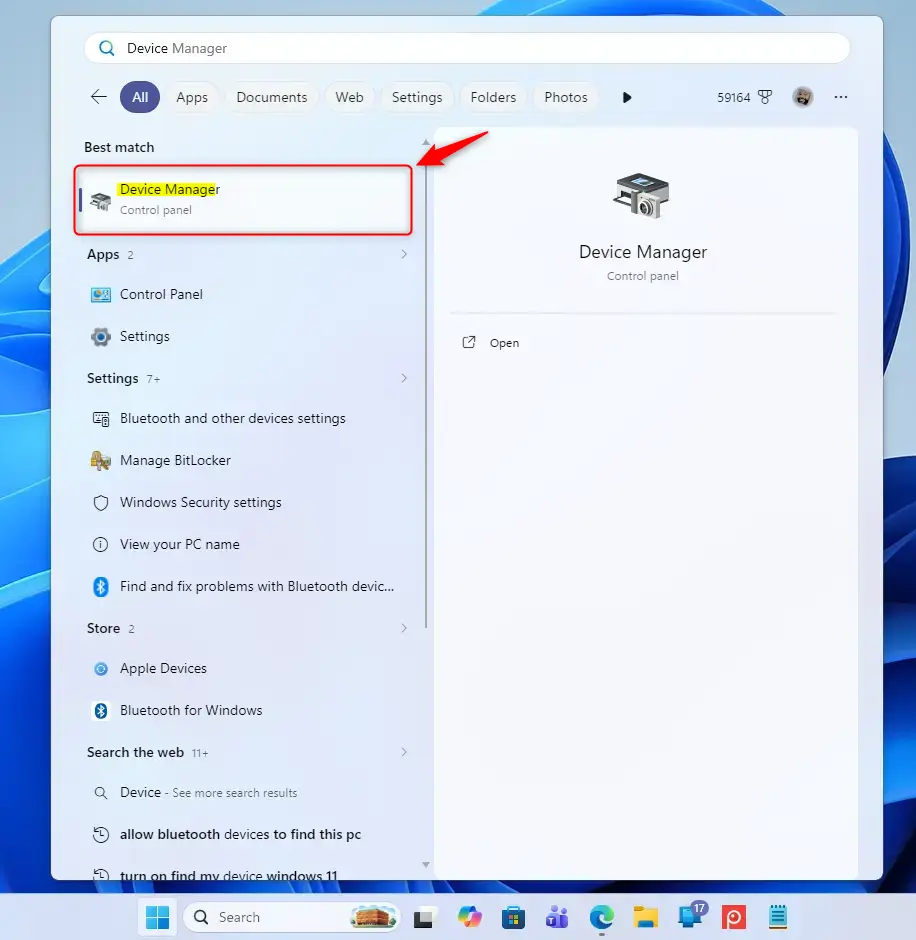
There are a few ways to open Device Manager. The most direct is to search for it from the Start menu , and the next three steps show how. You can also right-click the Start button and pick Device Manager from the menu that appears.
Click the Start button. It sits on the taskbar , in the bottom-left corner by default. If you have centered your taskbar icons, it is the Windows logo in the middle of the taskbar. The Start menu opens.
Type Device Manager straight away. The Start menu turns your typing into a search, so you do not need to click a search box first. Do not press Enter yet.
As you type, matching results appear in the list. Click Device Manager when it shows up, usually as the top result under "Best match". The Device Manager window opens with a list of hardware categories.
Step 2Find Your Bluetooth Device
Your Bluetooth adapter is listed under its own category in Device Manager. Expand that category to see the adapter by name. The next two steps cover how.
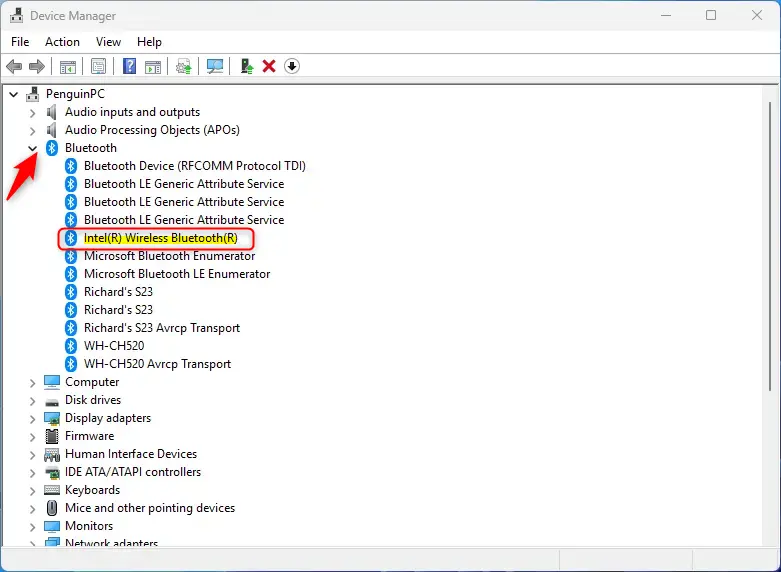
Scroll through the list of hardware categories and find Bluetooth. On some PCs the category may carry a similar name, such as "Bluetooth radios".
If you cannot find it, check the category called Other devices. A missing driver can leave the adapter there with a yellow warning icon. Also confirm Bluetooth hardware is actually present and not turned off in your PC's BIOS or by a hardware switch. A desktop without a Bluetooth adapter will have no Bluetooth category at all.
Click the small arrow next to Bluetooth to expand the category. The entries beneath it are your Bluetooth adapter and any paired Bluetooth devices.
The adapter usually has a name that includes the chip maker, for example "Intel(R) Wireless Bluetooth(R)" or a Realtek or MediaTek name. Entries that look like "Generic Bluetooth Adapter" also count. Pick the adapter, not the individual paired devices such as a headset or a mouse.
Step 3Access Power Management Settings
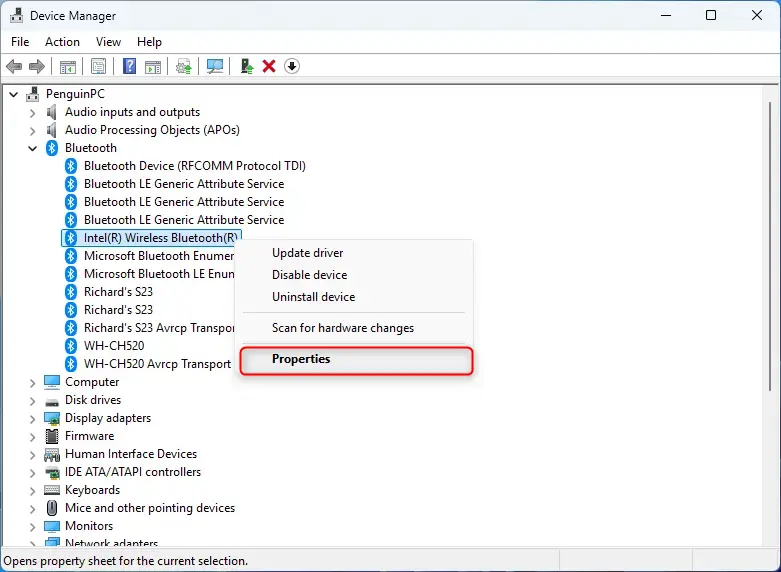
A context menu appears with options such as Update driver, Disable device and Properties. Be careful not to click Disable device or Uninstall device, because that would switch Bluetooth off or remove the driver.
Click Properties in the menu. A new window opens with several tabs along the top, such as General, Advanced, Driver, Details and Events.
Click the Power Management tab. The tab shows the power options for this adapter.
If the tab is missing, the adapter's driver does not expose power settings. This happens with some drivers and some virtual or generic adapters. In that case, check that you picked the actual adapter. Then try installing the latest Bluetooth driver from your PC or adapter manufacturer.
Step 4Turn Off Energy Saving
On the Power Management tab, you will see a checkbox labeled Allow the computer to turn off this device to save power. It is normally ticked by default. Clear it to stop the dropouts.
- Look at the checkbox on the Power Management tab.
- Click it to remove the tick.
The box should now be empty. If the checkbox is greyed out, close the window and reopen Device Manager. If it is still greyed out, sign in with an administrator account and try again.
With the box cleared, Windows no longer switches off the adapter to save power. Your wireless mouse, keyboard or headphones should hold their connection steadily instead of dropping out when the PC decides the adapter is idle.
In short, clearing Allow the computer to turn off this device to save power tells Windows to keep the Bluetooth hardware powered at all times. The cost is a small amount of extra battery use on laptops. If you decide you prefer the saving, come back to this tab and tick the box again to undo the change.
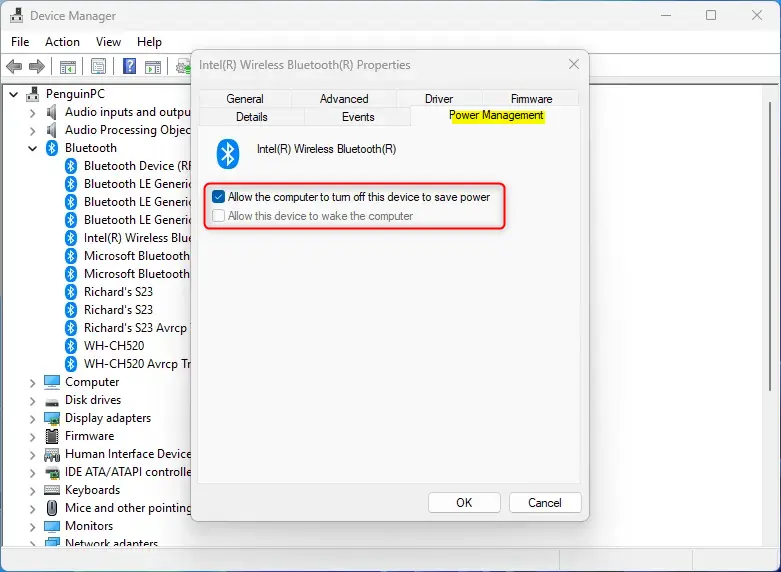
Click the OK button at the bottom of the Properties window to save your changes. The window closes. You normally do not need to restart. If a device still drops out, turn Bluetooth off and on again, or restart the PC once, then test it for a while.
Reference:
Summary
Major Windows feature updates or driver reinstalls can reset this power management setting. If your Bluetooth devices start dropping connections again, open the adapter's Power Management tab and check that the box is still clear.
If the setting is correct and the dropouts continue, look for updated Bluetooth drivers from your hardware manufacturer. An outdated or generic driver is a common cause of unstable connections.
Was this guide helpful?

About the Author
Richard
Tech Writer, IT Professional
Richard is a writer at Geek Rewind who turns complex IT tasks into clear, step-by-step guides. He draws on years of hands-on experience in system administration and enterprise IT operations, focusing on Windows, Linux and WordPress: the problems people actually run into, and the fixes that work. His server and WordPress guides come from systems he runs himself. Richard builds and maintains the platform behind Geek Rewind, from its Ubuntu servers and Nginx configuration to its custom WordPress plugins. Many new tutorials start with readers' questions, and he's always glad to answer them in the comments.




… liked this!