How to Lock and Unlock OneDrive Personal Vault in Windows 11
OneDrive Personal Vault locks and unlocks to protect your most sensitive files in Windows 11.
Personal Vault is a special folder in your OneDrive cloud storage that’s locked by a password. You need to prove your identity an extra time to get into it, on top of signing into your Microsoft account.
This keeps your private papers hidden and safe, even if someone gets into your Microsoft account. For instance, Personal Vault locks itself after you haven’t used it for a while or when you close the OneDrive app on Windows 11. You then have to prove who you are again to see your files.
Unlock your OneDrive Personal Vault by double-clicking its icon in File Explorer and verifying your identity with PIN, fingerprint, or Microsoft Authenticator. Alternatively, click the OneDrive cloud icon on your taskbar, then the gear icon for Settings, and select Unlock Personal Vault.
How to Unlock OneDrive Personal Vault
Unlocking OneDrive Personal Vault is straightforward using File Explorer on your Windows 11 computer.
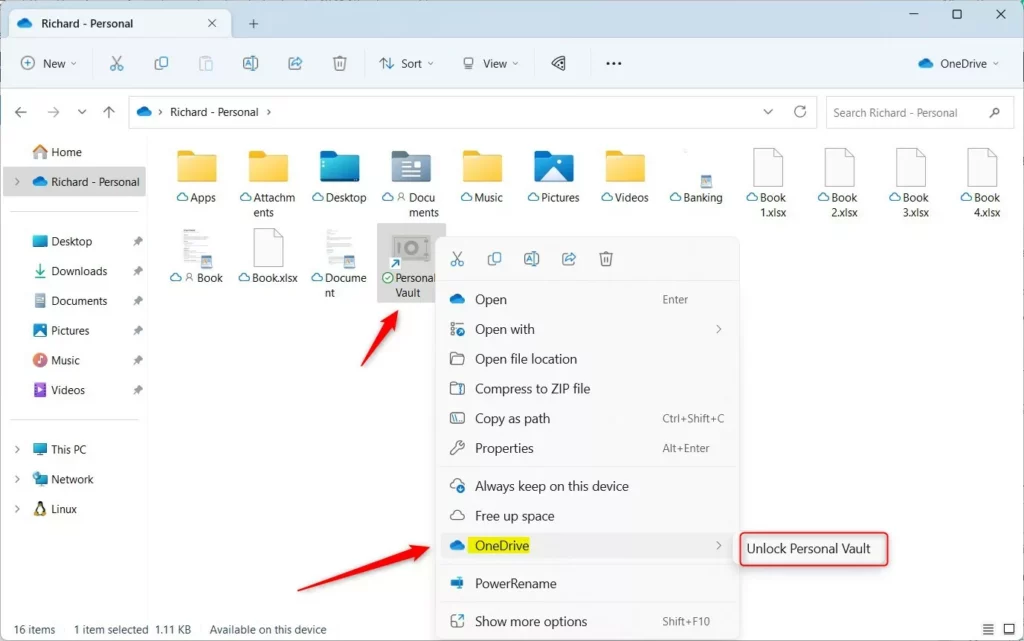
Using File Explorer
Using File Explorer
Open File Explorer and go to your OneDrive folder. Then, right-click the Personal Vault icon. From the menu that appears, select OneDrive, and then choose Unlock Personal Vault.
Using the Taskbar Menu
Using the Taskbar Menu
Click the OneDrive cloud icon that’s on your taskbar. If the vault is locked, click the gear icon for Settings and select Unlock Personal Vault.

Troubleshooting and Error Handling
If your OneDrive Personal Vault isn’t showing up, begin by checking if your OneDrive app is up to date.
Configuration and Security Settings
You can manage how your vault behaves. To change the auto-lock timer, open the OneDrive settings menu. Navigate to the Account tab. Look for the Personal Vault section. You can adjust the inactivity timeout duration there. Note: Changing system-wide security policies may require admin privileges.
Summary
Your OneDrive Personal Vault keeps your private files safe using security steps like Windows Hello or two-factor authentication.
Why does my Personal Vault keep locking automatically?
Your Personal Vault locks after a period of inactivity as a security measure to protect your files. You can adjust the auto-lock timer in OneDrive settings, but it will always lock if your computer is left idle for an extended period.


No comments yet — be the first to share your thoughts!