How to Use Voice Focus in Windows 11 for Clearer Audio

Voice Focus in Windows 11 is a built-in noise-cancelling feature. It reduces background sounds such as traffic, barking dogs and fan hum while you talk into a microphone. It sits inside Windows Studio Effects and uses AI running on a compatible Neural Processing Unit (NPU) to isolate your voice during video calls, voice chats and audio recordings.
You can turn it on in a few clicks from Quick Settings on the taskbar or from the Settings app. The switch is the same on Windows 11 Home and Pro. What matters is your hardware: if your PC has no supported NPU, the option may not appear at all.
Enable Voice Focus in Windows 11 via Quick Settings (Win+A, then Studio effects) or the Settings app (Win+I, System, Sound, select microphone). Choose “On” to always use it, “Automatic” for Windows to manage, or “Off” to disable.
What is Voice Focus?
Voice Focus is a noise-reduction feature that cuts out background sounds like traffic, fans and keyboard clicks during calls and recordings. The people you talk to hear you more clearly because the unwanted room noise is filtered out before your voice reaches the call or recording app.
How it works depends on your PC. Some machines use software-based noise reduction. Newer machines with an NPU, including Copilot+ PCs, can use AI for stronger noise cancellation. Either way, the goal is cleaner audio.
Before you look for the setting, keep three things in mind:
- The Studio Effects controls, including Voice Focus, only show up on PCs with supported hardware. If you can’t find them, your PC probably doesn’t have it.
- Updating Windows and your device drivers (Settings Windows Update ) often brings the controls back after a feature update.
- Turning Voice Focus on or off does not need a restart. The change applies right away, and you can reverse it at any time.
Option 1Use Quick Settings
Quick Settings is the fastest route. You can switch Voice Focus on or off from the taskbar without opening the full Settings app .
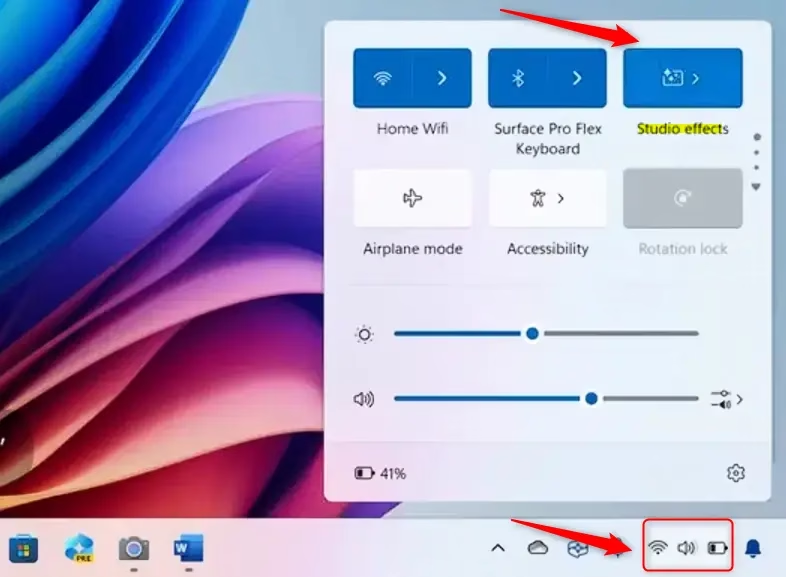
- Open Quick Settings. Press Windows key + A. A panel slides out from the right side of the screen with controls for Wi-Fi, Bluetooth, sound and more. You can also click the cluster of network, volume and battery icons at the right end of the taskbar.
- Find the Studio effects button. Look for a tile named Studio effects. This tile controls features like Voice Focus, and its icon may look like a magic wand or sparkle.
- Add the tile if it is missing. If you don't see it, click the pencil icon at the bottom of the panel to edit your Quick Settings buttons. Click Add and check whether Studio effects is in the list. If it is, select it, then click Done. If it isn't in the list, your PC doesn't support Windows Studio Effects.
- Open the Studio effects menu. Click the Studio effects tile. A small menu appears with the effects your PC supports. The microphone option is Voice Focus.
- Turn Voice Focus on or off. Click the Voice Focus toggle. When it is on, it is highlighted or shows a checkmark. When it is off, it is greyed out or unchecked.
To undo the change, open the same menu and click the toggle again. If your PC has a camera that supports Studio Effects, you will also see camera effects in this menu. They are separate from Voice Focus, so leave them as they are if you only want noise reduction.
Option 2Use the Settings App
Use the Settings app when you want more control, such as choosing which microphone gets noise reduction or setting Voice Focus to Automatic. The steps below follow Windows 11 as it appears on supported PCs. Labels can differ slightly between builds and drivers.
- Open the Settings app. Press Windows key + I. Or click the Start button and then the gear icon for Settings. The Settings window opens.
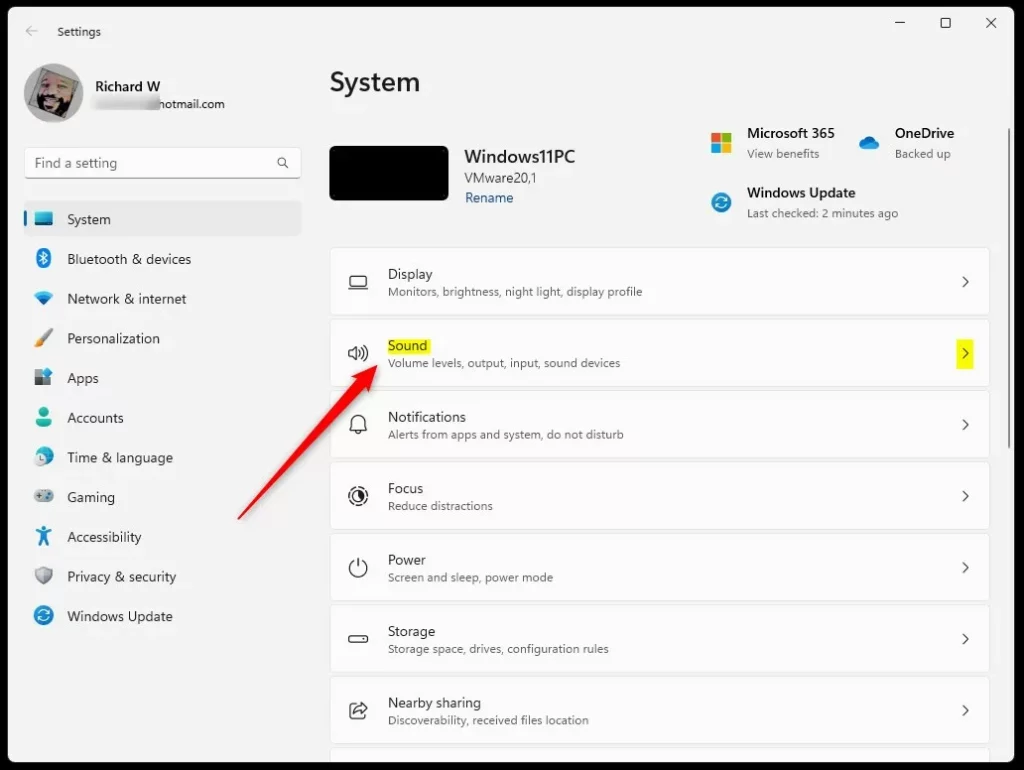
- Go to Sound settings. Click System on the left, then click Sound on the right. You will see your output devices at the top and your input devices further down.
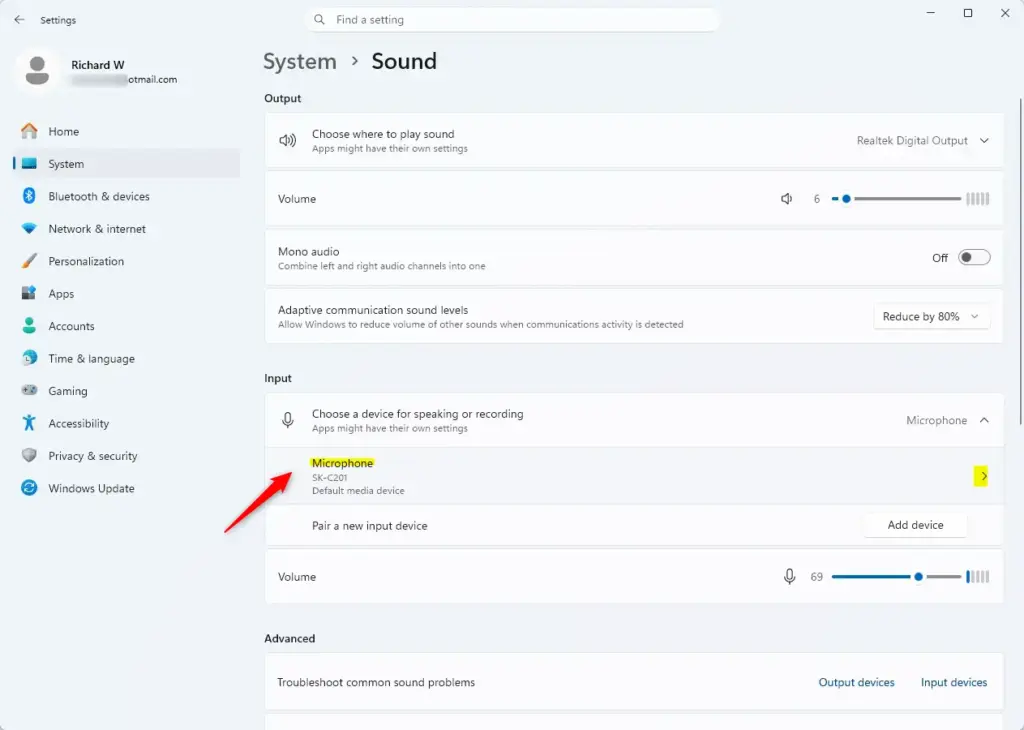
- Choose your microphone. Under Input, click the microphone you want to use. This could be your laptop's built-in mic, a headset mic or an external microphone. The choice decides which device gets background noise reduction. Clicking it opens that microphone's properties.
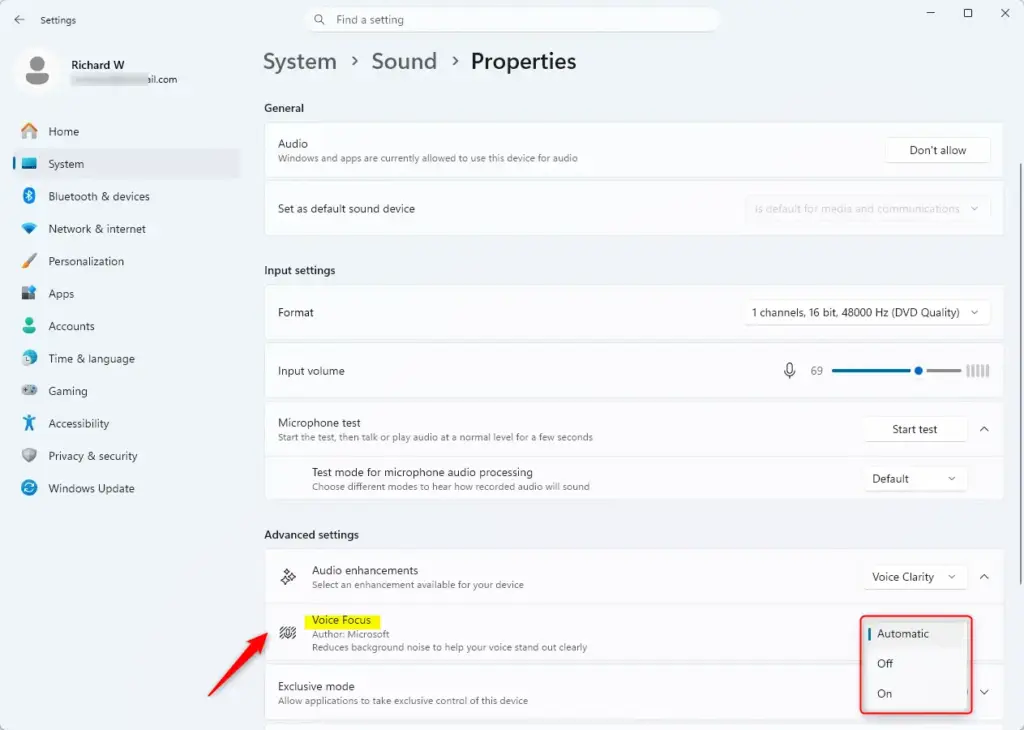
- Set Voice Focus. In the properties for that microphone, look for the Voice Focus setting. If you don't see it, check the audio enhancements options on the same page. The setting reduces background noise during voice calls. You will usually see these options:
- Automatic (default): Windows decides when to use Voice Focus.
- Off: Voice Focus is not used.
- On: Voice Focus is always active for this microphone.
- Pick the option you want. Select On to keep it active at all times, Automatic to let Windows manage it, or Off if you don't want noise cancellation.
- Close Settings. Close the window. Your changes are saved automatically.
If Voice Focus doesn't appear for a microphone, it may not be supported for that device. Switch to your built-in microphone and check again. Some apps, such as video-call apps, also have their own noise suppression setting in their audio options. If your voice sounds odd, try using only one noise filter at a time.
Summary
Voice Focus improves your microphone audio on calls by blocking background noise. You can turn it on in two ways:
- For quick changes, press Windows key + A and use the Studio effects tile.
- For lasting adjustments and per-microphone control, press Windows key + I and go to System Sound
If neither shows the option, your PC may lack the hardware for it. Check for driver and Windows updates before assuming that.
Have a question about this guide?
Answered by AI from this guide. Good questions may be added to this page — please don't include personal details.
Did this guide fix your problem?

About the Author
Richard
Tech Writer, IT Professional
Richard is a writer at Geek Rewind who turns complex IT tasks into clear, step-by-step guides. He draws on years of hands-on experience in system administration and enterprise IT operations, focusing on Windows, Linux and WordPress: the problems people actually run into, and the fixes that work. His server and WordPress guides come from systems he runs himself. Richard builds and maintains the platform behind Geek Rewind, from its Ubuntu servers and Nginx configuration to its custom WordPress plugins. Many new tutorials start with readers' questions, and he's always glad to answer them in the comments.
No comments yet — be the first to share your thoughts!