How to Stop Manufacturer Apps Installing in Windows 11

- 3 ways to do it
- Needs administrator rights
- Group Policy needs Windows 11 Pro, Enterprise or Education
- Includes a restart or sign-out
When you connect new hardware, such as a graphics card, monitor, or printer, Windows 11 can automatically download the manufacturer’s companion app. Most people never asked for these apps, and they add startup entries, background services, and tray icons.
You can stop this in three ways. The Settings app works on every edition and is the quickest. The Local Group Policy Editor suits Pro, Enterprise, and Education. The Windows Registry works on every edition, including Home. Pick one method; you do not need all three.
Prevent automatic manufacturer app installations by going to Settings System About Advanced system settings Hardware tab > Device Installation Settings, then select “No.” Alternatively, use gpedit.msc to enable the “Prevent automatic download of applications associated with device metadata” policy.
Method 1Using the Windows Settings App
This method works on every edition of Windows 11, Home included. It changes your device installation settings so Windows no longer pulls down manufacturer apps and icons when you plug in hardware or run updates. You need an administrator account, or the password for one.
- Open Settings . Click the Start button, then click the Settings cog icon. You can also press the Win+I. The Settings window opens.
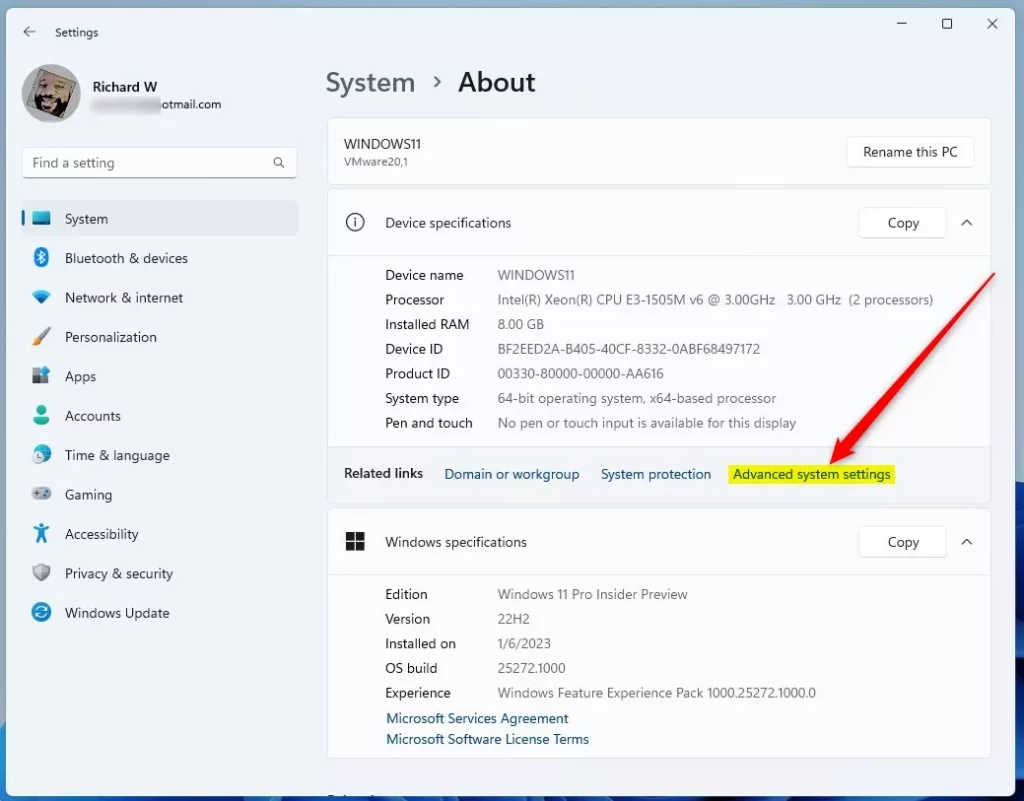
- Open the About page. Click System in the left sidebar, scroll down, and click About. The path is Settings System About, and you should now see your device specifications.
- Open Advanced system settings. Click Advanced system settings. In current builds it sits in the Related links row, next to the device specifications. The System Properties window opens.
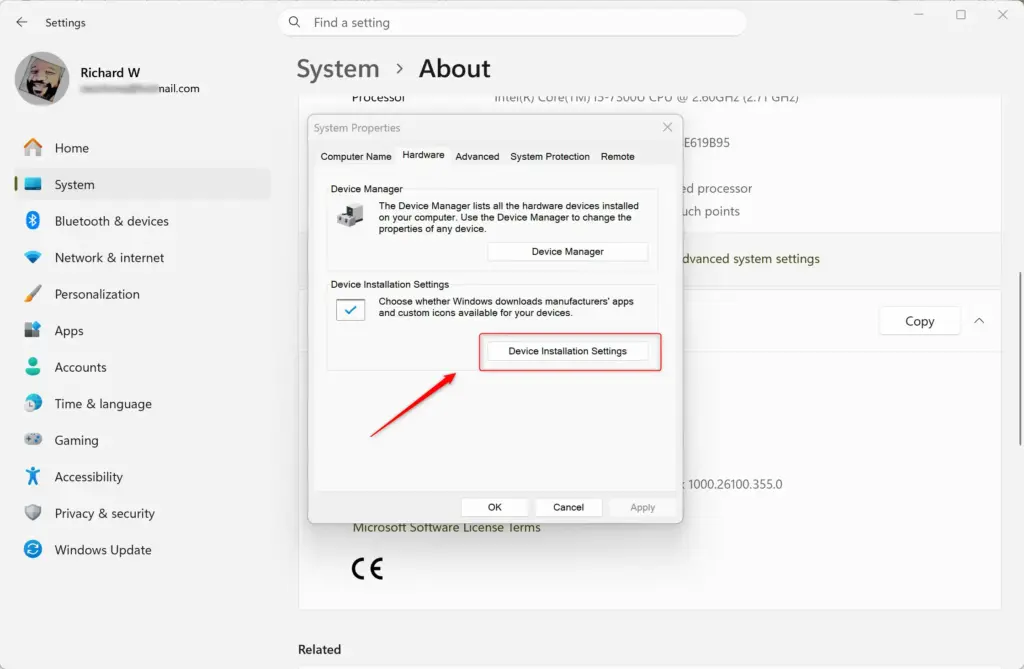
- Go to the Hardware tab. Click the Hardware tab at the top of the System Properties window.
- Open Device Installation Settings. Click the Device Installation Settings button. A small dialog opens with a question about downloading apps and icons.
- Choose not to install apps. The dialog asks: “Do you want to allow Windows to download inbox apps and manufacturer icons for your devices?” Select No (your device might not work as expected).
This stops unwanted programs from installing automatically. Windows Update will still install essential drivers in most cases. Some devices with extra features, such as RGB lighting or a custom button on a mouse, may need their app installed by hand afterwards.
- Save your changes. Click Save Changes at the bottom of the dialog.
- Confirm the changes. If a User Account Control prompt appears, click Yes. Then click OK to close the System Properties window.
If the options are greyed out or the dialog will not save, you are probably signed in with a standard account. Sign in as an administrator and try again. No restart is needed. To undo the change, open the same dialog and select the Yes option.
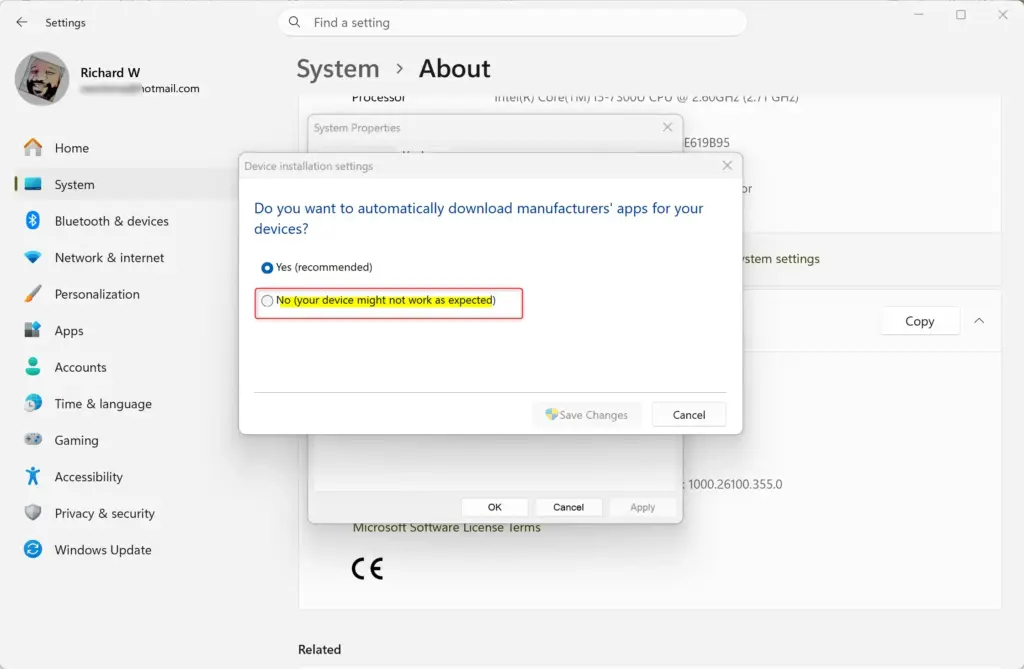
Once this is saved, Windows 11 should stop automatically downloading and installing companion apps from hardware manufacturers when you connect new devices. Apps that are already installed stay where they are, so remove those yourself in Settings Apps Installed apps.
Method 2Using the Local Group Policy Editor (🪟 Windows 11 Pro, Enterprise, Education)
The Local Group Policy Editor is a built-in tool for managing system settings. It is only available on Windows 11 Pro, Enterprise, and Education. On Home it is missing, so use the Settings method above or the Registry method below. A policy set here is stricter than the Settings option, because it applies a rule that blocks the downloads before they start.
- Open the Local Group Policy Editor. Click the Start button, type
gpedit.msc, then click the Run command result or press Enter. The Local Group Policy Editor window opens.💡TipThis tool changes many system settings that affect how Windows behaves.Only change the policy described here.
- Navigate to the correct policy folder. In the left pane, expand the folders in this order:
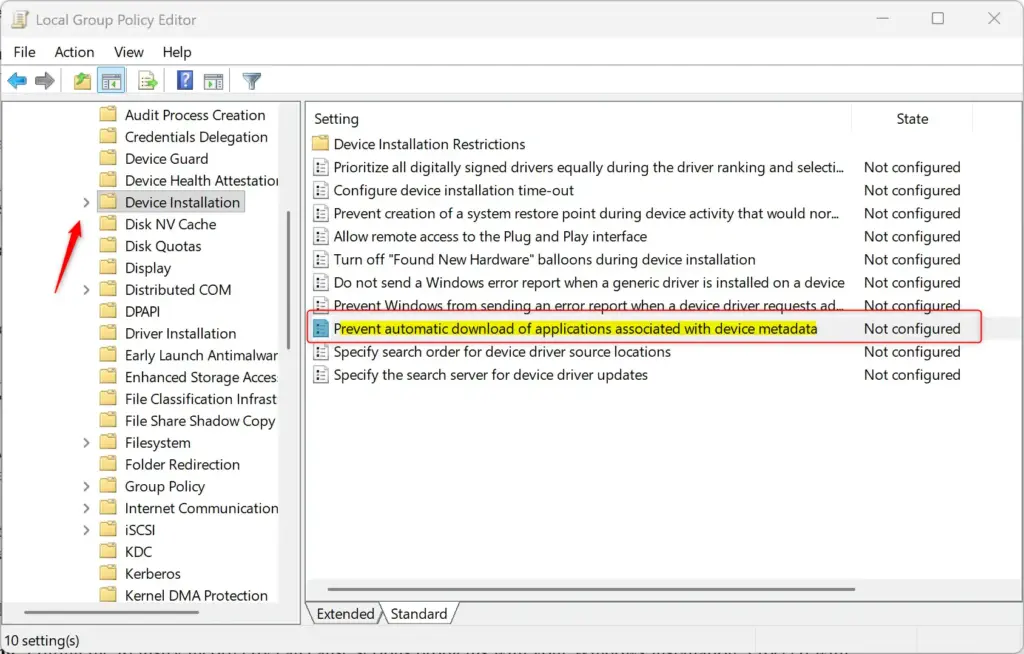
Computer Configuration>Administrative Templates>System>Device InstallationThe right pane now lists the policies in that folder.
- Find the policy setting. In the right pane, find Prevent automatic download of applications associated with device metadata and double-click it. The policy’s settings window opens.
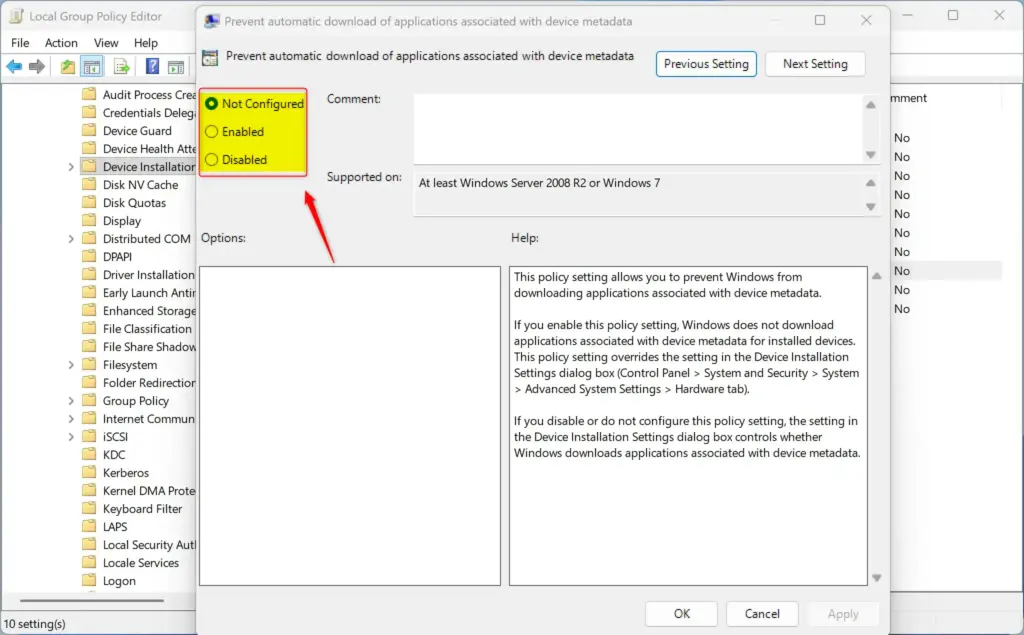
- Enable the policy. Select Enabled. Despite the wording, enabling this policy is what blocks the downloads. It tells Windows not to fetch applications based on information it receives from your connected devices.
- Apply and confirm. Click Apply, then click OK. The window closes and the policy now shows as Enabled in the list.
The change usually takes effect straight away. If a device still pulls in an app, restart the PC. To undo it, open the same policy and select Not Configured, then click Apply and OK.
The Local Group Policy Editor will now prevent Windows 11 from automatically installing manufacturer apps for your hardware.
Method 3Using the Windows Registry Editor (All 🪟 Windows 11 Versions)
The Windows Registry is a database of low-level system settings. This method works on every edition of Windows 11, including Home. You add one value to a specific key, and Windows then stops downloading device information and the apps tied to it.
Before you start: Back up the Registry first. Open the Registry Editor, go to File > Export, and save a copy of the entire Registry to a location you can find later. To restore it, double-click the saved file, or use the Registry Editor’s import option.
- Open the Registry Editor. Click the Start button, type
regedit, then click the Run command result or press Enter. Click Yes at the User Account Control prompt. The Registry Editor opens.⚠️WarningEditing the Registry incorrectly can cause serious problems with your Windows installation.Change only what is described here.
- Navigate to the correct registry key. Go to the location below. You can copy the path and paste it into the address bar at the top of the Registry Editor, then press Enter:
HKEY_LOCAL_MACHINE\SOFTWARE\Policies\Microsoft\Windows\Device MetadataIf the
Device Metadatakey does not exist, create it. Right-click theWindowskey, select New, then Key, and name itDevice Metadata. The new key appears in the left pane. Click it to select it. - Create or modify the DWORD value. With the
Device Metadatakey selected, look in the right-hand pane. You need a value namedPreventDeviceMetadataFromNetwork.- If
PreventDeviceMetadataFromNetworkalready exists, double-click it. - If it does not exist, right-click an empty space in the right pane, select New, then DWORD (32-bit) Value. Name the new value exactly
PreventDeviceMetadataFromNetwork, then double-click it.
- If
- Set the value data. In the Edit DWORD (32-bit) Value window, change the Value data field to
1.Explanation: A value of 1 tells Windows to stop automatically downloading device information and related apps from the internet. A value of 0 allows it.
Click OK to save the change. The value now shows your new data in the right pane.
- Restart your computer. Close the Registry Editor, then restart the PC. The change does not take effect until you do.
After your computer restarts, Windows 11 will stop trying to automatically download manufacturer apps, which keeps this bloatware off your system. If it does not seem to work, check that the key path and the value name are spelled exactly as shown, and that you created a DWORD (32-bit) value.
Reverting the Registry Changes
If you want to allow automatic app downloads again, follow the same steps as Method 3. In step 4, change the Value data for PreventDeviceMetadataFromNetwork back to 0, or delete the PreventDeviceMetadataFromNetwork value completely. Then restart your computer. If you used the Settings or Group Policy method instead, reverse that one as described at the end of its section.
Summary
To stop manufacturer apps from installing automatically in Windows 11, you have three main options. The Settings app works well for everyone and needs no restart. For Pro, Enterprise, and Education users, the Local Group Policy Editor offers more control. All editions can use the Registry Editor, but it needs caution, so back up first.
Have a question about this guide?
Answered by AI from this guide. Good questions may be added to this page — please don't include personal details.
Did this guide fix your problem?

About the Author
Richard
Tech Writer, IT Professional
Richard is a writer at Geek Rewind who turns complex IT tasks into clear, step-by-step guides. He draws on years of hands-on experience in system administration and enterprise IT operations, focusing on Windows, Linux and WordPress: the problems people actually run into, and the fixes that work. His server and WordPress guides come from systems he runs himself. Richard builds and maintains the platform behind Geek Rewind, from its Ubuntu servers and Nginx configuration to its custom WordPress plugins. Many new tutorials start with readers' questions, and he's always glad to answer them in the comments.
No comments yet — be the first to share your thoughts!