How to Stop Installing Apps on Drives Other Than Your Main Windows Drive in Windows 11

Windows 11 storage settings control where new apps install, so your main drive does not run out of space or fill up unevenly. This tutorial covers the opposite case: keeping new apps off secondary drives like D: or E: so they land on your C: drive instead.
Locking app installs to your main drive keeps your files organized and stops secondary storage from filling up with random program folders. You can do it with Group Policy or the Registry. Both take a few minutes, and both can be undone.
Change the default save location for new apps in Windows 11 Settings. Navigate to System Storage Advanced storage settings Where new content is saved. Select your primary drive from the “New apps will save to” dropdown.
What Types of Apps Are There?
Windows apps fall into two categories, and they behave differently when you try to control where they install. Knowing which type you have tells you what this tutorial can and cannot do for you.
- Microsoft Store apps: These download directly from the built-in Microsoft Store. They are packaged apps, and the policy and registry value in this guide apply to them.
- Standalone apps: These are installed using a setup file from a website or software company. The installer usually lets you pick the folder, so the settings in this guide do not control where these go. Check the install path in the setup wizard.
By default, Microsoft Store apps install on the C: drive (your main Windows drive). You can move them to other drives or choose another drive for new apps if you want. That choice is under Settings System Storage Advanced storage settings Where new content is saved.
Installing apps on the primary Windows drive helps them run smoothly and avoids problems with slower or removable secondary drives. An app on an external disk that is unplugged or asleep can fail to launch or update. For more detailed instructions on relocating existing apps or choosing default install locations, see the guides below.
How to Prevent Installing Apps on Other Drives
There are two ways to stop Store apps from being installed or moved to drives other than the main Windows drive: the Group Policy Editor or the Registry. Use Group Policy if your edition has it. Otherwise use the Registry.
Method 1Use Group Policy Editor (Easy Way)
Group Policy Editor changes a built-in Windows setting. With the policy turned on, new Store apps can no longer use secondary storage, and they stay on your C: drive. It is available on Windows 11 Pro, Enterprise, and Education. Windows 11 Home does not include it, so if the Start menu search finds nothing, use the Registry method further down.
- Click the Start button, type
Edit group policy, and open the Local Group Policy Editor. The editor window opens with a folder tree on the left. - In the left panel, go to the following location. The settings for that folder then appear in the right panel:
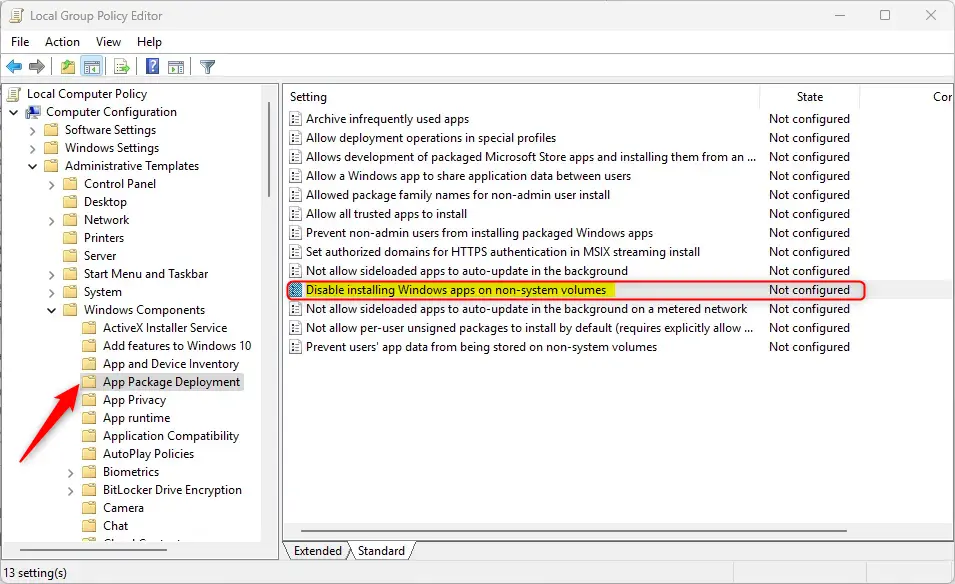
Computer Configuration > Administrative Templates > Windows Components > App Package Deployment - In the right panel, find Disable installing Windows apps on non-system volumes and double-click it. The setting's properties window opens.
- Select Enabled to stop installing or moving apps to other drives.
- Click OK to save. The window closes, and the setting's State column now reads Enabled.
Here's what the setting looks like:
Policy changes normally take effect on their own, but restarting your PC makes sure the setting is applied.
What the options mean:
- Not Configured: Default. Allows apps to be installed on other drives.
- Enabled: Blocks installing or moving apps to drives other than the main Windows drive.
- Disabled: Allows installing or moving apps to other drives.
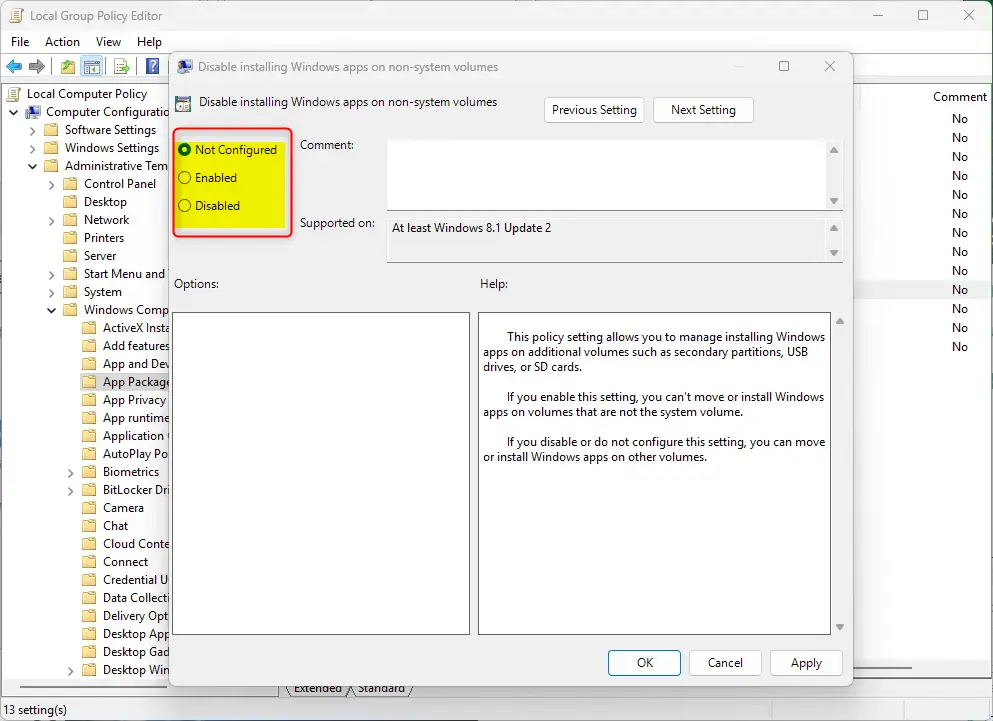
To undo this, open the same setting again and choose Not Configured (or Disabled), then click OK. The Where new content is saved options in Settings work normally again.
Method 2Use Registry Editor (More Advanced)
Registry Editor makes the same change by writing a value directly into the system database. This method works on every edition of Windows 11, including Home, where the Group Policy Editor is missing. It means editing system keys by hand, so follow the steps exactly and double-check the key name before you create anything.
This keeps your system safe if something goes wrong.
- [ADMIN] Press
Windows + R, typeregedit, and press Enter to open Registry Editor. If a User Account Control prompt appears, click Yes. - Navigate to this key, using the folder tree on the left:
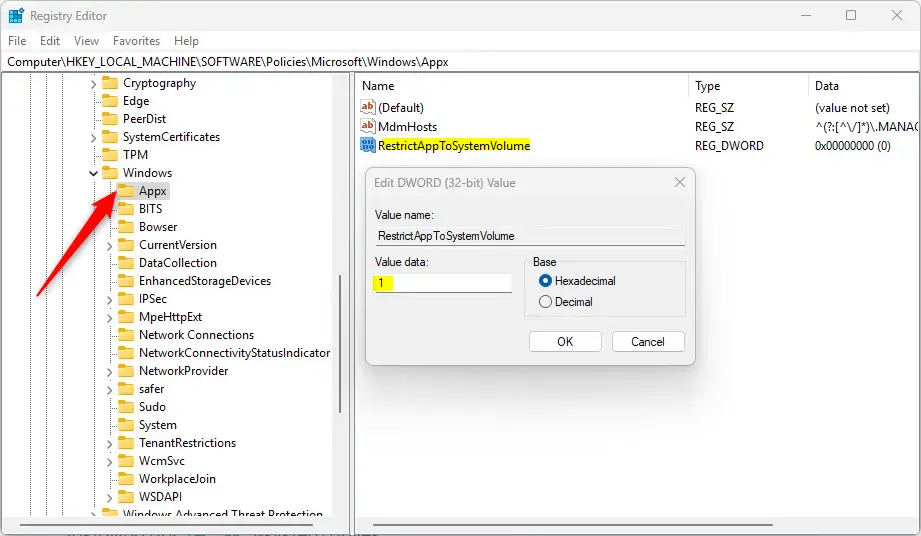
HKEY_LOCAL_MACHINE\SOFTWARE\Policies\Microsoft\Windows\Appx - If the Appx folder doesn't exist, right-click the Windows folder, choose New Key, and name it Appx. The new key appears under Windows.
- Right-click the Appx folder, select New DWORD (32-bit) Value, and name it RestrictAppToSystemVolume. The new value appears in the right panel.
- Double-click RestrictAppToSystemVolume and set its Value data to 1 to block app installs on other drives.
- Click OK and close the Registry Editor. The Data column for the value should now show 0x00000001 (1).
- Restart your computer to apply the changes.
If you ever need the default behavior back, the next section explains how to remove the restriction.
To revert the restriction, go back to the same key in Registry Editor. Then either delete the RestrictAppToSystemVolume value or change its Value data from 1 to 0. Restart your PC afterward. This restores the default Windows 11 behavior, so apps can again install on drives other than the main Windows drive, such as a secondary hard drive.
Summary
- Windows apps can come from the Microsoft Store or from setup files. The settings here apply to Store apps, not to standalone installers.
- By default, apps install to your main Windows drive (C:), but you can move them or install to other drives.
- To stop apps from installing on other drives, use Group Policy Editor or Registry Editor.
- Group Policy is easier but is not available on Windows 11 Home.
- Editing the registry works on all editions but requires care and a backup first.
- Restart your PC after making changes so they take effect.
Keeping new Store apps off secondary drives comes down to one choice: the Group Policy Editor or the Registry Editor. Both block new apps from taking up space on secondary storage, and both can be reversed in a minute. Pick the one that fits your Windows edition and how comfortable you are with system settings. Use Group Policy on Pro, Enterprise, and Education, and the Registry on Home.
Did this guide fix your problem?

About the Author
Richard
Tech Writer, IT Professional
Richard is a writer at Geek Rewind who turns complex IT tasks into clear, step-by-step guides. He draws on years of hands-on experience in system administration and enterprise IT operations, focusing on Windows, Linux and WordPress: the problems people actually run into, and the fixes that work. His server and WordPress guides come from systems he runs himself. Richard builds and maintains the platform behind Geek Rewind, from its Ubuntu servers and Nginx configuration to its custom WordPress plugins. Many new tutorials start with readers' questions, and he's always glad to answer them in the comments.
No comments yet — be the first to share your thoughts!