How to Stop an App from Running in the Background in Windows 11

Stopping apps from running in the background in Windows 11 helps your PC run faster and saves battery. Background apps keep using processing power, memory, network data and battery even when you are not looking at them.
Background apps can refresh their content, check for updates and send you notifications. For example, the Mail app checks for new email every few minutes, and each check uses a little power and data. A few apps doing this is no problem. Many of them at once can slow a PC down, especially on a laptop with limited RAM or a small battery.
Windows lets you control this app by app. You can set an individual app to stop running in the background. Doing so cuts unnecessary resource use and usually gives you better battery life and a smoother PC.
Disable background apps in Windows 11 by opening Settings, navigating to Apps & features, selecting an app, and changing its background app permissions to Never. This prevents unnecessary resource usage, improving performance and battery life.
Manage Background Apps in 🪟 Windows 11
Windows 11 has many convenient features, but some of them keep apps running that you never open. Those apps can slow your PC, drain the battery and use internet data, which matters on a metered or mobile connection. The steps below show how to take control.
Stop a Specific App from Running in the Background
You manage background permissions for each app in the Settings app. You can stop an app from checking for updates or running processes while you are not using it. This works on both Windows 11 Home and Pro, and no restart is needed.
Traditional desktop programs, such as older installers you downloaded from a website, do not have this option. For those, see the note after the steps.
- Open Windows Settings. Click the Start button (the Windows logo) on your taskbar, then click the gear icon in the Start menu. Alternatively, press Windows key + I at the same time. The Settings window should now be open.

Windows 11 Start menu with Settings gear icon highlighted. - Go to Apps. In the left-hand menu of the Settings window, click Apps. The Apps page opens on the right.
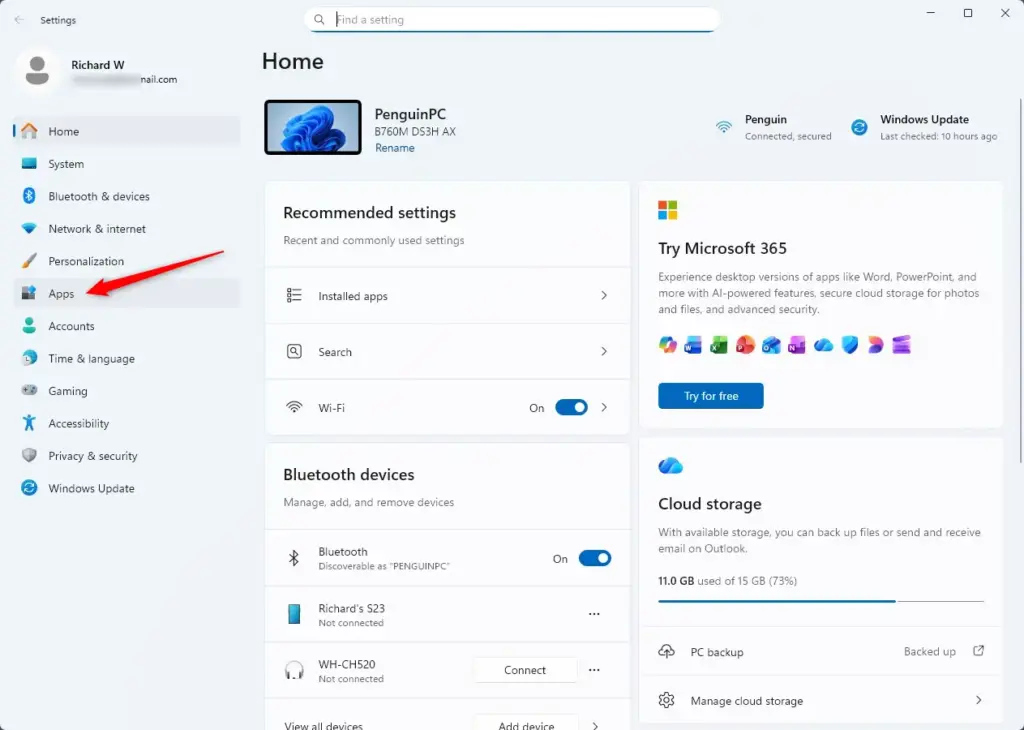
- Open the list of installed apps. Click Installed apps. The path is Settings Apps Installed apps You should see a list of the programs installed on your PC. It can take a few seconds to load.
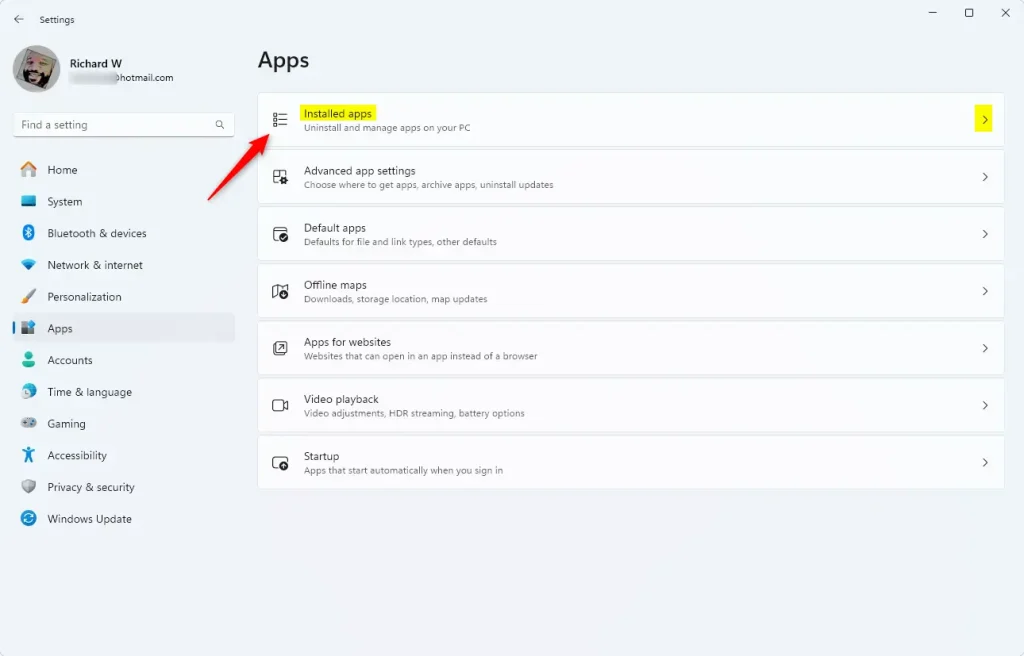
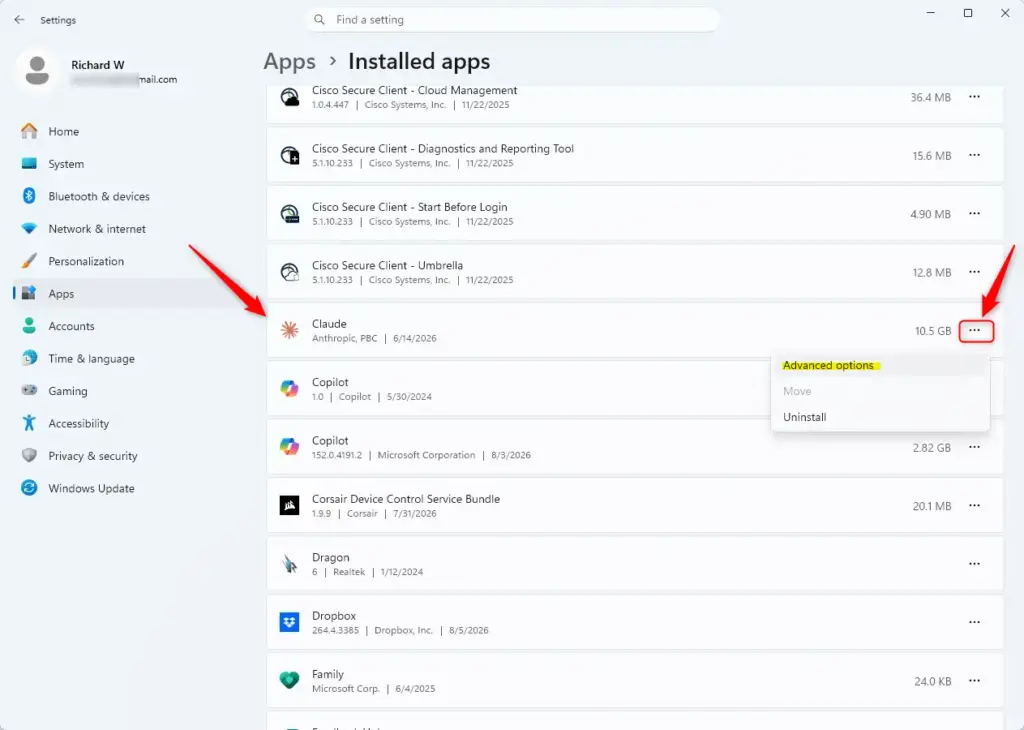
Windows 11 Settings app showing the list of installed applications. - Find the app. Scroll through the list, or type the app's name in the search box at the top of the list to find it faster. If you are not sure which app is causing problems, look at apps you rarely use, such as pre-installed software or old games.
- Open Advanced options. Click the three dots (ellipsis) to the right of the app's name. In the small menu that appears, click Advanced options. The app's settings page opens.
- Find the background setting. Scroll to the section called "Background apps permissions". You will see a dropdown labeled Let this app run in the background. If this section is missing, the app is a traditional desktop program (see the note below).
- Open the dropdown. Click it. You will see three options:
- Always: The app can run in the background all the time, even when you are not using it.
- Power optimized (recommended): Windows decides when the app can run in the background, to save power. This is the default for most apps.
- Never: The app does not run in the background at all.
- Select Never. Click Never. The dropdown now shows Never, and the app stops using resources when you are not using it.
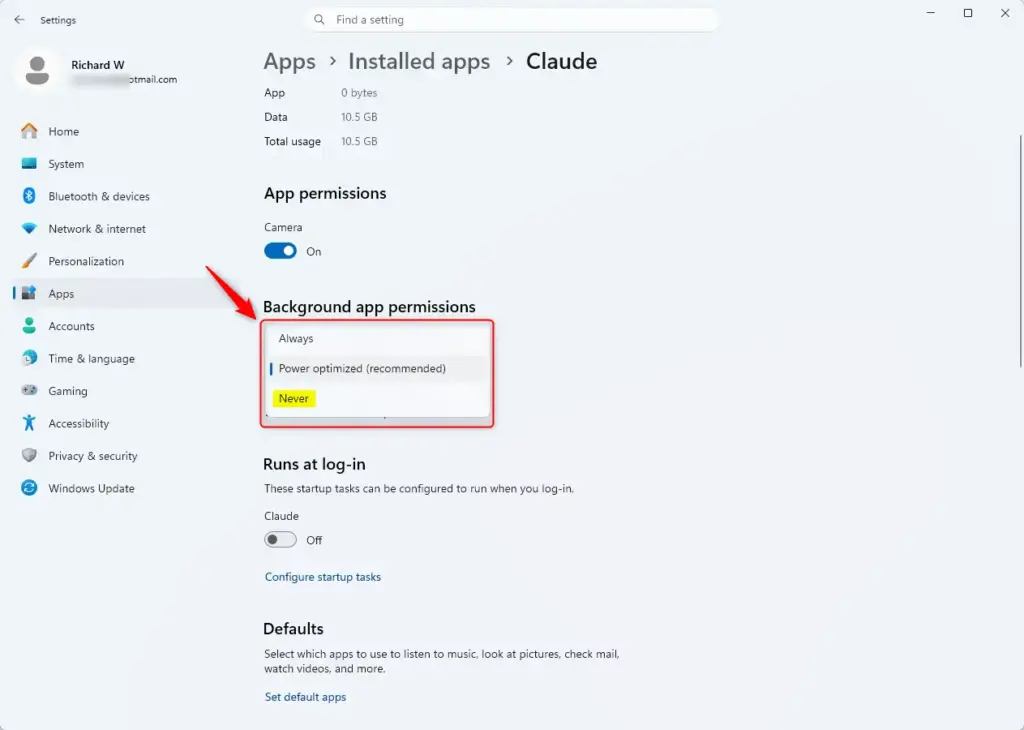
- Close Settings. Windows saves the change as soon as you pick the option. There is no Save button, so you can simply close the Settings window. To undo the change later, return to the same dropdown and choose Power optimized (recommended) again.
Warning: Be careful with the Never setting. Email, messaging and calendar apps need to run in the background to alert you about new messages and calls. If you set them to Never, you may miss important notifications until you open the app yourself.
Note for desktop programs: If an app has no background setting, the app is probably started at sign-in. In that case, look at Settings Apps Startup, or the Startup apps tab in Task Manager, and turn it off there. You can also close the program from its own settings, or uninstall it if you no longer need it.
References:
https://support.microsoft.com/en-us/windows/privacy/windows-background-apps-and-your-privacy
Summary
Managing background apps in Windows 11 helps improve your computer's speed and saves battery power. You control which Microsoft Store and built-in apps run in the background through Settings, so they stop using resources when you do not need them. Review the setting app by app, keep notifications working for the apps you rely on, and your PC will run more efficiently.
Have a question about this guide?
Answered by AI from this guide. Good questions may be added to this page — please don't include personal details.
Did this guide fix your problem?

About the Author
Richard
Tech Writer, IT Professional
Richard is a writer at Geek Rewind who turns complex IT tasks into clear, step-by-step guides. He draws on years of hands-on experience in system administration and enterprise IT operations, focusing on Windows, Linux and WordPress: the problems people actually run into, and the fixes that work. His server and WordPress guides come from systems he runs himself. Richard builds and maintains the platform behind Geek Rewind, from its Ubuntu servers and Nginx configuration to its custom WordPress plugins. Many new tutorials start with readers' questions, and he's always glad to answer them in the comments.
No comments yet — be the first to share your thoughts!