How to View Running Processes in Windows 11

- 16 steps
- Needs administrator rights
Task Manager is the built-in Windows 11 tool that lists every active app and background service on your PC. It shows resource use in real time, so you can spot a program that slows everything down.
Freezes and loud fan noise often start when one app uses over 90 percent of your processor. Find that app in the process list, close it, and the system recovers within seconds.
Four tools show running processes: Task Manager, Resource Monitor, Process Explorer, and the command line. Start with Task Manager. Move to the others when it doesn’t give you enough detail.
Press Ctrl+Shift+Esc to open Task Manager, then select Processes in the left sidebar to see every running app, background process and Windows process. Select the CPU, Memory, Disk or Network header to sort by resource use, and select More details first if the window shows only a short list.
Using Task Manager for Granular Control
Task Manager lists every application, background service, and system process on your PC. Each item shows its CPU, memory, disk, and network use, so slow and unresponsive programs stand out.
Open Task Manager and find the process causing trouble:
- Press Ctrl+Shift+Esc. Alternatively, right-click the Start button and choose Task Manager.
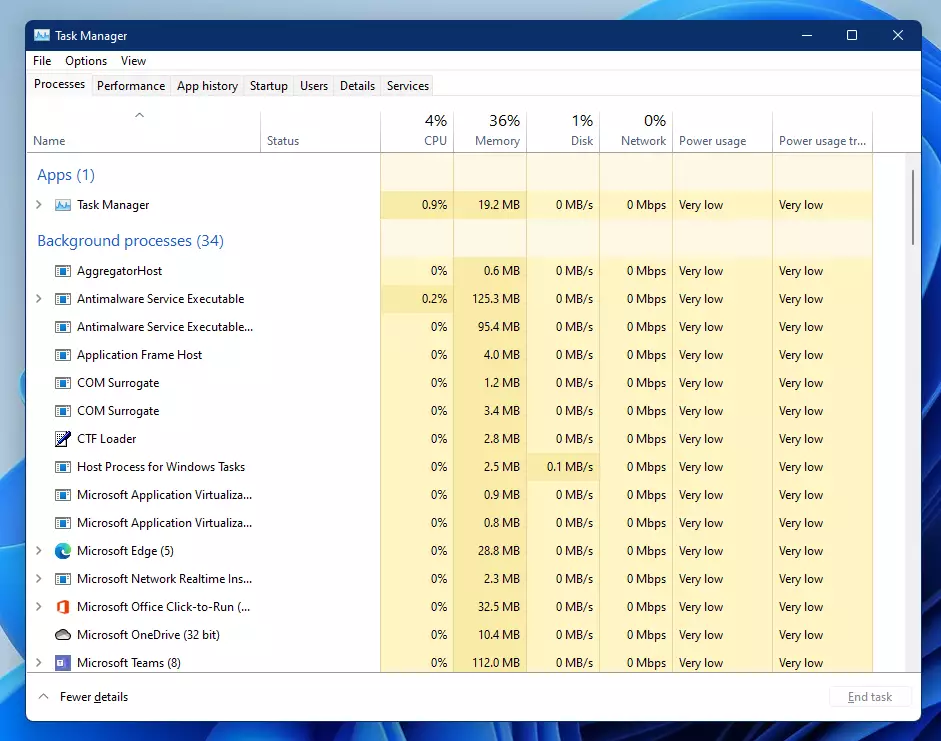
task manager in windows 11 - If the window shows only a short list of app names, select More details at the bottom. Recent Windows 11 builds open the full view by default, so you may not see this link.
- Select Processes in the left sidebar. Your running items appear grouped as Apps, Background processes, and Windows processes.
- Select the CPU, Memory, Disk, or Network column header to sort by that resource. The heaviest user moves to the top. Select the header again to reverse the order.
The percentages at the top of each column show total use across the whole PC. A process that stays near the top while you aren’t doing anything is usually the one to investigate. To see the Process ID (PID, the number Windows assigns to each running process), open the Details tab.
Recent Windows 11 updates for versions 24H2 and 25H2 add optional NPU columns (the NPU is a chip for AI workloads) to Task Manager: NPU, NPU Engine, NPU Dedicated Memory, NPU Shared Memory, and Isolation. Right-click a column header to add them. Task Manager also shows NPU utilization and memory information, and can identify applications running in an AppContainer.
You can stop a program from the same list:
- On the Processes page, select the name of the program you want to close.
- Select End task at the top of the window. You can also right-click the name and choose End task.
- Check the list. The program disappears within a few seconds.
Administrator permission: Some system programs need administrator permission to close. Without it, Windows 11 blocks the closure to prevent system instability. You may see an “Access is denied” message, or the process may stay in the list. This is normal. It usually means the process is part of Windows and you should leave it alone.
Resource Monitor vs. Task Manager
Resource Monitor shows more detail than Task Manager. It breaks usage down per file, service, and network connection. Task Manager gives a quick view of overall system health. Use Resource Monitor to find what is locking a file you can’t delete, see which program is using your internet bandwidth, or diagnose deeper performance bottlenecks.
Open it and look around:
- Select Start, type Resource Monitor, and select it from the results.
- Stay on the Overview tab to see CPU, Disk, Network, and Memory activity on one page.
- Switch to the CPU, Memory, Disk, or Network tab for a detailed breakdown of that resource.
Two tasks come up often:
- A file won’t delete or move. On the CPU tab, expand Associated Handles (the list of files and resources each process has open). Type part of the file name in the search box. The list shows which process has the file open. Close that program, then try again.
- Something is using your bandwidth. On the Network tab, expand Processes with Network Activity. Select the Send or Receive column header to sort by traffic.
Resource Monitor is mainly for viewing. You can end a process by right-clicking it there, but Task Manager is the easier place to do that.
Advanced Analysis with Sysinternals Process Explorer
Process Explorer is a free Microsoft utility from the Sysinternals collection (a set of advanced Windows tools). It isn’t part of Windows, so download it from Microsoft first. It is portable, so nothing needs installing. Extract the downloaded ZIP file and run the 64-bit version.
Process Explorer displays a process tree that shows which parent process started each task. This helps because malicious software sometimes hides by copying the name of a legitimate system process. A real Windows process has a predictable parent. A fake one often appears under something unexpected.
Check a suspicious process:
- Find the process in the tree and note which process sits above it.
- Right-click the process and choose Properties.
- On the Image tab, check the file location and the verified signer. System files sit in the Windows folders and are signed by Microsoft.
Administrator step: Run Process Explorer as administrator to see details for every process. Closing it leaves your system unchanged. The tool only reads process information unless you choose to end a process.
Using Command-Line Tools
Command Prompt and PowerShell list running processes with text commands instead of windows. Use them when you need to save a text list of your active programs, script automated tasks, or manage a PC remotely.
Open a command window:
- Right-click the Start button and choose Terminal. Alternatively, select Start, type Command Prompt or PowerShell, and select it.
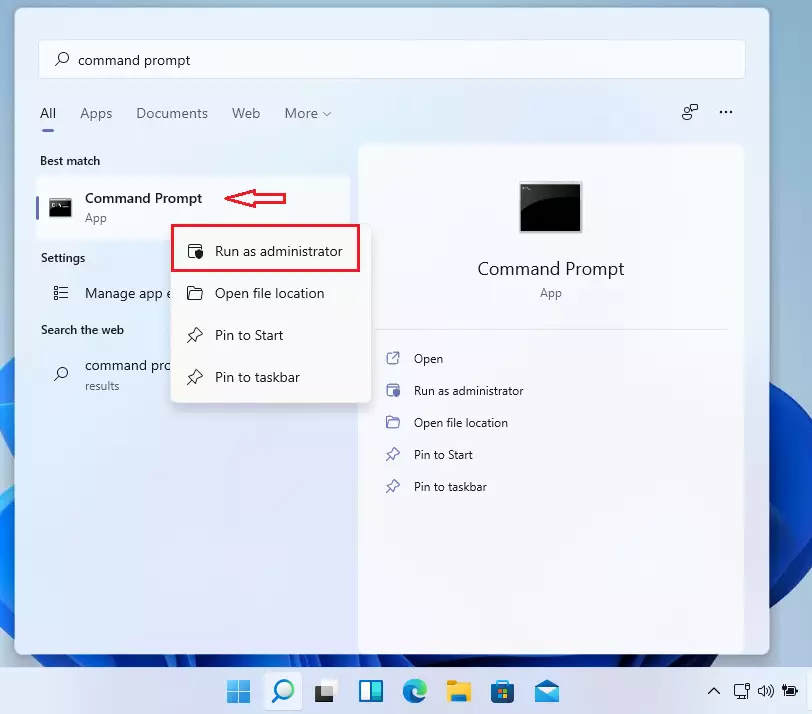
windows 11 command prompt administrator - Wait for the prompt, a line ending in a blinking cursor.
- Type or paste one of the commands below and press Enter.
Listing processes doesn’t need administrator rights. Opening the window as administrator can show more detail for some system processes.
This command lists all tasks. After you press Enter, the window prints a table with the image name, PID, session, and memory use of each process:
tasklistThis command exports the process list to a text file instead of printing it on screen. The file is saved in the folder your prompt is currently in. Open it with Notepad, or send it to someone helping you troubleshoot:
get-processThis command gives a detailed view that includes the PID. Match it to the PID column on the Details tab in Task Manager. That helps when two processes share a name and you need to tell them apart:
Get-CimInstance Win32_Process | Select-Object ProcessId,Name,ParentProcessIdSummary
Frequently asked questions
What is running on my computer?
Your computer runs apps you opened, plus background services and system processes that Windows needs. To see the full list, press Ctrl+Shift+Esc to open Task Manager, then select Processes. Each item shows how much CPU, memory, disk, and network it uses.
What apps are running?
Apps are the programs you open yourself, such as a browser or a music player. To see them, open Task Manager with Ctrl+Shift+Esc and look at the Apps group under Processes. Each app shows its name and how much processor and memory it uses. Close one by selecting it and choosing End task.
What programs are running?
Programs running on your PC appear in the Apps group in Task Manager. Open Task Manager by pressing Ctrl+Shift+Esc, then select Processes. Apps you opened sit at the top of the list. Background processes and Windows processes sit below them.
How to check running programs on PC?
Press Ctrl+Shift+Esc to open Task Manager, then select Processes in the left sidebar. Programs you opened appear under Apps. Sort by CPU or Memory by selecting those column headers to find what uses the most resources. For more detail, try Resource Monitor.
How to see what is running in the background?
Open Task Manager with Ctrl+Shift+Esc and select Processes. Background processes are listed under their own group, and they run without a window. Some are Windows services, which are system tasks that start with your PC. Sort the list by CPU or Memory to see which background items use the most.
How to see running programs?
Open Task Manager by pressing Ctrl+Shift+Esc, then select Processes. Programs with a window appear under Apps. If you can't see the list, select More details at the bottom of the window. Use the Name column to scan the list, and right-click any program to switch to it or end it.
Still have a question?
Answered by AI from this guide. Good questions may be added to this page — please don't include personal details.
Did this guide fix your problem?

About the Author
Richard
Tech Writer, IT Professional
Richard is a writer at Geek Rewind who turns complex IT tasks into clear, step-by-step guides. He draws on years of hands-on experience in system administration and enterprise IT operations, focusing on Windows, Linux and WordPress: the problems people actually run into, and the fixes that work. His server and WordPress guides come from systems he runs himself. Richard builds and maintains the platform behind Geek Rewind, from its Ubuntu servers and Nginx configuration to its custom WordPress plugins. Many new tutorials start with readers' questions, and he's always glad to answer them in the comments.
No comments yet — be the first to share your thoughts!