How to Enable or Disable Task Manager in Windows 11
You can enable or disable Task Manager in Windows 11 for standard users through Group Policy or the Registry Editor.
Task Manager is a Windows tool that shows you all the programs and processes currently running on your computer. It’s handy for spotting problems or closing apps that are frozen.
For instance, you might want to stop certain people from opening Task Manager, which can be useful in offices or on shared computers to keep your system running smoothly. This guide explains exactly how to do that using two different methods.
To disable Task Manager, open the Local Group Policy Editor, navigate to User Configuration Administrative Templates > Ctrl+Alt+Del Options, and enable “Remove Task Manager.” To enable it, set “Remove Task Manager” to Not Configured or Disabled.
Why Control Task Manager Access?
Controlling Task Manager access in Windows 11 stops people from closing important apps or seeing system details. You might need to enable Task Manager to fix computer issues or check your PC’s performance.
Even if you’re a regular user, knowing how to enable or disable Task Manager is useful in many situations.
Disable or Enable Task Manager Using Group Policy
Task Manager can be disabled or enabled in Windows 11 using the Local Group Policy Editor if you have administrator rights. This tool lets you control access, which is helpful for managing how others interact with your computer’s performance tools.
Here's how to do that:
- Open the Local Group Policy Editor.
- Expand the following folders:
User Configuration > Administrative Templates > Ctrl+Alt+Del Options
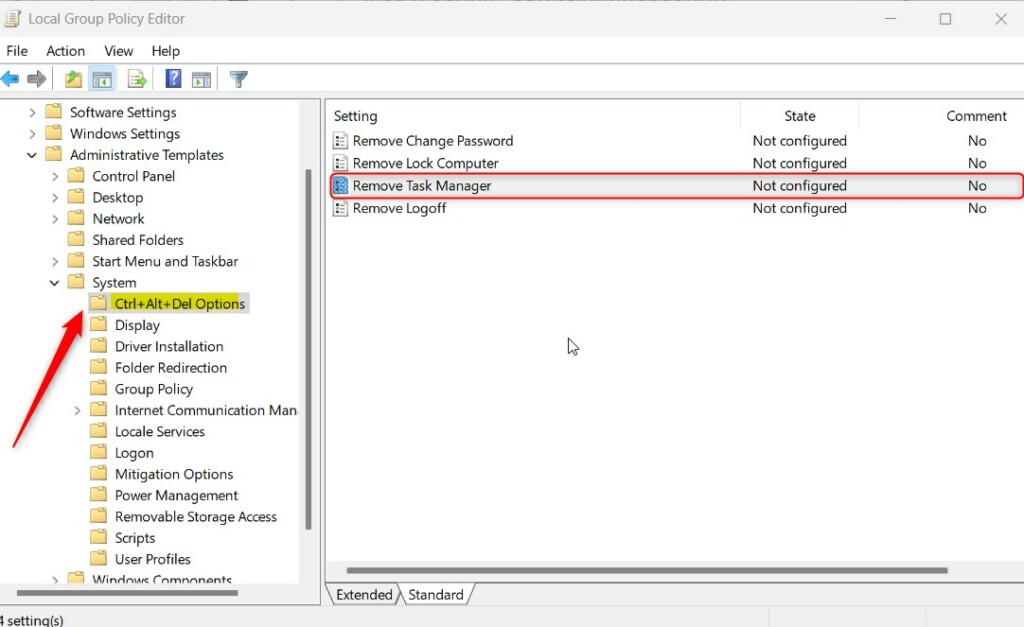
- Click on the
CTRL-Alt-Del Optionsfolder on the left panel. Then double-click the setting on the right called "Remove Task Manager" to open it.
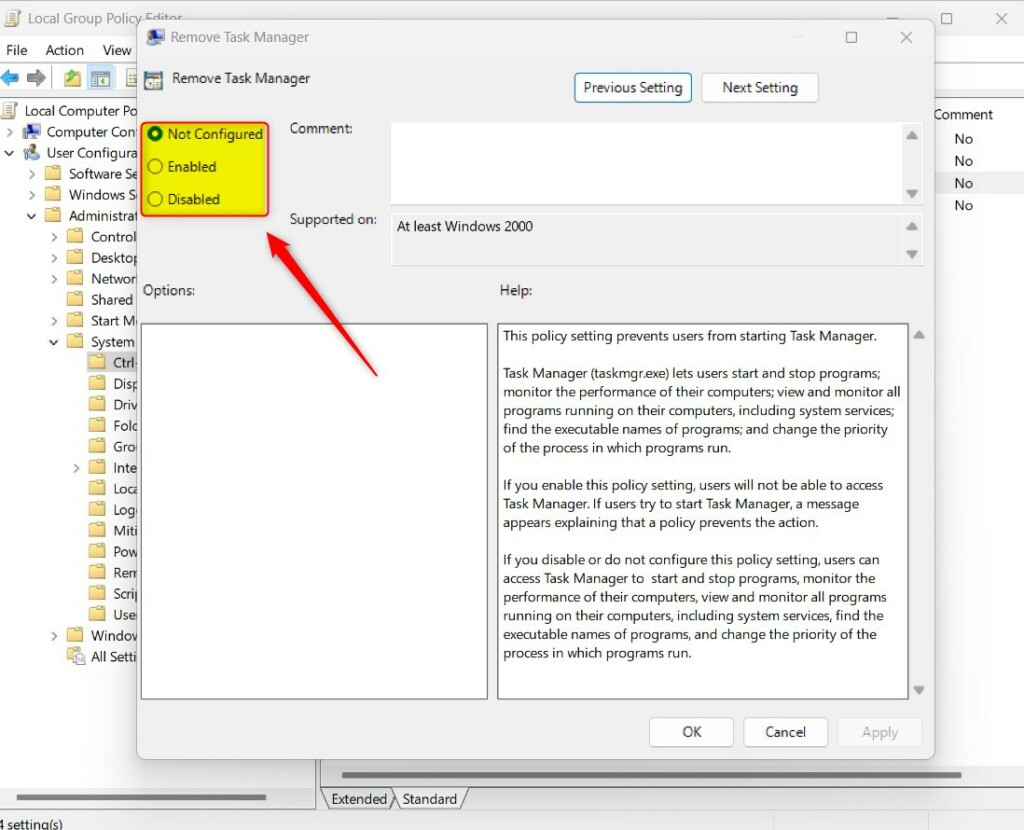
- When the setting window opens, select one of these options:
- Not Configured – Same as Disabled. Users will be able to access Task Manager.
- Enabled – Users will not be able to access Task Manager.
- Disabled – Users can access Task Manager to start, stop, and view system performance.
- Save your settings and restart your computer for the changes to apply.
Turn On or Off Task Manager Using Windows Registry Editor
If the Group Policy Editor isn't available, Task Manager access can be managed using the Windows Registry Editor. This method also requires administrator rights. It serves as a good alternative for controlling Task Manager when Group Policy isn't an option.
If you can't open the Local Group Policy Editor, turn to the Windows Registry instead.
- Open the Windows Registry, and navigate to one of these folder keys below:
HKEY_CURRENT_USER\SOFTWARE\Microsoft\Windows\CurrentVersion\Policies\System– Use this to disable or enable Task Manager for standard users only.HKEY_LOCAL_MACHINE\SOFTWARE\Microsoft\Windows\CurrentVersion\Policies\System– Use this to disable or enable Task Manager for all users.

- If you don't see the
Systemfolder key, right-click on thePolicieskey. Then create the subkey folders calledSystem. - Right-click inside the
Systemfolder's right pane. SelectNew > DWORD (32-bit) Value. Type a new key namedDisableTaskMgr. - Double-click the new key item name
DisableTaskMgr. Make sure theBaseoption is set toDecimal. Then update theValue data:- To disable Task Manager, type
1. - To enable Task Manager, delete the name
DisableTaskMgrthat you created above.
- To disable Task Manager, type

- Save your changes and restart your computer.
What Happens When You Disable Task Manager?
When Task Manager is disabled, people trying to open it will see a message saying the system administrator has blocked it, preventing them from closing apps or checking system performance.
Summary
Task Manager helps check your Windows 11 PC's health and fix problems, and administrators can control access to it. You can enable or disable Task Manager using either the Local Group Policy Editor or the Windows Registry Editor, depending on what works best for you.
Two methods exist for controlling Task Manager:
- Local Group Policy Editor – The easiest way for most administrators.
- Windows Registry Editor – Use this if Group Policy Editor is not available.
Can I disable Task Manager?
If the folder key isn't visible, right-click the existing key and create the subkey folders named 'Policies'. Then, within that, create a subkey named 'System'. Right-click in the folder's right pane, select 'New', and choose 'DWORD (32-bit) Value'. Name this new value 'DisableTaskMgr'. To disable the Task Manager, set its value data to 1.
Was this guide helpful?

About the Author
Richard
Tech Writer, IT Professional
Richard, a writer for Geek Rewind, is a tech enthusiast who loves breaking down complex IT topics into simple, easy-to-understand ideas. With years of hands-on experience in system administration and enterprise IT operations, he’s developed a knack for offering practical tips and solutions. Richard aims to make technology more accessible and actionable. He's deeply committed to the Geek Rewind community, always ready to answer questions and engage in discussions.


No comments yet — be the first to share your thoughts!