adjust background recording length settings windows
Xbox Game Bar is a built-in Windows tool that records gameplay and takes screenshots. It can also keep a rolling video buffer in the background, so you can save a moment after it has already happened. Windows 11 ships with a default length for that buffer.
Advertisement
Change the length if your clips cut off too early or take up too much space on your drive. The setting controls how much footage the background recording keeps. A longer buffer catches more, but it uses more disk space and puts a little more load on your PC while you play.
⚡ Quick Answer
Open Settings›Gaming›Captures, scroll to Background recording, click the dropdown under Record what happened, and select your desired length from 30 seconds to 10 minutes. The change applies immediately without restarting.
Advertisement
Checking Your Current Capture Configuration
Before you change anything, check what your PC is set to now. You can see your video quality, audio options and length limits in the Game Bar overlay. Game Bar is part of Windows 11 and is on by default. If the shortcut does nothing, open Settings, go to Gaming and then Xbox Game Bar, and make sure it is switched on.
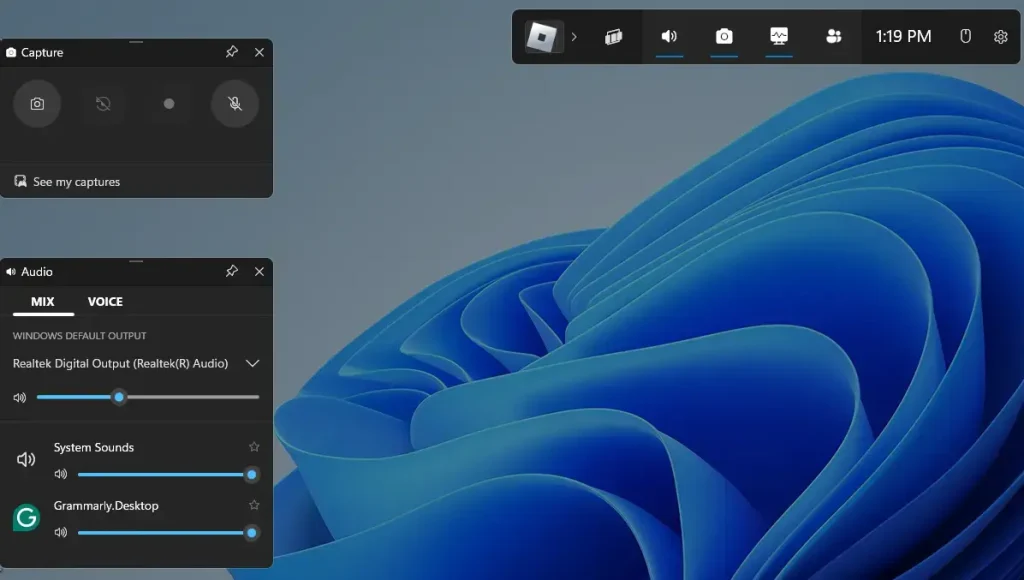
Press Win+G to open Xbox Game Bar. You should see the overlay and a widget bar across the top of the screen.
Click the Settings icon (the gear) on the Game Bar widget bar. The Game Bar settings window opens.
Select the Capturing tab in the left menu. Your recording options appear on the right.
Look at the dropdown menu under Background recording. It shows how many minutes your system is set to keep.
If you can’t see a background recording option, the feature may be off, or your PC may not support it. Close the overlay by pressing Win+G again when you’re done.
How to Adjust Background Recording Length Settings
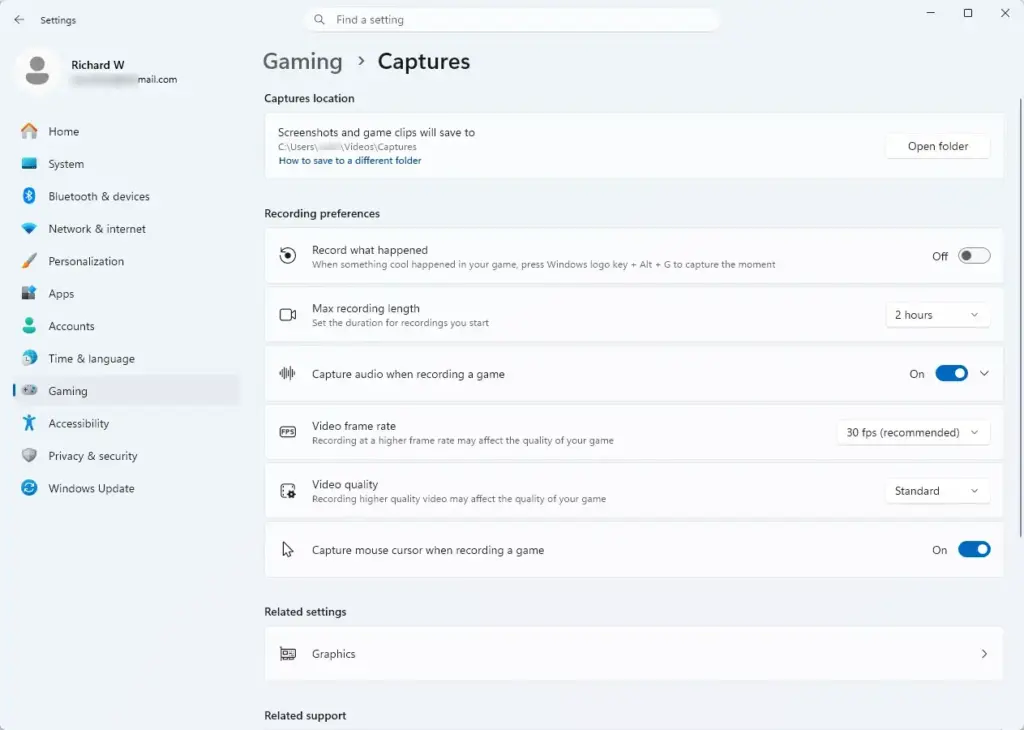
You can also change the background recording length in the main Windows 11 Settings app ⚙️. The path is Settings›Gaming›Captures. Use the background recording dropdown to pick how much gameplay Windows keeps. This works the same on Home and Pro.
Open the Start menu and select Settings. Windows 11 Start menu with Settings gear icon highlighted.
Click Gaming in the left-hand menu.
Select Captures. Settings › Gaming › Captures The capture options for Game Bar open on the right.
Scroll down to the Background recording section.
Click the dropdown menu under Record what happened and pick a length, such as 30 seconds, 1 minute, 3 minutes, 5 minutes or 10 minutes. The exact choices can differ between Windows 11 versions, so use the closest option your build offers.
Close the Settings ⚙️ app. Windows applies the change as soon as you pick it, so there is no Save button and no restart.
To undo the change, come back to the same dropdown and choose your old value. If the whole Background recording section is missing or greyed out, background recording may be switched off. Check the toggle in this section first.
Advertisement
Managing Maximum Recording Length vs. Background Recording
Windows 11 treats maximum recording length and background recording as two separate features. Background recording keeps a temporary rolling buffer of what you just played. Manual recording starts when you press the record shortcut and runs until you stop it or reach the maximum time limit. Changing one setting does not change the other.
To set the manual recording limit:
Open Settings from the Start menu.
Go to Gaming and select Captures. Settings › Gaming › Captures
Scroll down to the Recorded length section.
Click the dropdown menu and choose your maximum recording time, from 30 minutes up to 4 hours.
⚠️WarningA longer limit means a bigger file.
A 4-hour recording can fill a lot of disk space, so only raise it if you really need it. You can lower it again at any time.
Troubleshooting Short or Missing Captures
If your Game Bar captures are short or missing, check your free disk space and how hard your PC is working. Windows may stop background recording when the drive runs low on space or when a game puts a heavy load on your hardware.
Advertisement
Open File Explorer and check that the drive where your captures are saved has plenty of free space. Several gigabytes is a sensible minimum, and more is better for long clips.
Open Settings›Gaming›Captures.
Make sure the box labeled Record in the background while I'm playing a game is ticked. If it is off, Windows keeps no buffer, so there is nothing to save.
If your clips are still shorter than expected, try a shorter background recording length or a lower capture quality. Both put less strain on the PC.
Optimizing System Performance While Recording
💡TipYou can reduce the load recording puts on your PC by lowering the video frame rate and quality in the capture settings.
Dropping the frame rate from 60 to 30 frames per second takes a lot of strain off your hardware and can stop stuttering in games.
Open the capture settings, either in Game Bar (Windows Key + G›Settings›Capturing) or in Settings›Gaming›Captures.
Select 30 fps for the video frame rate instead of 60.
Change the video quality from High to Standard if you still notice stuttering or input lag during long, demanding sessions.
Lower settings also make smaller files, so your clips will take up less space. If the footage looks too soft for your needs, raise one setting at a time and test again.
What to do next
To test your new settings, play a game for a few minutes and then press the clip shortcut, which is Windows Key + Alt + G by default. Open the clip and check that it covers the length you chose. If it does, you can change your default storage folder in Windows 11 to keep large video files off your main operating system drive.
Advertisement
How do I change the screen recording length?
Open Settings, go to Gaming, then Captures. Under Record what happened, choose a new option from the Length of recording list. Save any clip you want to keep first, because the new length changes how much footage the background recording holds from then on.
How to record more than 30 seconds on PC?
Open Settings, go to Gaming, then Captures, and set Length of recording to the longest option you need. Background recording keeps that much footage. Press Windows Key + Alt + G to save the last moments you recorded. A longer length uses more disk space.
How do I shorten a screen recording on Windows?
Game Bar cannot cut a saved clip, so open the Photos app instead. Open the video, select Edit & Create, then choose Trim. Drag the handles to set the new start and end, then select Save a copy so the original file stays unchanged.
How to screen record last 5 minutes on PC?
In Settings, go to Gaming, then Captures, and set Length of recording to 5 minutes. Turn on Record in the background while I'm playing a game if it is off. Press Windows Key + Alt + G to save the last 5 minutes of gameplay. A game must be running for this to work.
📬 Get new Windows tips in your inbox
One email when we publish something worth your time. No spam, unsubscribe anytime.
Have a question about this guide?
Answered by AI from this guide. Good questions may be added to this page — please don't include personal details.
Richard is a writer at Geek Rewind who turns complex IT tasks into clear, step-by-step guides. He draws on years of hands-on experience in system administration and enterprise IT operations, focusing on Windows, Linux and WordPress: the problems people actually run into, and the fixes that work.
His server and WordPress guides come from systems he runs himself. Richard builds and maintains the platform behind Geek Rewind, from its Ubuntu servers and Nginx configuration to its custom WordPress plugins.
Many new tutorials start with readers' questions, and he's always glad to answer them in the comments.
One email when we publish a guide worth your time — new Windows features, the fixes that actually
work, and a heads-up when Microsoft breaks something. Unsubscribe in one click.
📬 Get new Windows tips in your inbox
One email when we publish something worth your time. No spam, unsubscribe anytime.



No comments yet — be the first to share your thoughts!