How to Adjust Video Quality for Game Clips in Windows 11

Xbox Game Bar (an overlay for recording gameplay and taking screenshots) handles video recording in Windows 11. It lets you switch from a sluggish 30 frames per second to smooth 60 frames per second without installing extra software.
Blurry game clips ruin the details of a hard-earned win. You can fix this by changing your capture settings, which control the frame rate, video quality and audio options directly inside Windows.
Open Settings , go to Gaming Captures, scroll to Recorded video, and use the Frame rate and Video quality drop-downs to choose 60 fps for smooth motion or 30 fps for smaller files, then pick Standard or High quality. Changes take effect immediately.
Using the 🪟 Windows 11 Settings App
You change clip quality in the Settings app , under Gaming and then Captures. This page lets you set the video frame rate, switch between standard and high quality, and control how long background recordings run while you play. The steps below are the same on Windows 11 Home and Pro.
- Press the Win+I to open Settings . The Settings window opens with a list of categories on the left.

- Click Gaming in the left-hand menu. The gaming options appear on the right, including Xbox Game Bar and Captures.
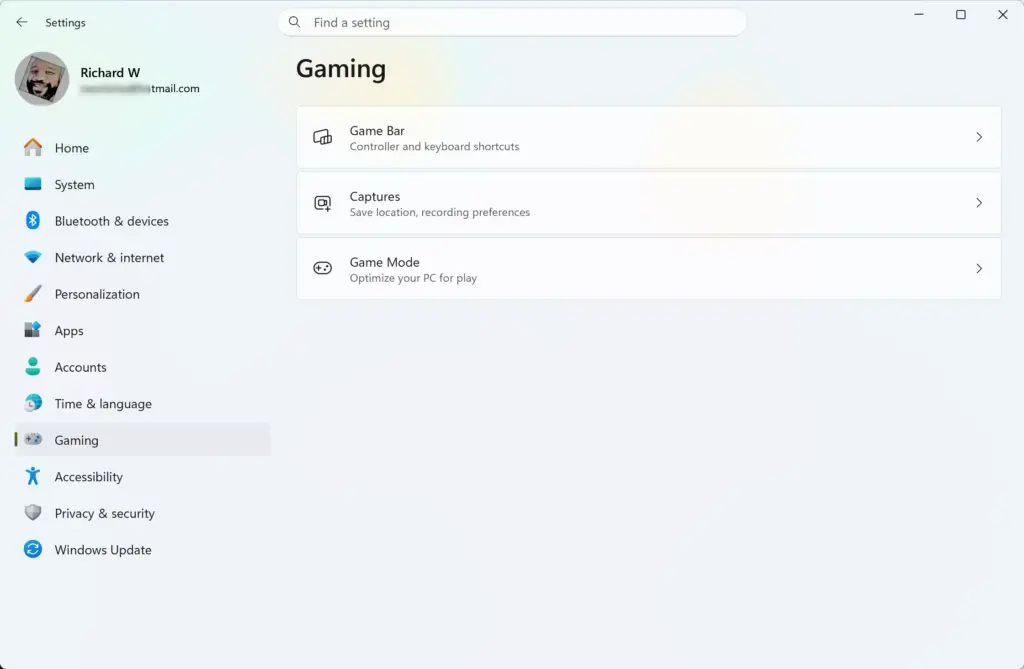
- Select Captures to open the video quality and recording length options.
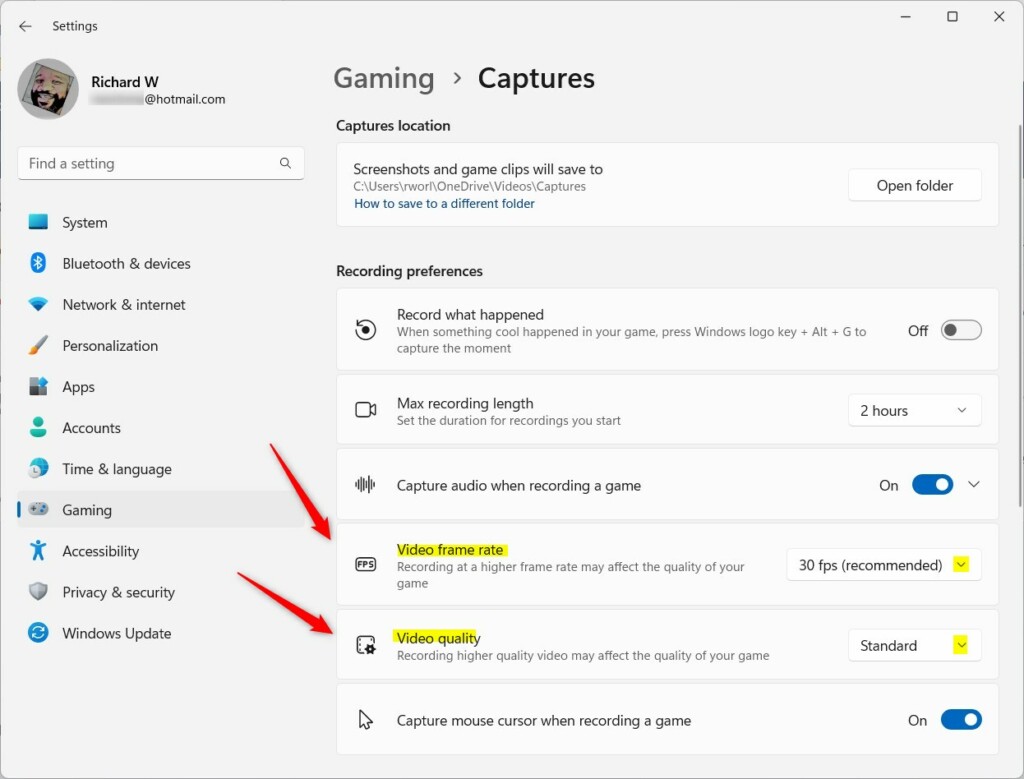
- Scroll down to the Recorded video section. This is where the frame rate and quality settings live. Depending on your Windows 11 build, the labels may read slightly differently, for example Video frame rate instead of Frame rate.
- Open the drop-down menu under Frame rate and choose 30 fps or 60 fps. Pick 60 fps for fast games where smooth motion matters. Pick 30 fps for smaller files or a slower PC.
- Open the drop-down menu under Video quality and choose Standard or High. High keeps more detail but creates larger files and puts more load on your PC while you record.
The setting takes effect immediately, with no restart. If the options are greyed out, you are probably recording at that moment. Stop the recording and try again. To undo a change, return to the same page and pick the previous value.
Configuring Xbox Game Bar Capture Options
You can also change quality from the Xbox Game Bar overlay while a game is running. This saves you from leaving the game to open Settings . Game Bar has to be turned on first, under Settings Gaming Game Bar. If the overlay never appears when you press the shortcut, check that switch.
- Press the Win+G to open the Xbox Game Bar overlay on your screen. The overlay appears on top of your game, with a row of widgets along the top.
- Click the Settings icon (shaped like a gear) on the Game Bar widget menu. The Game Bar settings window opens.
- Select Capturing from the left sidebar of the settings window.
- Find the Recorded video settings and change the frame rate and video quality to what you want. These are the same settings as in the Settings app, so a change made here shows up there too.
- Check or uncheck the options for recording game audio and capturing microphone input, and adjust the audio quality to match the result you want. Higher audio quality makes files a little larger, but video is the main factor in file size.
Some options cannot be changed while a recording is in progress. If one is greyed out, stop recording first.
Modifying Game Clip Settings via the Registry
For most people the Settings app is the safer choice, because a wrong registry edit can cause problems that are hard to trace. If you go this route, take care.
Before you change anything, back up the key. In Registry Editor, right-click the key, choose Export, and save the file somewhere you can find it. Double-clicking that file later restores the old values.
- Press the Windows key + R to open the Run dialog box.
- Type
regeditand press Enter. Click Yes if User Account Control asks for permission. Registry Editor opens. - Navigate to the following path in the left sidebar:
HKEY_CURRENT_USER\SOFTWARE\Microsoft\Windows\CurrentVersion\GameDVR - Look for existing DWORD values, or create new ones, that correspond to your preferred video bitrate and frame rate, if your administrative requirements specify them. Change only the values you actually need.
- Close Registry Editor and restart your computer to apply the changes.
If your clips behave oddly afterwards, import the backup you exported or set the options again in the Settings app.
Managing Storage Space for High-Quality Clips
Windows saves your game clips in the Captures subfolder inside your Videos directory by default. High-resolution recordings fill up a hard drive very quickly, so you need to move old video files to an external drive or clear out space regularly.
- Move older clips to an external hard drive, or delete the ones you no longer need.
- Lower the Maximum recording length on the Captures page in Settings, so a recording you forget to stop cannot grow without limit.
- Use a shorter background recording length, such as 30 seconds instead of a longer interval. This also reduces the temporary storage your system consumes while you play.
Some newer Windows 11 builds also let you choose a different capture location on the Captures page. If you see that option, you can point clips at a larger drive.
Optimizing System Performance While Recording
If recording causes stuttering or dropped frames, lower your video quality settings. Recording at 60 frames per second puts heavy demand on your graphics card and processor, so switching from High to Standard quality helps games run smoothly.
- Open Settings Gaming Captures.
- Change Video quality from High to Standard.
- Leave Frame rate at 60 fps and run the game again. If it is still choppy, drop the frame rate to 30 fps.
Standard quality at 60 fps is a good middle ground. It keeps motion smooth without demanding excessive system resources. Closing background applications and web browsers before you launch a heavy game also frees up the resources your PC needs to encode clean footage.
What to do next
With your video quality settings adjusted, you can now capture high-framerate footage of your favorite gaming moments. To make your clips look even better, consider adjusting your computer's display resolution or setting up HDR calibration in Windows 11 before you start recording again.
Have a question about this guide?
Answered by AI from this guide. Good questions may be added to this page — please don't include personal details.
Did this guide fix your problem?

About the Author
Richard
Tech Writer, IT Professional
Richard is a writer at Geek Rewind who turns complex IT tasks into clear, step-by-step guides. He draws on years of hands-on experience in system administration and enterprise IT operations, focusing on Windows, Linux and WordPress: the problems people actually run into, and the fixes that work. His server and WordPress guides come from systems he runs himself. Richard builds and maintains the platform behind Geek Rewind, from its Ubuntu servers and Nginx configuration to its custom WordPress plugins. Many new tutorials start with readers' questions, and he's always glad to answer them in the comments.
No comments yet — be the first to share your thoughts!