How to Capture Game Audio in Windows 11

Capturing game audio in Windows 11 records the sound straight from your game, including music, explosions, and character voices, so your recordings sound clear and finished. Xbox Game Bar is built into Windows 11 and opens with the Win+G shortcut. It records your gameplay and its sound without extra software.
Good audio makes better clips for YouTube uploads and Twitch streams. The steps below help you get your sound levels right so viewers hear every detail. Game Bar works on both Windows 11 Home and Pro, and it needs no separate install.
Quick Tip: How to Record a Game Clip
Pressing the Win, Alt, and G together saves the last few moments of your gameplay as a video file directly to your PC. Game Bar records the game’s sound along with the picture.
- Start your game and play until the moment you want to keep happens.
- Press the shortcut:
Windows key + Alt + G - Look for a small notification that says the clip was saved. This confirms the capture worked.
This saves the last few moments of your game as a video clip. If nothing happens, check that Game Bar is turned on in Settings Gaming Xbox Game Bar. Also check the options in Settings Gaming Captures. Recording the last few moments only works if background recording is allowed there. Some games running in exclusive full screen also block Game Bar, so switch the game to windowed or borderless mode if it won’t respond.
To check what sound gets recorded, press Win+G while in your game. Open the audio controls in the overlay and make sure the game’s volume is up and not muted. In Settings Gaming Captures, look for the audio setting that decides whether Game Bar records only the game or all system sound. Choose game audio only if you don’t want notifications or other apps in your clip.
You can also change where these clips are saved if you want. To undo that change later, point it back to the original folder.
Why Capture Game Audio?
Capturing game audio, which includes music, sound effects, and character voices, makes game videos more exciting. Including this captured game audio in your game recordings makes them more engaging and gives viewers a fuller experience of the game's atmosphere.
Before you share a clip, play it back once with headphones. Check that the game sound is clear, the music doesn't drown out voices, and nothing you didn't mean to record has crept in. If the levels are off, adjust the game's own volume sliders and record again.
How to Turn Game Audio Capture On or Off in 🪟 Windows 11
Controlling how you capture game audio Windows 11 settings work requires opening the Settings app and heading to the Gaming menu. From there, you can easily toggle audio recording on or off so your saved video clips include sound from your games.- Open Settings by clicking the Start button and selecting Settings, or press
Windows key + Ion your keyboard. - In the Settings window, click on Gaming from the left menu.

Windows 11 Settings app with Gaming button highlighted - Click on Captures on the right side.

Windows 11 Gaming Captures settings - Find the option called "Capture audio when recording a game".
- Toggle the switch to On if you want to record game sounds, or to Off if you don't.
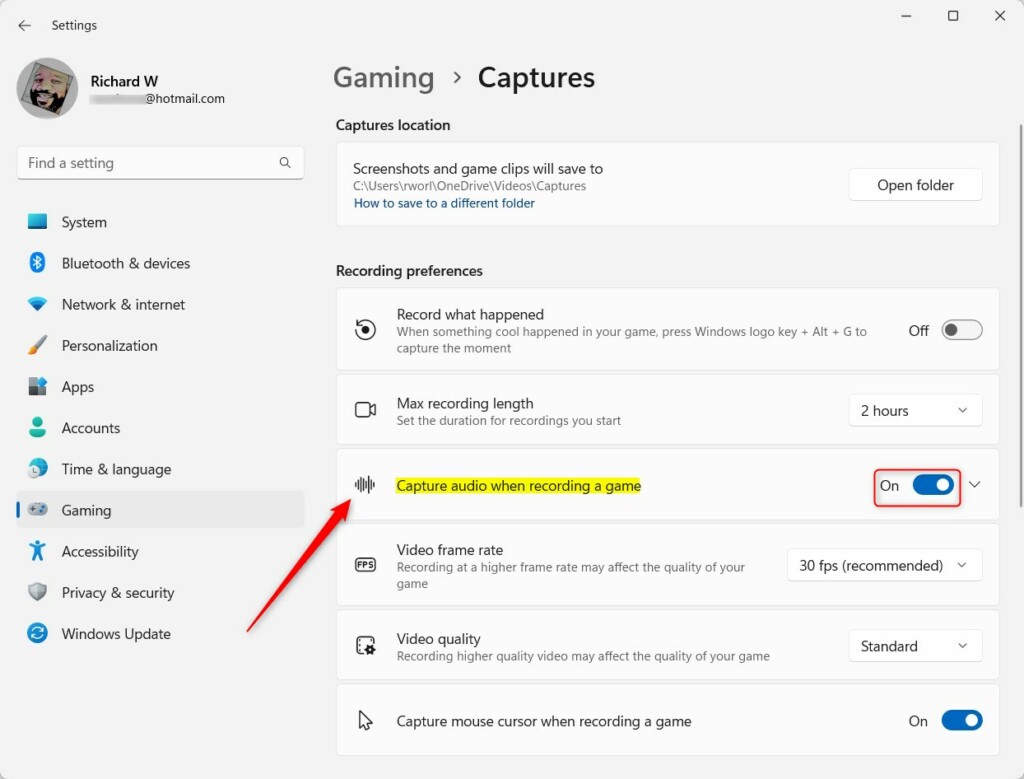
Toggle capture audio on or off in Windows 11 - If you turn it on, click the arrow next to the toggle to see more settings like:
- Audio recording quality - how clear the sound will be
- Microphone volume - if you want to add your voice
- System volume - controls the game sounds volume
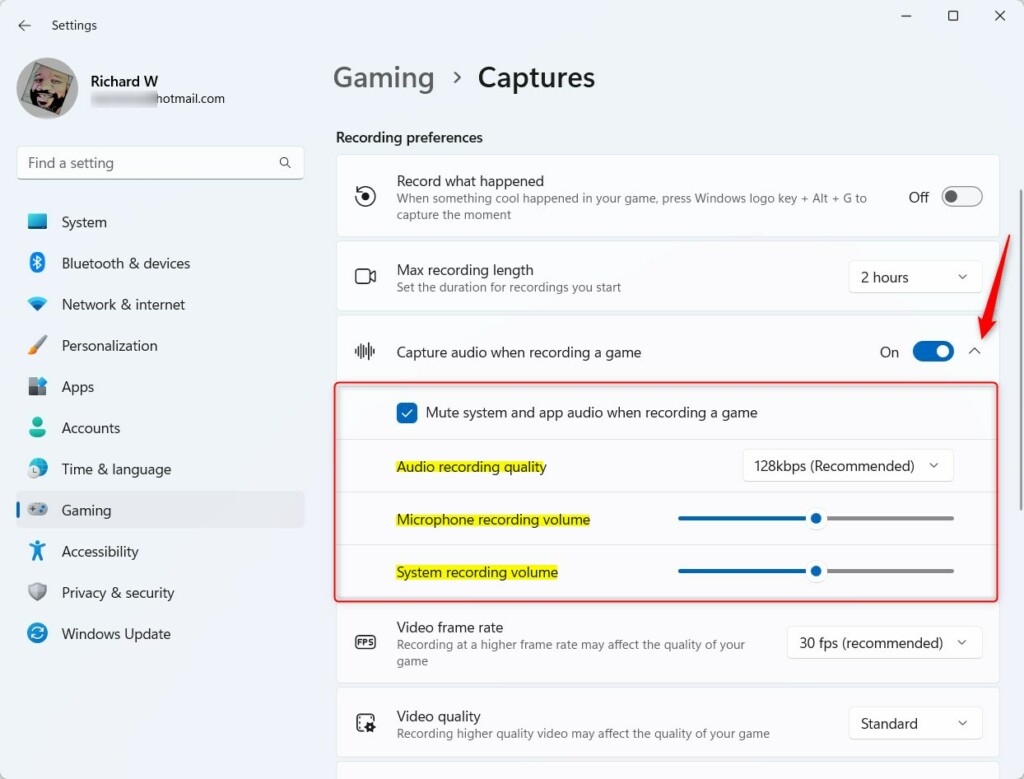
Additional audio capture settings in Windows 11 - When done, close the Settings app.
Summary
Turning on game audio capture in Windows 11 makes your recorded game clips much better by including background music, sound effects, and voices.
Was this guide helpful?

About the Author
Richard
Tech Writer, IT Professional
Richard is a writer at Geek Rewind who turns complex IT tasks into clear, step-by-step guides. He draws on years of hands-on experience in system administration and enterprise IT operations, focusing on Windows, Linux and WordPress: the problems people actually run into, and the fixes that work. His server and WordPress guides come from systems he runs himself. Richard builds and maintains the platform behind Geek Rewind, from its Ubuntu servers and Nginx configuration to its custom WordPress plugins. Many new tutorials start with readers' questions, and he's always glad to answer them in the comments.




No comments yet — be the first to share your thoughts!