How to Enable or Disable Fullscreen Optimizations for Games in Windows 11

Fullscreen optimizations in Windows 11 version 23H2 change how games run by letting your PC manage hardware resources for better frame rates. This built-in Windows feature gives games top performance priority, though it sometimes causes screen tearing or lag.
You can turn fullscreen optimizations on or off for individual games through the compatibility settings to fix stuttering or boost speed. The setting is per executable file (.exe), not system-wide, so you can change one problem game and leave everything else alone. The steps are the same on Windows 11 Home and Pro.
Right-click the game’s.exe file, open Properties, go to the Compatibility tab, and check Disable fullscreen optimizations. Click OK and relaunch the game. Uncheck the box to turn the feature back on.
How It Works
Fullscreen optimizations in Windows 11 manage system resources dynamically by giving your game top priority when it runs as the primary window. Windows keeps fullscreen optimizations turned on by default to improve frame rates and performance. Turning the feature off can fix stuttering, graphical glitches, or input lag in specific games.
Fullscreen optimizations remain enabled out of the box in Windows 11. Efficiency in resource usage typically improves game performance while the feature stays active. Disabling fullscreen optimizations can improve performance for some specific games, offering a performance boost.
If a game stutters, tears, lags on input, or behaves oddly when you switch windows, turn the option off for that game only and test again. If nothing improves, turn it back on.
Reference: Demystifying Fullscreen Optimizations – DirectX Developer Blog
This article explains the difference between Fullscreen Exclusive and Fullscreen Optimizations.
Option 1
Enable or Disable Fullscreen Optimizations for One App or Game (Your Account Only)
You can turn off fullscreen optimizations for a single game on your user account by opening the properties of the game's executable file (.exe). Open the Compatibility tab in the properties window, check the box next to Disable fullscreen optimizations, and save your changes. This applies the setting only to your user profile without affecting other accounts.
If you only have a shortcut, right-click it and select Open file location to find the .exe. In a launcher such as Steam, you can usually right-click the game and browse to its local files.
- Right-click (or press and hold) the EXE file of the app or game, then click Properties. The properties window opens.
- Click the Compatibility tab. You should see a list of compatibility and display settings. (see screenshot below)
- Check the box next to Disable fullscreen optimizations to turn the feature off. Uncheck it to turn the feature back on (the default).
- Click OK to save the change and close the window.
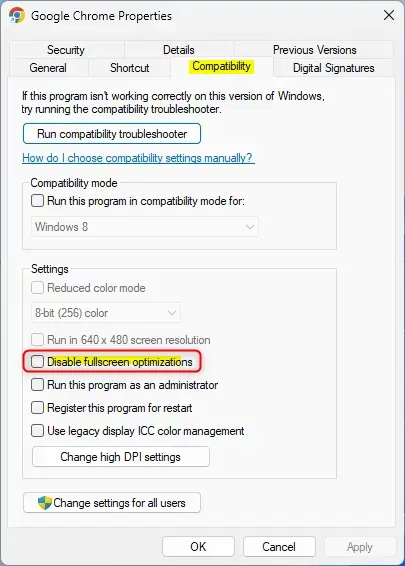
You don't need to restart Windows. Close the game completely and launch it again so it picks up the new setting. To undo the change, repeat the steps and uncheck the box.
Option 2
Enable or Disable Fullscreen Optimizations for One App or Game (All Users)
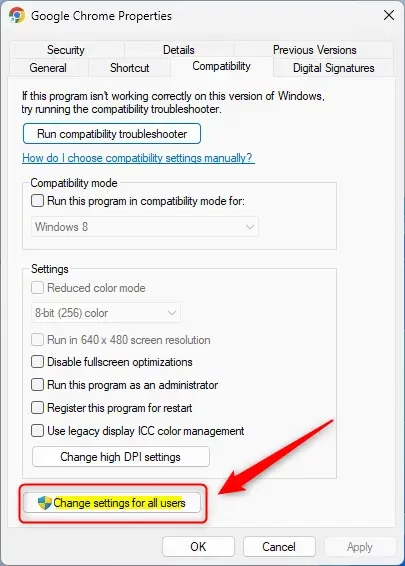
You can change fullscreen optimizations for all users on your Windows 11 PC by accessing the game properties with administrator permissions. Open the executable file properties, select the Compatibility tab, and click Change settings for all users. Check the box to disable the feature so the setting applies to every account on the computer.
You need an administrator account for this, and Windows will ask you to confirm with a User Account Control prompt. If you sign in as a standard user, you'll have to enter an administrator's credentials.
Follow these steps to change fullscreen optimizations for everyone on your computer:
- Right-click (or press and hold) the EXE file of the app or game, then click Properties.
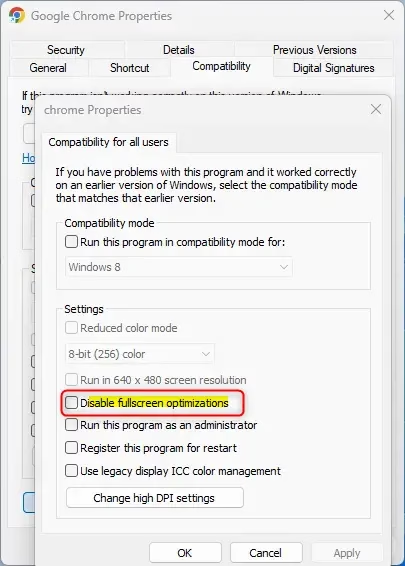
- Click the Compatibility tab, then click Change settings for all users. Approve the User Account Control prompt if it appears. A second properties window opens for all users.
- Check the box next to Disable fullscreen optimizations to turn the feature off, or uncheck it to turn it back on (the default). Then click OK. The all-users window closes and you return to the main properties window.
- Click OK again to close the properties window and apply the change.
Summary
Fullscreen optimizations help games run faster and keep features like overlays functional, though disabling them for specific games remains an option when issues arise. Relaunch the game after any change so it takes effect, and if the result is worse, go back and reverse the setting.
Was this guide helpful?

About the Author
Richard
Tech Writer, IT Professional
Richard is a writer at Geek Rewind who turns complex IT tasks into clear, step-by-step guides. He draws on years of hands-on experience in system administration and enterprise IT operations, focusing on Windows, Linux and WordPress: the problems people actually run into, and the fixes that work. His server and WordPress guides come from systems he runs himself. Richard builds and maintains the platform behind Geek Rewind, from its Ubuntu servers and Nginx configuration to its custom WordPress plugins. Many new tutorials start with readers' questions, and he's always glad to answer them in the comments.
No comments yet — be the first to share your thoughts!