This article explains how to disable or turn off touch screens when using Windows 11.
Some laptops come with touch screens that allow users to use and control the computer from the screen. If you’re not a fan of touch screens, then the steps below will show you how to disable them on Windows 11
There’s no special button needed to disable or turn off the touchscreen on Windows 11, as it is built directly into the operating System. However, you can turn off or stop the touchscreen functionality on your computer by disabling the device from the Device Manager in Windows 11.
The steps below should work if you use a Microsoft Surface or another Windows 11 computer with a touchscreen.
Once the touchscreen is disabled, it will not turn back on unless you go back into the Device Manager and re-enable it to restore the touchscreen functionality.
How to turn off the touchscreen on Windows 11
As mentioned above, there’s usually no dedicated button to turn off touchscreens on computers running Windows 11. If you turn off your computer’s touchscreen functionality, the easiest way is to turn it off in Device Manager.
Windows 11 has a centralized location for the majority of its settings. From system configurations to creating new users and updating Windows, all can be done from the System Settings pane.
To get to System Settings, you can use the Windows key + I shortcut or click on Start ==> Settings, as shown in the image below:

Alternatively, you can use the search box on the taskbar to search for Settings. Then select to open it.
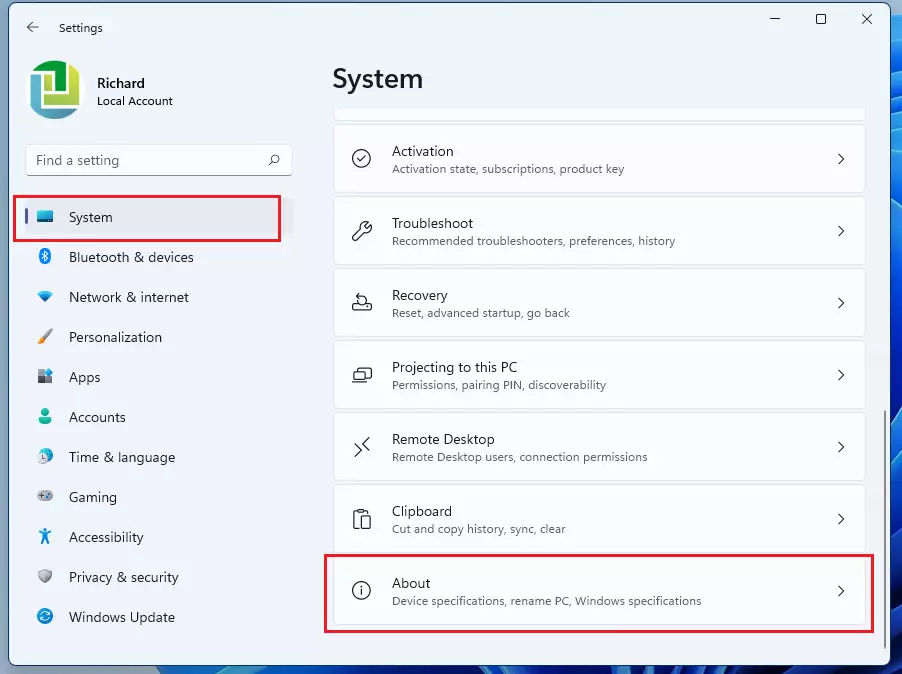
In Windows Settings, click System, and select About on the right pane of your screen, as shown in the image below.

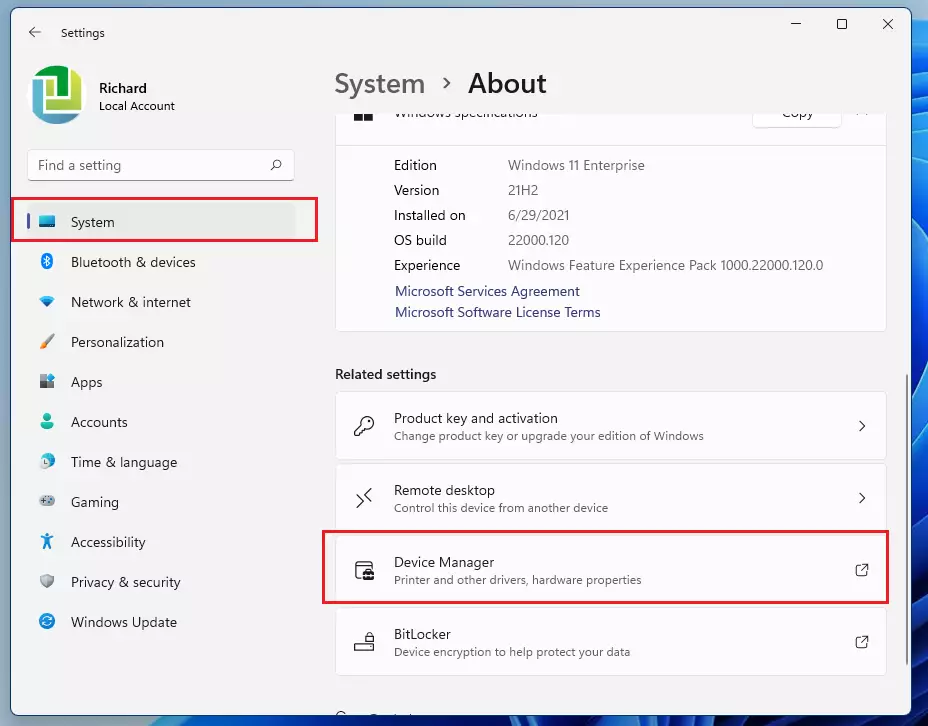
On the About settings pane, under Related settings, click Device Manager, as highlighted below.

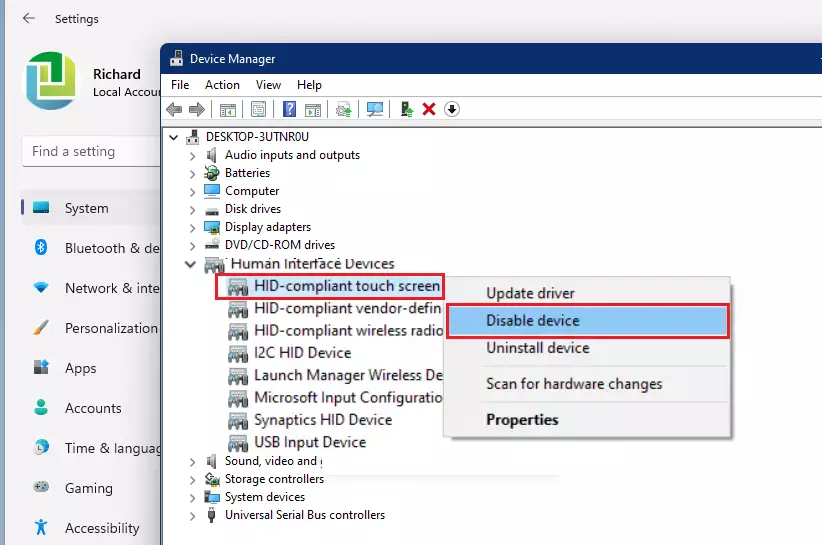
In the Device Manager, select a category to see the names of devices, then right-click (or press and hold) the one you’d like to disable. The touchscreen device(s) will be under the Human Interface Devices category. Expand the category to find the touchscreen device(s).
If you have multiple HID-compliant touchscreen items, make sure to disable each one of them. Right-click or hold down the first HID-compliant touchscreen device, then select Disable device.
You can also click Action from the top menu and select Disable device.

Do this for any other HID-compliant touchscreen item in that category. If you don’t have a second item, that’s completely fine. Most computers will only have a single HID-compliant touchscreen device in the Device Manager.
Restart your computer, and your computer touchscreen should be disabled.
Conclusion:
Disabling the touchscreen on your Windows 11 device is straightforward and can enhance your user experience if you prefer using a keyboard and mouse. Here are the key takeaways:
- You can easily disable the touchscreen via the Device Manager without any special hardware buttons.
- Access Device Manager through the System Settings or the search function on the taskbar.
- Ensure to disable all HID-compliant touchscreen devices if there are multiple entries.
- A restart is necessary to apply the changes effectively.
- You can re-enable the touchscreen functionality at any time by following the same steps.
By following these steps, you can gain better control over your device’s functionality based on your preference.

Leave a Reply