How to Add or Remove Compatibility Tab in App Properties in Windows 11

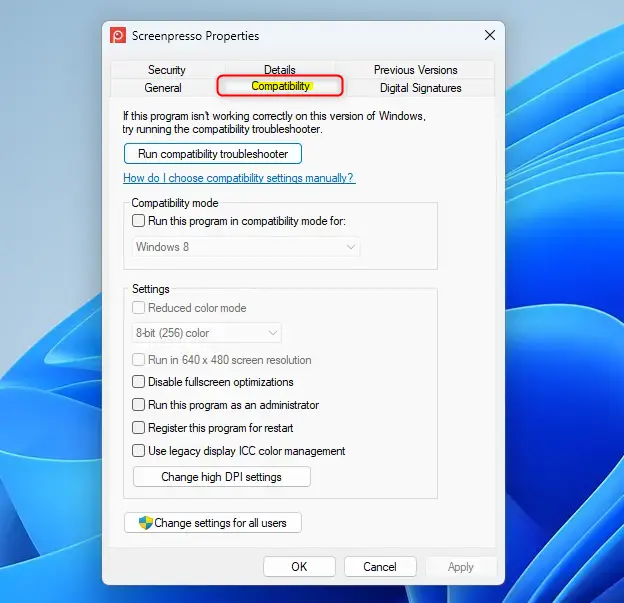
The Compatibility tab in a file’s Properties window lets you run older software built for earlier versions of Windows, such as Windows 7. It offers a compatibility mode, reduced colour settings and a few other legacy options. Most people never open it. Hiding it shortens the Properties window, which helps on shared PCs where you want users to see fewer settings.
This is reversible. You can bring the tab back whenever you need to run an older game or legacy program. This guide covers two methods: Local Group Policy Editor for Pro, Enterprise and Education, and Registry Editor for Home.
Open Local Group Policy Editor, navigate to Computer Configuration Administrative Templates Windows Components Application Compatibility, double-click Remove Program Compatibility Property Page, select Enabled, click OK, then restart your computer. The Compatibility tab disappears from all app Properties windows.
How to Remove the Compatibility Tab Using Group Policy Editor (for Pro, Enterprise, and Education Editions)
Local Group Policy Editor is a tool built into Windows for managing system settings. It is only included in Windows 11 Pro, Enterprise and Education. Windows 11 Home does not have it, so if you run Home, skip ahead to the Registry Editor method. You will need to be signed in with an administrator account.
We will use one policy setting here to hide the Compatibility tab for all apps on the PC.
Step 1Open the Local Group Policy Editor
The quickest way to open the editor is from the Run box.
- Press Win+R on your keyboard. The Run box opens.
- In the box, type
gpedit.mscand press Enter or click OK. - If a User Account Control (UAC) window asks for permission, click Yes. The Local Group Policy Editor window should now be open, with a folder tree on the left and settings on the right.
If Windows says it cannot find the file, you are most likely on Home edition. Use the Registry Editor method below instead.
Step 2Find the Right Setting
The policy is buried a few folders deep, so open them in order.
- In the left pane of the Local Group Policy Editor, click Computer Configuration.
- Under it, click Administrative Templates.
- Next, click Windows Components.
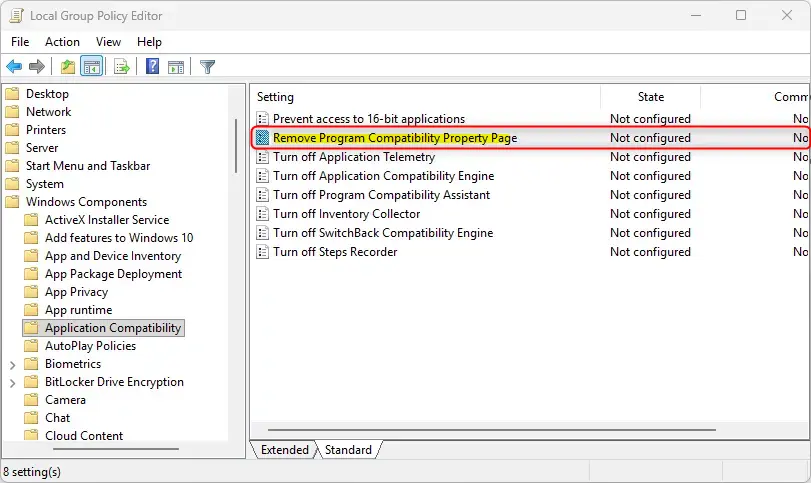
- Scroll down the list and click Application Compatibility. The right pane now shows the policies for this folder.
- On the right side, look for the setting called Remove Program Compatibility Property Page.
If the right pane looks empty, click the Standard tab at the bottom of the window, or click the folder name again.
Step 3Set the Policy to Remove the Tab
Group Policy settings control how Windows features behave and appear. This one decides whether the Compatibility tab is shown.
- Double-click Remove Program Compatibility Property Page. A new window opens.
- You will see three choices: Not Configured, Enabled and Disabled. To remove the Compatibility tab, select Enabled.
- Click OK at the bottom to save the change. The setting should now show as Enabled in the list.
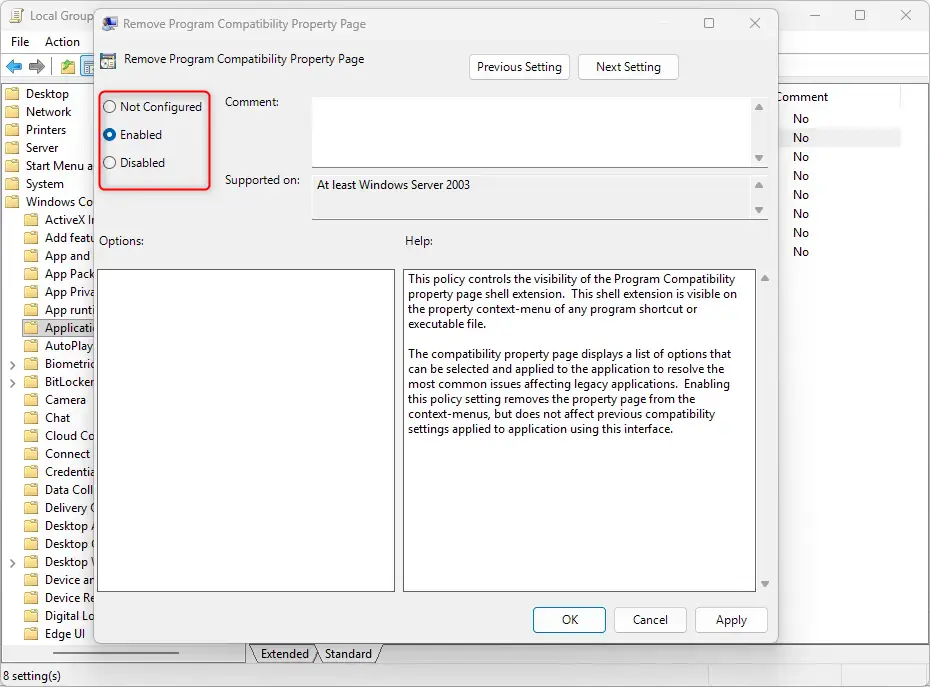
Not Configured is the default, and it means the tab is visible. Enabled means the policy is switched on, so the tab is removed. Disabled means the removal is switched off, so the tab still shows.
Step 4Close the Editor and Test
Windows does not always apply a policy change to windows you already have open. Restarting is the most reliable way to be sure it has taken effect.
- Close the Local Group Policy Editor.
- Restart your computer, or sign out and sign back in. Sometimes the change applies straight away, but a restart removes any doubt.
- After restarting or signing back in, find any program or app shortcut. Right-click it and choose Properties. The Compatibility tab should be gone.
If the tab is still there, reopen the policy and confirm it says Enabled. Also check that you are using a .exe file or a shortcut to one, since other file types never show this tab.
When you reach the step where you chose Enabled, choose Not Configured instead, click OK, and restart.
How to Remove the Compatibility Tab Using the Registry Editor (for All Windows Editions)
Registry Editor is a tool for viewing and changing the low-level settings Windows stores in its registry. Use this method on Windows 11 Home, which has no Group Policy Editor. It also works on Pro and the other editions. You will need an administrator account.
Editing the registry incorrectly can cause serious problems with Windows, and in the worst case you might need to reinstall it. Only change the values this guide names. Back up the registry before you start:
- Open Registry Editor (the next section shows how).
- Click File, then Export.
- Under Export range, choose All, pick a location and a file name, and click Save.
If something goes wrong, you can double-click that saved file to restore the settings it holds.
Step 1Open the Registry Editor
Opening Registry Editor works much like opening the Group Policy Editor.
- Press Windows key + R on your keyboard to open the Run box.
- Type
regeditand press Enter or click OK. - If a User Account Control (UAC) window asks for permission, click Yes. Registry Editor opens with a folder-like tree on the left.
Step 2Go to the Correct Registry Location
Registry keys are organised like folders, so you need to reach the right one. In the Registry Editor, go to this path:
HKEY_LOCAL_MACHINE\SOFTWARE\Policies\Microsoft\Windows\AppCompat
Here is how to find it by clicking through the left pane:
- Click the arrow next to HKEY_LOCAL_MACHINE to open it.
- Open SOFTWARE in the same way.
- Keep going: open Microsoft, then Windows.
- Finally, click AppCompat. Its contents, if any, appear in the right pane.
You can also paste the path into the address bar at the top of Registry Editor and press Enter.
Tip: If you do not see an AppCompat folder, you may need to create it. Right-click the folder one level above where it should be, select New Key, and name it AppCompat. Then select the new key.
Step 3Create or Change the Value to Remove the Tab
Registry values are individual settings stored inside a key. You will add one value that tells Windows to hide the tab.
- With the AppCompat key selected on the left, look at the right pane.
- Right-click an empty space in the right pane.
- In the menu that appears, select New, then click DWORD (32-bit) Value. A new entry appears with its name highlighted for editing.
- Name this new value exactly
DisablePropPage. Spelling and capitalisation matter. - Double-click the new
DisablePropPagevalue you just created. An edit window opens. - In the Value data box, type
1. - Make sure Base is set to Hexadecimal.
- Click OK. The value should now show in the right pane with your data next to it.
Explanation: Setting the DisablePropPage value to 1 tells Windows to hide the program compatibility property page, which is the tab. If you want the tab to show again, change this value to 0 or delete the DisablePropPage value.
Step 4Close the Registry Editor and Restart
Windows reads this setting when it loads, so the change will not show up until you restart.
- Close the Registry Editor window.
- You must restart your computer for this change to take effect.
- After your computer restarts, test it. Right-click any application or shortcut and select Properties. The Compatibility tab should be gone.
Tip: If you ever want the Compatibility tab back, return to the same registry location (HKEY_LOCAL_MACHINE\SOFTWARE\Policies\Microsoft\Windows\AppCompat). Right-click DisablePropPage, select Delete, and confirm. Then restart your PC. If you made an export earlier, you can also restore from that file, though deleting the value is simpler.
Summary
Removing the Compatibility tab from app properties in Windows 11 declutters the Properties window for standard users. Use the Local Group Policy Editor on Pro, Enterprise and Education editions, or the Registry Editor on Home. Both methods need a restart, or at least a sign-out, to take full effect, and both can be undone by reversing the setting you changed.
Was this guide helpful?

About the Author
Richard
Tech Writer, IT Professional
Richard is a writer at Geek Rewind who turns complex IT tasks into clear, step-by-step guides. He draws on years of hands-on experience in system administration and enterprise IT operations, focusing on Windows, Linux and WordPress: the problems people actually run into, and the fixes that work. His server and WordPress guides come from systems he runs himself. Richard builds and maintains the platform behind Geek Rewind, from its Ubuntu servers and Nginx configuration to its custom WordPress plugins. Many new tutorials start with readers' questions, and he's always glad to answer them in the comments.

No comments yet — be the first to share your thoughts!