How to Enhance Video Quality on Windows 11 While Streaming


Enhancing video quality on Windows 11 helps with choppy playback, soft or blurry detail, and buffering while you watch movies and shows online. Most of the improvement comes from a handful of display settings, a few playback options in Settings, and the internet controls that decide what resolution a stream starts at.
Matching your monitor refresh rate to 60Hz or higher stops visual stuttering during fullscreen playback. You can check it in Settings System Display Advanced display, where the Choose a refresh rate list sits. Turning on hardware acceleration also moves the heavy video processing onto your graphics card (GPU) instead of the processor, which keeps streams running smoothly. If your browser has its own graphics acceleration setting, such as Use graphics acceleration when available in Edge under Settings System and performance, make sure it is on too.
Open Settings Apps Video playback and toggle on HDR streaming and hardware acceleration. Enable GPU scheduling at Settings System Display Graphics, set your display refresh rate to 60Hz or higher in Advanced display settings, and install HEVC Video Extensions from the Microsoft Store for smoother 4K playback.
How to change video playback settings
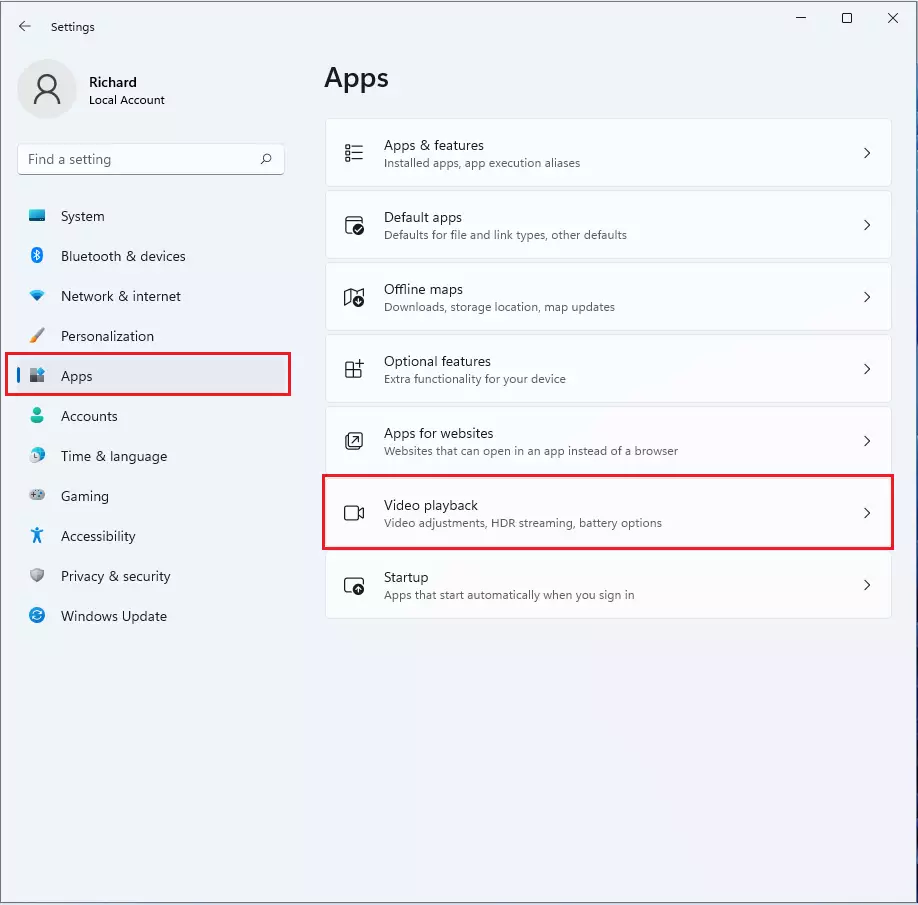
The quickest place to start is the built-in video playback settings. Press Win+I to open Settings , select Apps, then click Video playback. This page can turn on HDR streaming and let Windows automatically process video to make dark scenes clearer and colors brighter.
Some of them depend on your display and graphics hardware. For example, HDR options only show up if your screen supports HDR. A missing switch usually means the hardware does not support it, not that something is broken. The steps below work the same on Windows 11 Home and Pro.
Press Win+I to open Settings . You can also right-click the Start button and choose Settings. The Settings window should open with a list of categories down the left side.

- Once the Settings window is open, click Apps in the left sidebar. A list of app-related tiles should appear on the right.
- Select the Video playback tile on the right. The video settings page should open, with the available switches and drop-down lists for your hardware.
On the next screen, look for the option to save network bandwidth by playing video at a lower resolution. Toggle the switch On or Off, depending on your connection.
If your internet is slow or has a data cap, turn it On. Video will use less data and buffer less, but it will look softer. If you have a fast connection and want the sharpest picture, leave it Off. Changes apply straight away, so you can flip the switch back at any time. Close and reopen the video app if it does not seem to pick up the change.

Essential Video Enhancements
HEVC is a video format that lets high-definition and 4K video play smoothly without stuttering. Some PCs already include it, and some versions in the Store are paid, so check the listing before you install. Restart your video app after the install finishes.
You should also download the Windows HDR Calibration app from the Microsoft Store. It fixes washed-out colors and makes bright highlights stand out on an HDR screen. It only helps if your display supports HDR and HDR is turned on in Windows.
Next, launch the Windows HDR Calibration app and follow its on-screen test patterns to tune your display for better color depth and brightness. If the app finds no HDR display, it will not run properly, so check your monitor first.
Graphics cards handle the rendering work, and modern GPUs support a feature called hardware-accelerated GPU scheduling. Go to Settings System Display Graphics, open the default graphics settings, and make sure it is turned on for lower latency and better performance. If the option is missing, your GPU or driver does not support it, and updating the graphics driver may fix that. Restart the PC after you change it. To undo it, turn the switch off and restart again.
AI Upscaling and Hardware Acceleration
AI upscaling uses your graphics card to sharpen blurry videos in real time. It works best on lower-resolution streams, such as 720p video shown on a 1080p or 4K screen. Whether it is available depends on your GPU, its driver, and the app or browser you watch in. Look in your browser's settings and in your graphics driver's control app. If you do not see an option, it is usually not supported on your hardware yet. Upscaling uses extra GPU power, so turn it off if your laptop gets hot or the fans get loud.
Summary
To enhance video quality on Windows 11, adjust the playback settings in the Settings app, install HEVC extensions, calibrate HDR, and keep your GPU drivers updated for sharp visuals. Change one setting at a time and test it with the same video. That way you know which change helped, and you can undo any that did not.
Have a question about this guide?
Answered by AI from this guide. Good questions may be added to this page — please don't include personal details.
Did this guide fix your problem?

About the Author
Richard
Tech Writer, IT Professional
Richard is a writer at Geek Rewind who turns complex IT tasks into clear, step-by-step guides. He draws on years of hands-on experience in system administration and enterprise IT operations, focusing on Windows, Linux and WordPress: the problems people actually run into, and the fixes that work. His server and WordPress guides come from systems he runs himself. Richard builds and maintains the platform behind Geek Rewind, from its Ubuntu servers and Nginx configuration to its custom WordPress plugins. Many new tutorials start with readers' questions, and he's always glad to answer them in the comments.
No comments yet — be the first to share your thoughts!