How to Configure Video Playback Options in Windows 11 Apps Settings

Video playback options in Windows 11 apps settings control how your computer decodes and renders video. They cover hardware acceleration, color calibration, and HDR (High Dynamic Range) streaming. Moving this video work from your central processor (CPU) to your graphics hardware (GPU) reduces stutter and helps prevent thermal throttling on laptops and desktops.
Not every option in this guide shows up on every PC. Some depend on your display, your graphics driver, or whether the device is a laptop with a battery. If a setting is missing, the section below says what usually causes it.
Open Settings , select Apps, then click Video playback to access video playback settings. Adjust hardware acceleration, HDR streaming, battery optimization, and color calibration toggles based on your display and graphics hardware capabilities.
How to Access Video Playback Preferences
Video playback settings sit inside the main Windows Settings app, under the Apps section. From there you can tune battery behavior, streaming quality, and how video is processed for the media apps you have installed.
- Press Win+I to open Settings.

Windows 11 Start menu with Settings gear icon highlighted. - Select Apps in the left-hand sidebar. The right pane now lists app-related pages.
- Click Video playback to see the toggles and dropdowns.
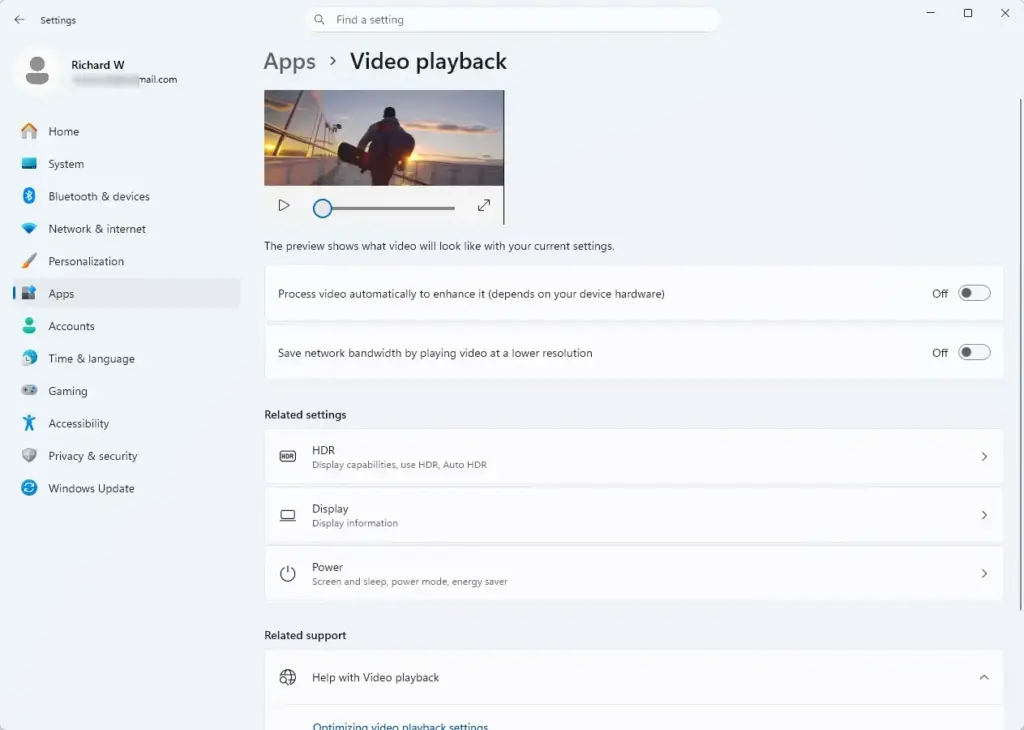
Settings › Apps › Video playback
If you do not see Video playback, scroll down the Apps page, because it is usually near the bottom of the list. Which options appear on this page depends on your hardware. A desktop PC with no battery, for example, will not show battery options.
Optimizing Video Quality Using HDR
HDR (High Dynamic Range) expands contrast and color range on compatible monitors. When it is on at the system level, supported media players can use your display’s full capability. Bright scenes stand out more and dark areas show more detail.
- Open Settings and select System.
- Click Display, then select Use HDR.
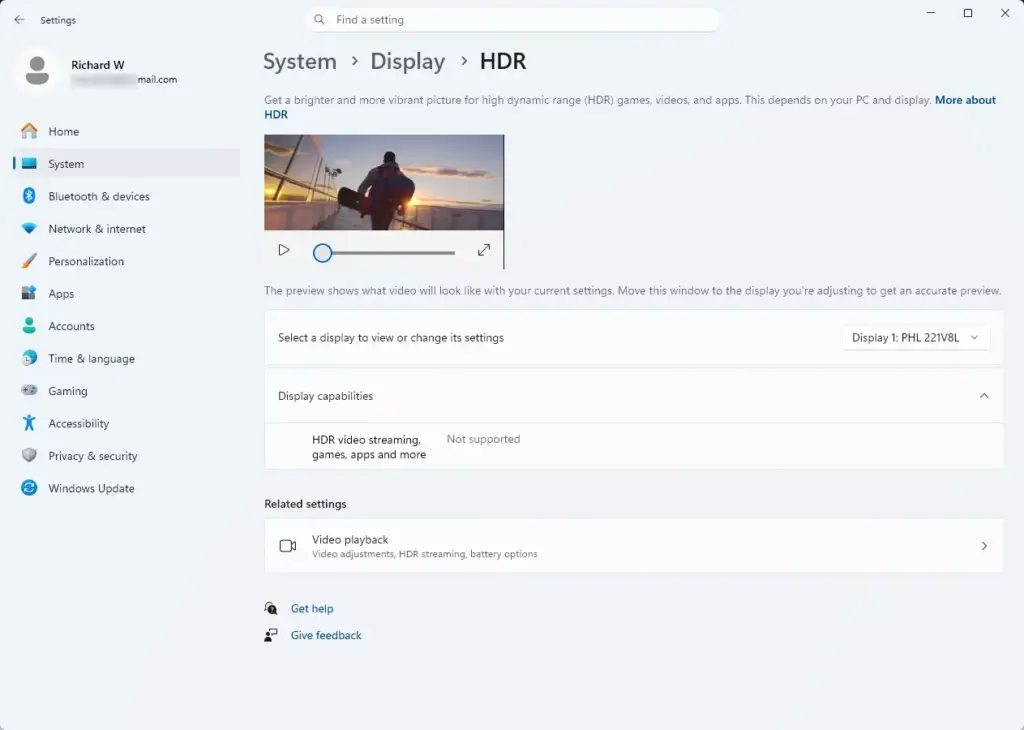
Settings › System › Display › HDR - Set the switch to On for your primary monitor. The screen may flicker for a moment and look a little washed out in the desktop. That is normal, because SDR content is being mapped into an HDR signal.
- Return to the Video playback page and adjust the HDR video streaming setting to balance brightness between SDR and HDR content. On some Windows 11 builds this appears as a toggle rather than a slider. Use whichever control your version shows.
Also check that you picked the right monitor at the top of the Display page when you have more than one. To undo this, set the switch back to Off.
Streamlining Playback for Battery Life
When a laptop runs on battery, Windows may lower video quality to save power, and that can cause dropped frames. You can change your video playback settings to favor visual quality so movies and streams do not stutter while unplugged.
- Open Settings, select Apps, then select Video playback.
- Find the Battery options section.
- Select Optimize for video quality from the dropdown menu instead of optimizing for battery life.
If you are on a long flight, switch it back to the battery-saving choice. If Battery options is missing, you are most likely on a desktop or a device without a battery.
Adjusting Hardware Acceleration and Decoding
Hardware acceleration and decoding improve rendering performance for media players and help prevent audio-video desynchronization. Turning on hardware-accelerated GPU scheduling lets your graphics card manage its own memory, which keeps playback smooth and in sync.
- Open Settings and select System.
- Click Display, then select Graphics.
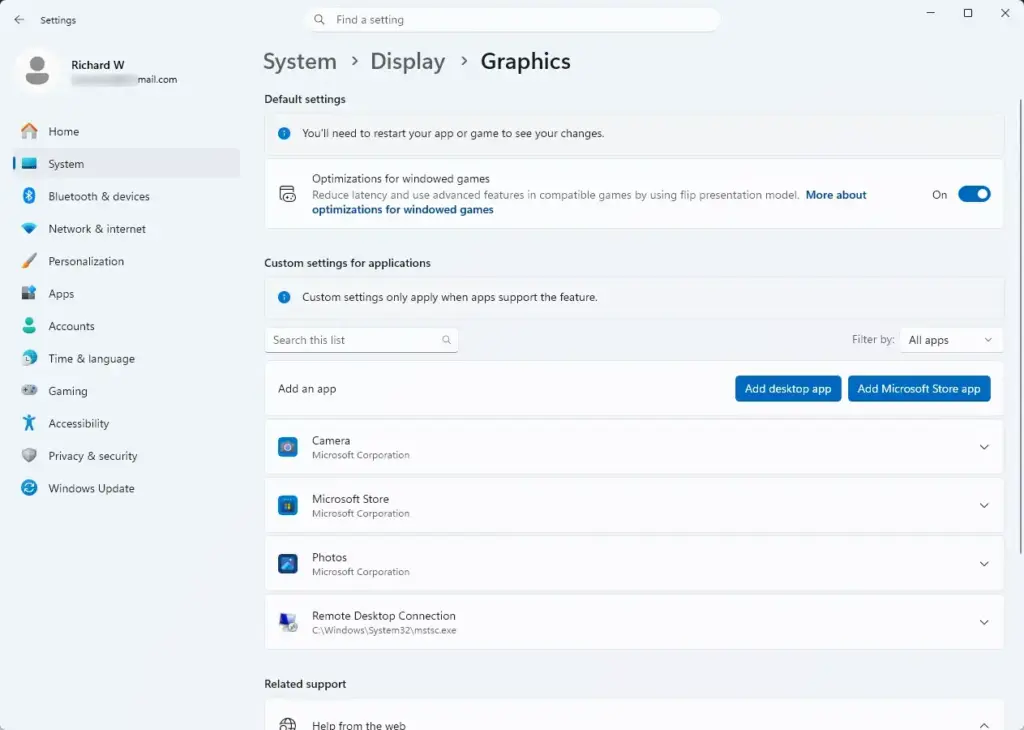
Settings › System › Display › Graphics - Click Change default graphics settings.
- Set Hardware-accelerated GPU scheduling to On. This step requires an administrator account and a system restart to take effect.
- Restart the PC when prompted, then check that the setting is still On.
If the toggle is missing or greyed out, your graphics card or its driver likely does not support the feature. Updating the graphics driver, covered later in this guide, often fixes that. If you see new crashes or glitches after enabling it, turn the setting off and restart again.
Calibrating Color and Display Profiles
Washed-out visuals and crushed blacks can ruin playback on an otherwise good monitor. Applying a color profile that matches your panel makes movies and shows display colors more accurately.
- Open the Start menu, type Color Management, and press Enter. The Color Management window opens on the Devices tab.
- Select your display from the Device dropdown menu. If you have several monitors, make sure you pick the right one.
- Check the box labeled Use my settings for this device.
- Click Add to select a manufacturer-approved ICC color profile, then click Set as Default Profile.
You can usually download the ICC profile from your monitor maker's support page. To go back, select the profile in the list and click Remove, or choose a different one as the default.
Troubleshooting Common Playback Stutter
Playback stutter often comes down to outdated graphics drivers. Newer drivers add support for modern video codecs like AV1 and HEVC and fix resource conflicts that disrupt video.
- Right-click the Start button and select Device Manager. This step requires administrator privileges.
- Expand the Display adapters category. Your graphics card is listed underneath.
- Right-click your graphics card and select Update driver.
- Choose Search automatically for drivers and follow the on-screen prompts.
Windows only finds drivers it has in its own catalog, so it may report that the best driver is already installed even when a newer one exists. In that case, get the latest driver from your GPU maker (NVIDIA, AMD, or Intel) or from your PC manufacturer. Restart the PC if the installer asks you to.
Advanced Codec Management and Extensions
Missing media decoders cause black screens and audio-only playback. Installing official video extension packages from the Microsoft Store gives your system what it needs to play formats like HEIF and HEVC.
- Open the Microsoft Store application from your taskbar or Start menu.
- Type HEVC Video Extensions in the search bar.
- Purchase or download the official extension provided by Microsoft Corporation to enable native decoding support across all system media players.
Check the publisher name before you buy, since look-alike listings exist. Some PCs already include a free HEVC extension from the device manufacturer, so you may not need to pay. After installation, close and reopen your media player and try the file again.
What to do next
With your video playback settings optimized, you should now get smooth, high-resolution media in your applications. Consider adjusting your audio device properties next, so multi-channel surround sound or spatial audio matches your newly calibrated picture.
Frequently asked questions
How do I change my video playback settings on my iPhone?
Open Settings on your iPhone and scroll down to the app you watch videos in, such as TV or YouTube. Look for Video Quality or Playback options there. For most streaming apps, though, the controls are inside the app itself. Tap your profile icon or the gear icon and choose Playback or Video quality.
How do I open the video options in Teams?
Open Teams and click your profile picture at the top right, then choose Settings. Select Devices to change your camera, microphone, or speaker. During a call, click More options (the three dots) and choose Device settings to change video while you're in a meeting.
How do I change the YouTube playback area?
Press T to switch to Theater mode, which widens the player to the full width of the page. Press F for full screen, and Esc to leave it. You can also click the Theater mode icon, the rectangle next to the gear icon, in the player controls.
How do I change video settings?
Video settings depend on the app you use. In Windows 11, press Windows Key + I, select Apps, then click Video playback to change battery, streaming, and processing options. In a streaming app or video player, look for a gear icon or Settings menu to adjust quality and display.
Still have a question?
Answered by AI from this guide. Good questions may be added to this page — please don't include personal details.
Did this guide fix your problem?

About the Author
Richard
Tech Writer, IT Professional
Richard is a writer at Geek Rewind who turns complex IT tasks into clear, step-by-step guides. He draws on years of hands-on experience in system administration and enterprise IT operations, focusing on Windows, Linux and WordPress: the problems people actually run into, and the fixes that work. His server and WordPress guides come from systems he runs himself. Richard builds and maintains the platform behind Geek Rewind, from its Ubuntu servers and Nginx configuration to its custom WordPress plugins. Many new tutorials start with readers' questions, and he's always glad to answer them in the comments.
No comments yet — be the first to share your thoughts!