How to Change Video Frame Rate and Quality in Windows 11

Changing the video frame rate and quality in Windows 11 controls how smooth and how clear your screen recordings look. Frame rate is measured in frames per second (FPS). It decides how fluid motion appears on screen. The quality setting adjusts sharpness and, as a result, the final file size.
Xbox Game Bar is the built-in tool that records your screen, and the settings that drive it live in the Windows Settings app. There you can switch between 30 FPS and 60 FPS and choose Standard or High quality. These two options let you balance clarity against storage space, depending on what you record. This works the same on Windows 11 Home and Pro.
Open Settings , click Gaming, then Captures, and use the Video frame rate drop-down to choose between 30 fps or 60 fps. Select your preferred Video quality from Standard or High. Changes apply to new recordings only.
What Are Frame Rate and Video Quality?
Frame rate is how many individual pictures your screen shows every second. More pictures per second make motion look smoother, which matters most for fast games and quick mouse movement. Video quality controls how sharp and clear each of those pictures looks.
The cost is file size. A recording at 60 FPS and High quality can take up several times the space of the same clip at 30 FPS and Standard. It also asks more of your PC while you record, so a weaker machine may stutter in the game itself.
Video quality is about how clear and sharp your video looks. Higher quality videos look better but take more space on your computer. Lower quality videos save space but might look blurry or pixelated, especially when there is a lot of fast movement or small text on screen.
As a rule of thumb, use Standard for casual clips and long sessions. Use High for short clips you plan to share or edit. Also keep in mind that 60 FPS only helps if what you are recording actually runs at that rate. A game capped at 30 FPS will not look smoother just because you record at 60.
Where Are Your Game Videos Saved?
Recordings are normal video files, so you can open, copy or delete them like any other file. You can also change this save location if you want to save your videos somewhere else, like a different drive. This is worth doing if your system drive is small, because high-quality recordings fill it quickly.
How to Capture Game Clips
To capture a cool moment while gaming, press:
Windows logo key + ALT + G
This will save a short video of the last few seconds of your gameplay. It only works if background recording is turned on in the capture settings covered below. Otherwise there is nothing for Windows to save.
Steps to Change Frame Rate and Video Quality
You change the frame rate and quality in the Settings app, under the capture options. The path is Settings Gaming Captures The steps below walk through it. Any change you make applies to new recordings only. Clips you have already saved stay as they were.
- Open Settings. Click the Start menu button and select Settings, or press
Windows key + Ion your keyboard. The Settings window opens with a list of categories on the left. - Click Gaming in the list on the left side of the Settings window. The Gaming page opens on the right, with entries such as Game Bar and Captures.

Windows Settings app showing Gaming button - Click Captures on the right side to open the capture settings. You should now see the options for recording, including where clips are saved.

Windows Captures settings - Find the Video frame rate and Video quality options. If you do not see them, scroll down the page a little. Both appear as drop-down lists.
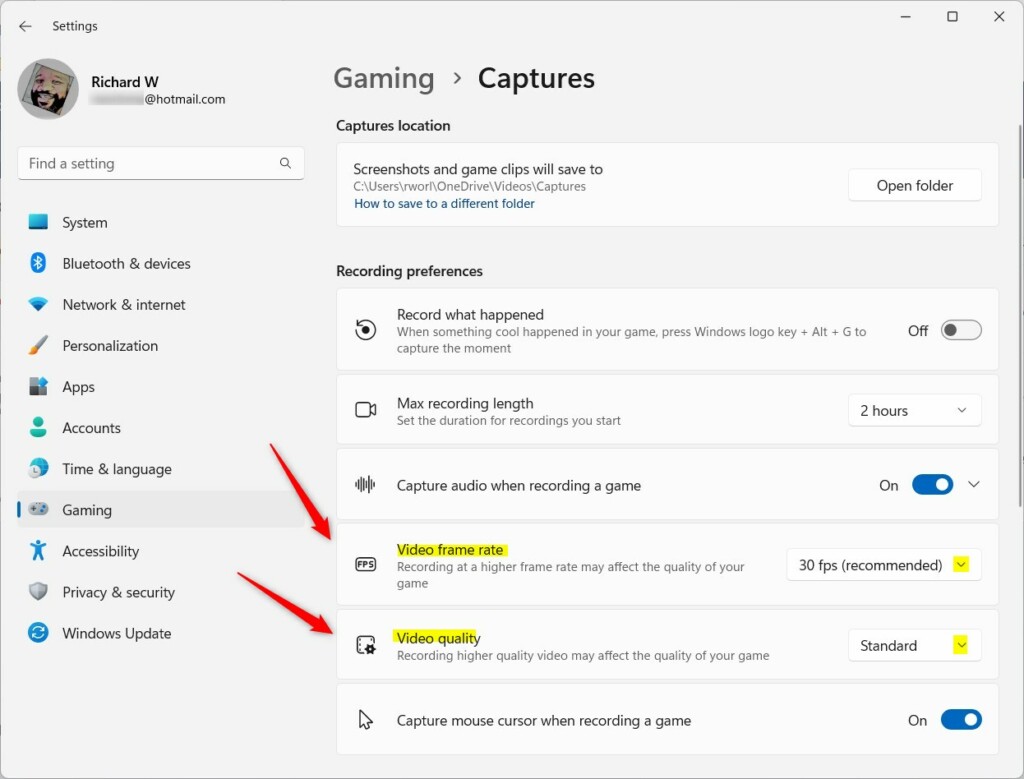
Windows 11 settings showing gameplay capture video frame rate and quality options - Click the small arrow next to each setting to see its options. A short list drops down below the setting.
- Pick the frame rate you want from the Video frame rate list:
- 30 fps – Good for most computers and saves space.
- 60 fps – Smoother video, but it uses more space and needs a stronger PC.
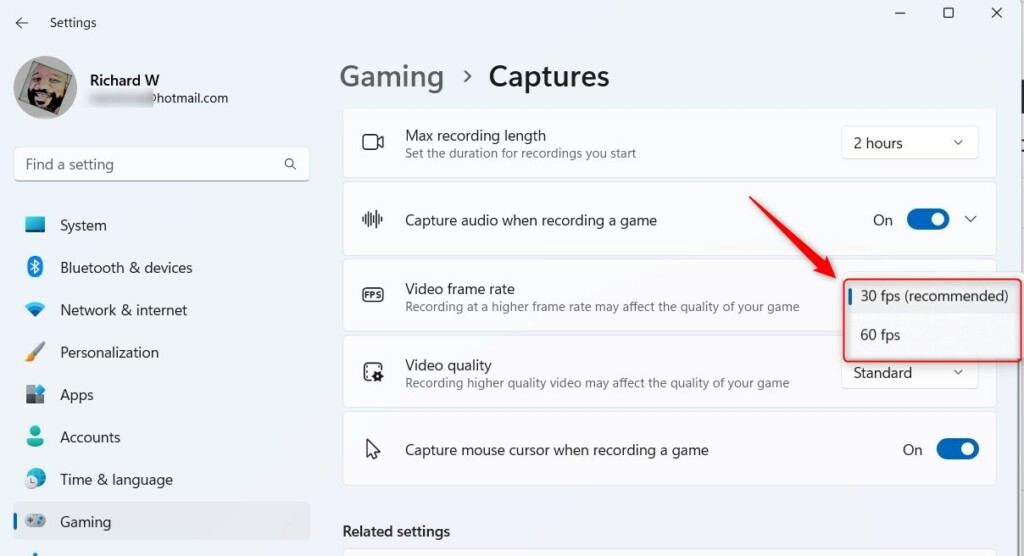
Frame rate options in Windows 11 - Pick your quality from the Video quality list:
- Standard – Smaller file size, good for casual use.
- High – Sharper and clearer, but a bigger file size.
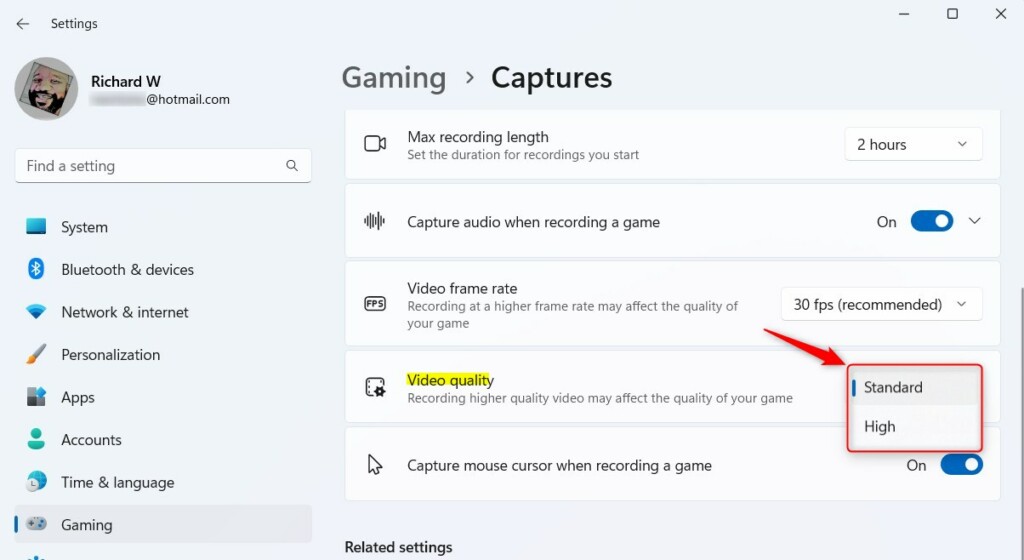
Video quality options in Windows 11 - Close the Settings window when you are done. There is no Save button, because the choices apply as soon as you select them. Record a short test clip to check the result. To undo a change, come back to the same page and pick the previous option.
Summary
- Adjusting frame rate and quality helps your game videos look better and smoother.
- Windows 11 lets you pick settings that work best with your computer. Use 30 FPS and Standard on modest hardware, and 60 FPS and High when your PC and storage can handle it.
- Try different options to see what looks best and saves enough space. A short test recording at each setting shows you the difference in both looks and file size.
- If you have questions or tips, feel free to leave a comment below!
Was this guide helpful?
50% of readers found this helpful (2 votes)

About the Author
Richard
Tech Writer, IT Professional
Richard is a writer at Geek Rewind who turns complex IT tasks into clear, step-by-step guides. He draws on years of hands-on experience in system administration and enterprise IT operations, focusing on Windows, Linux and WordPress: the problems people actually run into, and the fixes that work. His server and WordPress guides come from systems he runs himself. Richard builds and maintains the platform behind Geek Rewind, from its Ubuntu servers and Nginx configuration to its custom WordPress plugins. Many new tutorials start with readers' questions, and he's always glad to answer them in the comments.



No comments yet — be the first to share your thoughts!