How to Access Linux Files on Windows 11 Using WSL
You can access Linux files on Windows 11 directly through File Explorer using the Windows Subsystem for Linux (WSL).
WSL allows you to run a Linux environment seamlessly within Windows. This means you can work with Linux commands, applications, and crucially, your Linux files without the need for dual-booting (installing two operating systems on one computer) or setting up a separate virtual machine (a computer simulated within your computer).
WSL 2's integration allows users to mount Linux file systems for direct browsing. This feature means Linux files are no longer isolated and can be opened using familiar Windows applications, improving file access across operating systems.
Access Linux files in Windows 11 using WSL by opening PowerShell as administrator and running `wsl –mount `. Then, navigate to `\wsl$` in File Explorer to see your Linux distributions and mounted drives.
Steps to Mount Linux File System on 🪟 Windows 11
Step 1Open PowerShell as Administrator
⚠️ Admin privileges required
First, you’ll want to open PowerShell with administrator privileges:
- Click Start. Type PowerShell.
- Right-click Windows PowerShell. Select Run as administrator.
Step 2See Your Drives
Windows Subsystem for Linux (WSL) can access your computer's drives. To see a list of accessible drives, open PowerShell and type the command `wmic diskdrive list brief`. This command displays a clear list of your drives, showing their names and sizes, helping you select the correct drive for mounting.
wmic diskdrive list briefYou should see a list like this:
Caption                     DeviceID            Model                   Partitions  Size

SAMSUNG MZVKW512HMJP-000H1  \.PHYSICALDRIVE0  SAMSUNG MZVKW512HMJP-000H1  3         512105932800

ST1000LM035-1RK172          \.PHYSICALDRIVE1  ST1000LM035-1RK172          1         1000202273280
Look at the DeviceID column; this tells you the name of the physical drives.
Step 3Mount the Linux Drive
Mounting your Linux drive lets you access its files directly from Windows using a simple PowerShell command. In PowerShell, type ‘wsl –mount ‘, but replace with the specific drive identifier you found earlier, like \.PHYSICALDRIVE0 for the first drive.
wsl --mount <DISKPATH>For example, to mount the first drive shown above:
wsl --mount \.PHYSICALDRIVE0--partition and the partition number. For example, to mount partition 1 on the same drive:wsl --mount \.PHYSICALDRIVE0 --partition 1-t option. For example:wsl --mount <DISKPATH> -t vfatStep 4Access Linux Files in Windows File Explorer
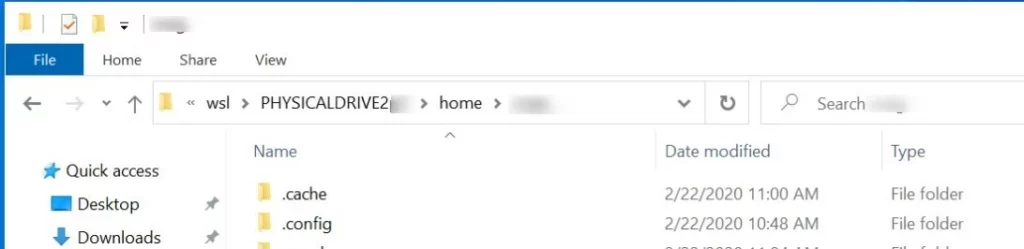
Once your Linux drive is mounted, you can easily access its files from Windows File Explorer. Simply open File Explorer, type ‘\wsl$’ into the address bar at the top, and then click on your Linux distribution’s name to see all your files.
In the address bar at the top, type:
\wsl$You’ll see your Linux distributions listed here. Click on your Linux distro (for example, Ubuntu). Then open the mount folder to find your mounted drive’s files.
Step 5Unmount the Linux Drive (When Done)
When you want to safely disconnect the Linux drive, go back to PowerShell and run:
wsl --unmount <DISKPATH>Example:
wsl --unmount \.PHYSICALDRIVE0Summary
- WSL lets you run Linux inside Windows 11 easily.
- You can mount and open Linux drives or partitions directly in Windows via PowerShell commands.
- Once mounted, Linux files are available inside Windows File Explorer under
\wsl$. - Remember to unmount your drives safely when done.
Windows Subsystem for Linux (WSL) makes it easy to run Linux on your Windows 11 computer. You can mount your Linux drives or partitions and access their files directly in Windows File Explorer using simple PowerShell commands and the ‘\wsl$’ path.
How to Install WSL on Windows 11
How to Use File Explorer on Windows 11
How to Run PowerShell as Administrator
If you have questions or want to share your experience, please leave a comment below!
Was this guide helpful?

About the Author
Richard
Tech Writer, IT Professional
Richard, a writer for Geek Rewind, is a tech enthusiast who loves breaking down complex IT topics into simple, easy-to-understand ideas. With years of hands-on experience in system administration and enterprise IT operations, he’s developed a knack for offering practical tips and solutions. Richard aims to make technology more accessible and actionable. He's deeply committed to the Geek Rewind community, always ready to answer questions and engage in discussions.

No comments yet — be the first to share your thoughts!