

phpMyAdmin on Windows Subsystem for Linux (WSL) with Apache gives you a web page to manage MySQL and MariaDB databases without using complicated command-line tools. It replaces text commands with a visual interface where you can create users, run queries, and back up data.
Install phpMyAdmin with Apache on Windows WSL by enabling WSL and Virtual Machine Platform features, installing Ubuntu from the Microsoft Store, then installing Apache and MariaDB within Ubuntu using apt commands.
Windows Subsystem for Linux (WSL 2) provides a fast, lightweight way to host these web tools directly on your PC. Pairing phpMyAdmin with the Apache web server sets up a complete local database environment that runs smoothly on Windows 11 and Windows 10.
- First, turn on the Windows Subsystem for Linux (WSL) and the Virtual Machine Platform by running commands in PowerShell as an administrator.
- Next, install Ubuntu from the Microsoft Store. Open Ubuntu and create a username and password.
- Install the Apache web server in Ubuntu by typing
sudo apt updatethensudo apt install apache2in your Ubuntu terminal. - Install the MariaDB database server by typing
sudo apt-get install mariadb-server mariadb-clientin Ubuntu, then runsudo mysql_secure_installationto secure it. - Install PHP, needed for phpMyAdmin, by typing
sudo apt install php libapache2-mod-php php-common php-mysql php-gmp php-curl php-intl php7.4-mbstring php-xmlrpc php-gd php-xml php-cli php-zipinto your Ubuntu terminal. - Finally, install phpMyAdmin itself by typing
sudo apt install phpmyadminin Ubuntu. Follow the prompts to set it up with Apache and create a password. - Open your web browser and go to
http://localhost/phpmyadminto log in and start managing your databases.
Getting Started
Summary
You have finished setting up phpMyAdmin Windows WSL by enabling the required Windows features, installing Ubuntu, and configuring Apache, MariaDB, PHP, and phpMyAdmin. You can now use this local environment to manage your databases through your web browser.
You have now successfully installed phpMyAdmin with Apache on Windows WSL, setting up a powerful system for managing your databases. The process covered enabling WSL and Virtual Machine Platform, installing Ubuntu, Apache, MariaDB, and PHP, before finally installing phpMyAdmin itself.
-
- Enabled WSL 2, which lets you run Linux on Windows
-
- Installed Ubuntu, a Linux operating system
-
- Installed Apache, a web server
-
- Installed MariaDB, a database system
-
- Installed PHP, a programming language
-
- Installed phpMyAdmin, a web tool to manage databases
Now you have a powerful system for storing and managing data. You can use phpMyAdmin's interface instead of typing complicated database commands.
Step 7Install phpMyAdmin
To manage your databases through a web page for your phpMyAdmin Windows WSL environment, you need to install the phpMyAdmin package in Ubuntu. Run the install command in your terminal and select Apache when the setup asks which web server to use.
phpMyAdmin is the web-based tool you'll use to easily manage your MariaDB databases. To install it on your Windows WSL system, open your Ubuntu terminal and type 'sudo apt install phpmyadmin'. When prompted, select Apache as your web server for the setup.
Run this command:
sudo apt install phpmyadmin
⚠️ Requires admin privileges
When asked which web server to use, select apache2 and press Enter.
Please choose the web server that should be automatically configured to run phpMyAdmin.

[*] apache2

[ ] lighttpd
When asked "Configure database for phpmyadmin with dbconfig-common?", select Yes.
Create a password for phpMyAdmin when asked. Remember this password.
About root access: MariaDB has a security feature that can block the root user from logging into phpMyAdmin. If you need to use the root account, follow these steps:
Log into MariaDB:
sudo mysql
⚠️ Requires admin privileges
Run these commands:
USE mysql;

UPDATE user SET plugin='' WHERE user ='root';

FLUSH PRIVILEGES;

EXIT;
Restart Apache:
sudo service apache2 restart
Now open phpMyAdmin by going to:
http://localhost/phpmyadmin
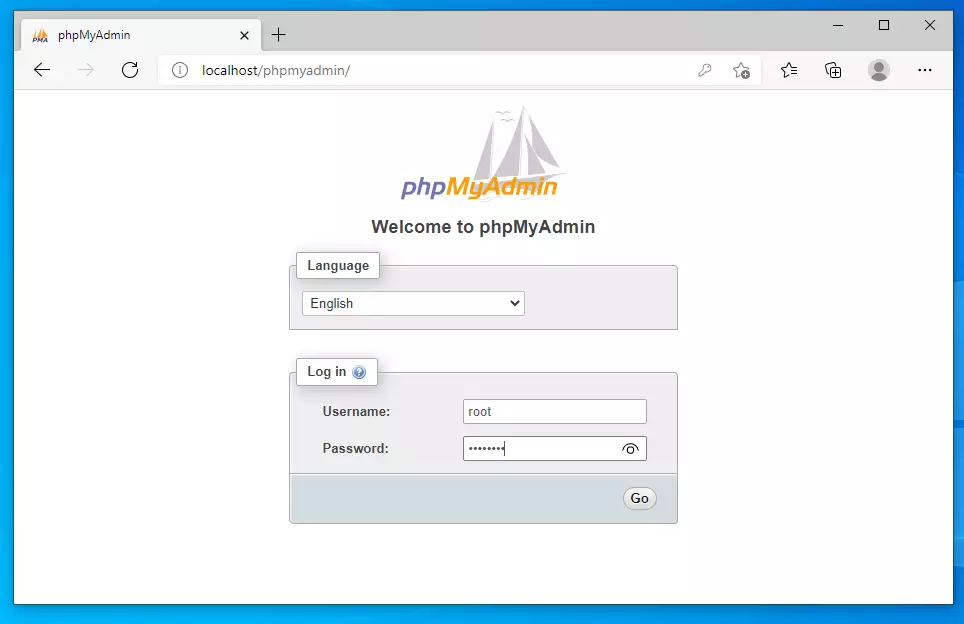
You should see a login page. Log in with your root username and password.
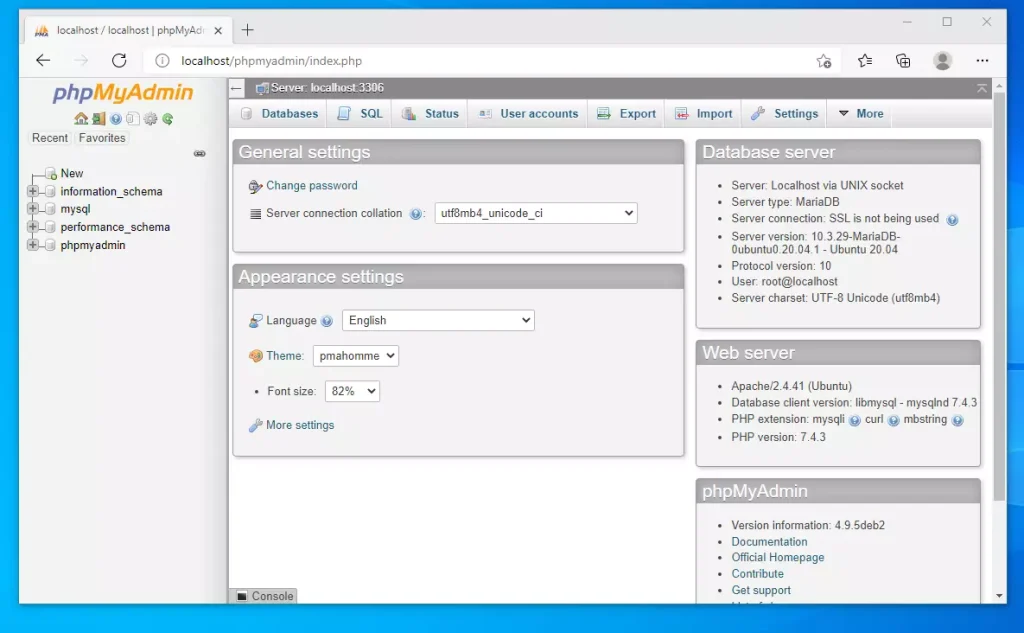
You're done! You can now manage your databases from phpMyAdmin.
Summary
You have finished setting up phpMyAdmin Windows WSL by enabling the required Windows features, installing Ubuntu, and configuring Apache, MariaDB, PHP, and phpMyAdmin. You can now use this local environment to manage your databases through your web browser.
You have now successfully installed phpMyAdmin with Apache on Windows WSL, setting up a powerful system for managing your databases. The process covered enabling WSL and Virtual Machine Platform, installing Ubuntu, Apache, MariaDB, and PHP, before finally installing phpMyAdmin itself.
-
- Enabled WSL 2, which lets you run Linux on Windows
-
- Installed Ubuntu, a Linux operating system
-
- Installed Apache, a web server
-
- Installed MariaDB, a database system
-
- Installed PHP, a programming language
-
- Installed phpMyAdmin, a web tool to manage databases
Now you have a powerful system for storing and managing data. You can use phpMyAdmin's interface instead of typing complicated database commands.
Step 6Install PHP
To run phpMyAdmin Windows WSL successfully, you need to install the PHP programming language and its required modules in your Ubuntu terminal. Run the apt install command with the full list of dependencies to make sure the web interface works properly.
phpMyAdmin requires the PHP programming language to function, making its installation a vital step for your phpMyAdmin on Windows WSL setup. Run the command 'sudo apt install php libapache2-mod-php php-common php-mysql php-gmp php-curl php-intl php7.4-mbstring php-xmlrpc php-gd php-xml php-cli php-zip' in your Ubuntu terminal to install PHP and its necessary tools.
Run this command to install PHP and the tools it needs:
sudo apt install php libapache2-mod-php php-common php-mysql php-gmp php-curl php-intl php7.4-mbstring php-xmlrpc php-gd php-xml php-cli php-zip
⚠️ Requires admin privileges
Did it work? Check the PHP version:
php -v
You should see something like:
PHP 7.4.3 (cli) (built: Oct 6 2020 15:47:56) ( NTS )

Copyright (c) The PHP Group

Zend Engine v3.4.0, Copyright (c) Zend Technologies
To test PHP more thoroughly, create a test file:
sudo nano /var/www/html/phpinfo.php
⚠️ Requires admin privileges
Type this inside the file:
<?php phpinfo( ); ?>
Press Ctrl+X, then Y, then Enter to save.
Restart Apache:
sudo service apache2 restart
Now open your browser and go to:
http://localhost/phpinfo.php
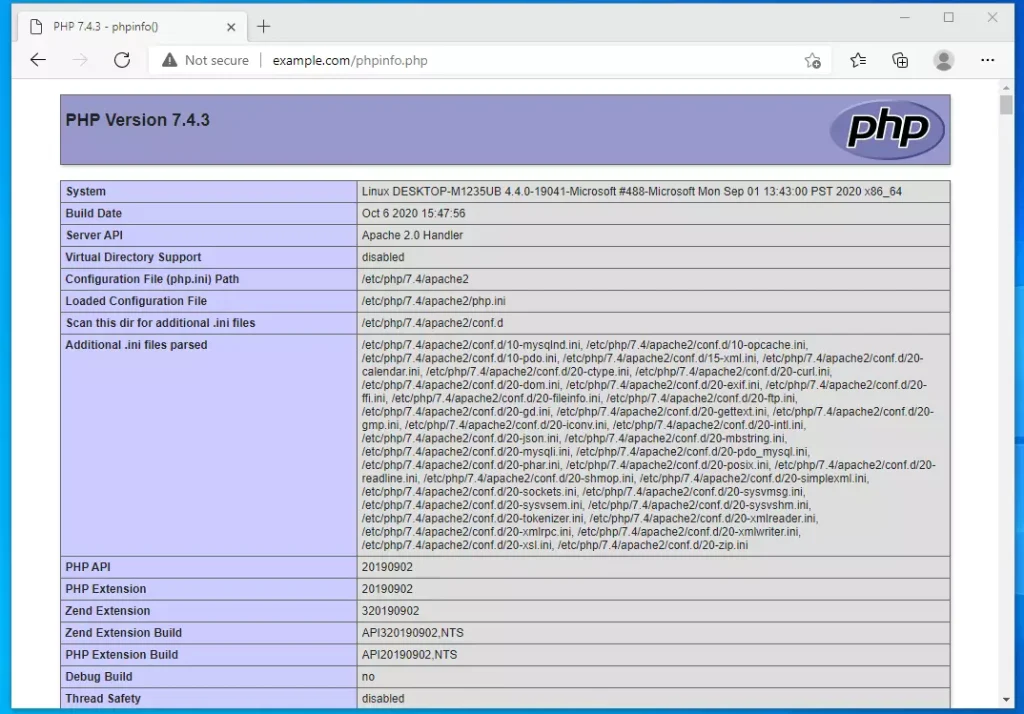
You should see a page showing all your PHP information.
Step 7Install phpMyAdmin
To manage your databases through a web page for your phpMyAdmin Windows WSL environment, you need to install the phpMyAdmin package in Ubuntu. Run the install command in your terminal and select Apache when the setup asks which web server to use.
phpMyAdmin is the web-based tool you'll use to easily manage your MariaDB databases. To install it on your Windows WSL system, open your Ubuntu terminal and type 'sudo apt install phpmyadmin'. When prompted, select Apache as your web server for the setup.
Run this command:
sudo apt install phpmyadmin
⚠️ Requires admin privileges
When asked which web server to use, select apache2 and press Enter.
Please choose the web server that should be automatically configured to run phpMyAdmin.

[*] apache2

[ ] lighttpd
When asked "Configure database for phpmyadmin with dbconfig-common?", select Yes.
Create a password for phpMyAdmin when asked. Remember this password.
About root access: MariaDB has a security feature that can block the root user from logging into phpMyAdmin. If you need to use the root account, follow these steps:
Log into MariaDB:
sudo mysql
⚠️ Requires admin privileges
Run these commands:
USE mysql;

UPDATE user SET plugin='' WHERE user ='root';

FLUSH PRIVILEGES;

EXIT;
Restart Apache:
sudo service apache2 restart
Now open phpMyAdmin by going to:
http://localhost/phpmyadmin
You should see a login page. Log in with your root username and password.
You're done! You can now manage your databases from phpMyAdmin.
Summary
You have finished setting up phpMyAdmin Windows WSL by enabling the required Windows features, installing Ubuntu, and configuring Apache, MariaDB, PHP, and phpMyAdmin. You can now use this local environment to manage your databases through your web browser.
You have now successfully installed phpMyAdmin with Apache on Windows WSL, setting up a powerful system for managing your databases. The process covered enabling WSL and Virtual Machine Platform, installing Ubuntu, Apache, MariaDB, and PHP, before finally installing phpMyAdmin itself.
-
- Enabled WSL 2, which lets you run Linux on Windows
-
- Installed Ubuntu, a Linux operating system
-
- Installed Apache, a web server
-
- Installed MariaDB, a database system
-
- Installed PHP, a programming language
-
- Installed phpMyAdmin, a web tool to manage databases
Now you have a powerful system for storing and managing data. You can use phpMyAdmin's interface instead of typing complicated database commands.
Step 5Install MariaDB Database Server
To store and manage your data for phpMyAdmin Windows WSL, you must install the MariaDB database server within your Ubuntu environment. Use the apt package manager in your terminal to download and set up both the server and client components.
MariaDB is the database system that phpMyAdmin will use to store and manage your data safely. Install it within your Ubuntu environment using the apt package manager. Type 'sudo apt-get install mariadb-server mariadb-client' into your Ubuntu terminal to get both the server and client components.
Run these commands:
sudo apt-get install mariadb-server mariadb-client
⚠️ Requires admin privileges
To control MariaDB, use these commands:
sudo service mysql stop (stops it)
sudo service mysql start (starts it)
sudo service mysql restart (restarts it)
Now secure your database with a password:
sudo mysql_secure_installation
⚠️ Requires admin privileges
Answer the questions like this:
Enter current password for root (enter for none): Press Enter

Set root password? [Y/n]: Y

New password: (type your password)

Re-enter new password: (type it again)

Remove anonymous users? [Y/n]: Y

Disallow root login remotely? [Y/n]: Y

Remove test database and access to it? [Y/n]: Y

Reload privilege tables now? [Y/n]: Y
Did it work? Test by logging in to the database:
sudo mysql -u root -p
Type your password when asked. You should see:
Welcome to the MariaDB monitor. Commands end with ; or g.

Your MariaDB connection id is 46

Server version: 10.3.29-MariaDB-0ubuntu0.20.04.1 Ubuntu 20.04

MariaDB [(none)]>
Type exit to leave.
Step 6Install PHP
To run phpMyAdmin Windows WSL successfully, you need to install the PHP programming language and its required modules in your Ubuntu terminal. Run the apt install command with the full list of dependencies to make sure the web interface works properly.
phpMyAdmin requires the PHP programming language to function, making its installation a vital step for your phpMyAdmin on Windows WSL setup. Run the command 'sudo apt install php libapache2-mod-php php-common php-mysql php-gmp php-curl php-intl php7.4-mbstring php-xmlrpc php-gd php-xml php-cli php-zip' in your Ubuntu terminal to install PHP and its necessary tools.
Run this command to install PHP and the tools it needs:
sudo apt install php libapache2-mod-php php-common php-mysql php-gmp php-curl php-intl php7.4-mbstring php-xmlrpc php-gd php-xml php-cli php-zip
⚠️ Requires admin privileges
Did it work? Check the PHP version:
php -v
You should see something like:
PHP 7.4.3 (cli) (built: Oct 6 2020 15:47:56) ( NTS )

Copyright (c) The PHP Group

Zend Engine v3.4.0, Copyright (c) Zend Technologies
To test PHP more thoroughly, create a test file:
sudo nano /var/www/html/phpinfo.php
⚠️ Requires admin privileges
Type this inside the file:
<?php phpinfo( ); ?>
Press Ctrl+X, then Y, then Enter to save.
Restart Apache:
sudo service apache2 restart
Now open your browser and go to:
http://localhost/phpinfo.php
You should see a page showing all your PHP information.
Step 7Install phpMyAdmin
To manage your databases through a web page for your phpMyAdmin Windows WSL environment, you need to install the phpMyAdmin package in Ubuntu. Run the install command in your terminal and select Apache when the setup asks which web server to use.
phpMyAdmin is the web-based tool you'll use to easily manage your MariaDB databases. To install it on your Windows WSL system, open your Ubuntu terminal and type 'sudo apt install phpmyadmin'. When prompted, select Apache as your web server for the setup.
Run this command:
sudo apt install phpmyadmin
⚠️ Requires admin privileges
When asked which web server to use, select apache2 and press Enter.
Please choose the web server that should be automatically configured to run phpMyAdmin.

[*] apache2

[ ] lighttpd
When asked "Configure database for phpmyadmin with dbconfig-common?", select Yes.
Create a password for phpMyAdmin when asked. Remember this password.
About root access: MariaDB has a security feature that can block the root user from logging into phpMyAdmin. If you need to use the root account, follow these steps:
Log into MariaDB:
sudo mysql
⚠️ Requires admin privileges
Run these commands:
USE mysql;

UPDATE user SET plugin='' WHERE user ='root';

FLUSH PRIVILEGES;

EXIT;
Restart Apache:
sudo service apache2 restart
Now open phpMyAdmin by going to:
http://localhost/phpmyadmin
You should see a login page. Log in with your root username and password.
You're done! You can now manage your databases from phpMyAdmin.
Summary
You have finished setting up phpMyAdmin Windows WSL by enabling the required Windows features, installing Ubuntu, and configuring Apache, MariaDB, PHP, and phpMyAdmin. You can now use this local environment to manage your databases through your web browser.
You have now successfully installed phpMyAdmin with Apache on Windows WSL, setting up a powerful system for managing your databases. The process covered enabling WSL and Virtual Machine Platform, installing Ubuntu, Apache, MariaDB, and PHP, before finally installing phpMyAdmin itself.
-
- Enabled WSL 2, which lets you run Linux on Windows
-
- Installed Ubuntu, a Linux operating system
-
- Installed Apache, a web server
-
- Installed MariaDB, a database system
-
- Installed PHP, a programming language
-
- Installed phpMyAdmin, a web tool to manage databases
Now you have a powerful system for storing and managing data. You can use phpMyAdmin's interface instead of typing complicated database commands.
Step 4Install Apache Web Server
To host phpMyAdmin Windows WSL and view it in your browser, you need to install the Apache web server inside your Ubuntu terminal. Run the package update and installation commands to get Apache running on your local system.
Install the Apache web server to host phpMyAdmin on Windows WSL and access it through your web browser. Open your Ubuntu terminal and use the commands 'sudo apt update' followed by 'sudo apt install apache2' to get Apache installed and ready to go.
In Ubuntu, run these commands:
sudo apt update

sudo apt install apache2
⚠️ These commands require admin privileges (sudo)
To control Apache, use these commands:
sudo service apache2 stop (stops it)
sudo service apache2 start (starts it)
sudo service apache2 restart (restarts it)
Does it work? Open your web browser and go to:
http://localhost
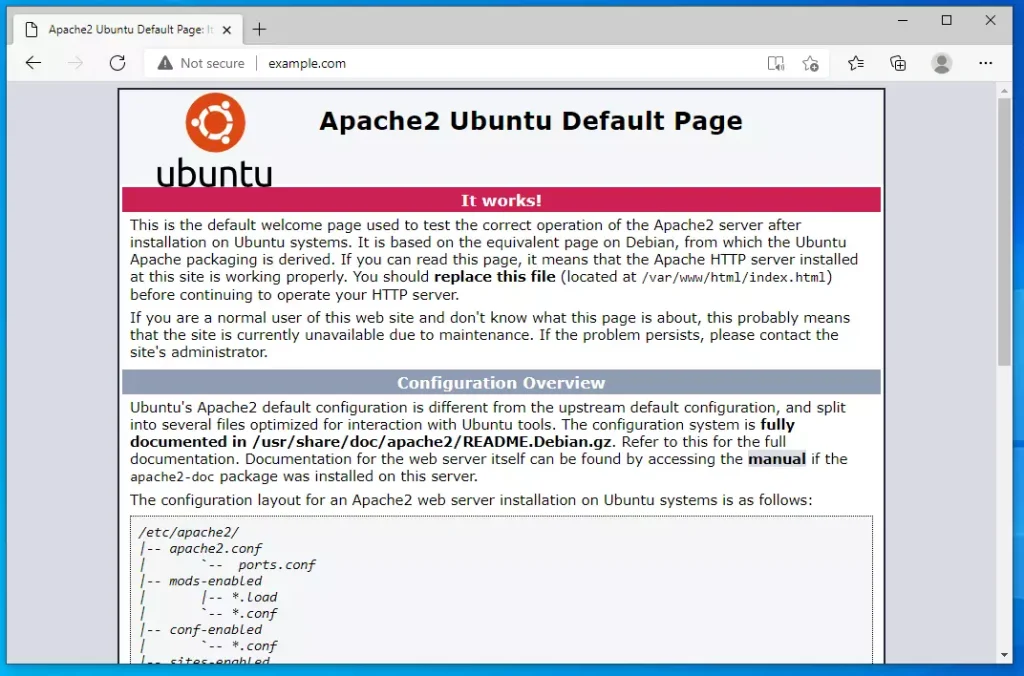
You should see Apache's test page.
Step 5Install MariaDB Database Server
To store and manage your data for phpMyAdmin Windows WSL, you must install the MariaDB database server within your Ubuntu environment. Use the apt package manager in your terminal to download and set up both the server and client components.
MariaDB is the database system that phpMyAdmin will use to store and manage your data safely. Install it within your Ubuntu environment using the apt package manager. Type 'sudo apt-get install mariadb-server mariadb-client' into your Ubuntu terminal to get both the server and client components.
Run these commands:
sudo apt-get install mariadb-server mariadb-client
⚠️ Requires admin privileges
To control MariaDB, use these commands:
sudo service mysql stop (stops it)
sudo service mysql start (starts it)
sudo service mysql restart (restarts it)
Now secure your database with a password:
sudo mysql_secure_installation
⚠️ Requires admin privileges
Answer the questions like this:
Enter current password for root (enter for none): Press Enter

Set root password? [Y/n]: Y

New password: (type your password)

Re-enter new password: (type it again)

Remove anonymous users? [Y/n]: Y

Disallow root login remotely? [Y/n]: Y

Remove test database and access to it? [Y/n]: Y

Reload privilege tables now? [Y/n]: Y
Did it work? Test by logging in to the database:
sudo mysql -u root -p
Type your password when asked. You should see:
Welcome to the MariaDB monitor. Commands end with ; or g.

Your MariaDB connection id is 46

Server version: 10.3.29-MariaDB-0ubuntu0.20.04.1 Ubuntu 20.04

MariaDB [(none)]>
Type exit to leave.
Step 6Install PHP
To run phpMyAdmin Windows WSL successfully, you need to install the PHP programming language and its required modules in your Ubuntu terminal. Run the apt install command with the full list of dependencies to make sure the web interface works properly.
phpMyAdmin requires the PHP programming language to function, making its installation a vital step for your phpMyAdmin on Windows WSL setup. Run the command 'sudo apt install php libapache2-mod-php php-common php-mysql php-gmp php-curl php-intl php7.4-mbstring php-xmlrpc php-gd php-xml php-cli php-zip' in your Ubuntu terminal to install PHP and its necessary tools.
Run this command to install PHP and the tools it needs:
sudo apt install php libapache2-mod-php php-common php-mysql php-gmp php-curl php-intl php7.4-mbstring php-xmlrpc php-gd php-xml php-cli php-zip
⚠️ Requires admin privileges
Did it work? Check the PHP version:
php -v
You should see something like:
PHP 7.4.3 (cli) (built: Oct 6 2020 15:47:56) ( NTS )

Copyright (c) The PHP Group

Zend Engine v3.4.0, Copyright (c) Zend Technologies
To test PHP more thoroughly, create a test file:
sudo nano /var/www/html/phpinfo.php
⚠️ Requires admin privileges
Type this inside the file:
<?php phpinfo( ); ?>
Press Ctrl+X, then Y, then Enter to save.
Restart Apache:
sudo service apache2 restart
Now open your browser and go to:
http://localhost/phpinfo.php
You should see a page showing all your PHP information.
Step 7Install phpMyAdmin
To manage your databases through a web page for your phpMyAdmin Windows WSL environment, you need to install the phpMyAdmin package in Ubuntu. Run the install command in your terminal and select Apache when the setup asks which web server to use.
phpMyAdmin is the web-based tool you'll use to easily manage your MariaDB databases. To install it on your Windows WSL system, open your Ubuntu terminal and type 'sudo apt install phpmyadmin'. When prompted, select Apache as your web server for the setup.
Run this command:
sudo apt install phpmyadmin
⚠️ Requires admin privileges
When asked which web server to use, select apache2 and press Enter.
Please choose the web server that should be automatically configured to run phpMyAdmin.

[*] apache2

[ ] lighttpd
When asked "Configure database for phpmyadmin with dbconfig-common?", select Yes.
Create a password for phpMyAdmin when asked. Remember this password.
About root access: MariaDB has a security feature that can block the root user from logging into phpMyAdmin. If you need to use the root account, follow these steps:
Log into MariaDB:
sudo mysql
⚠️ Requires admin privileges
Run these commands:
USE mysql;

UPDATE user SET plugin='' WHERE user ='root';

FLUSH PRIVILEGES;

EXIT;
Restart Apache:
sudo service apache2 restart
Now open phpMyAdmin by going to:
http://localhost/phpmyadmin
You should see a login page. Log in with your root username and password.
You're done! You can now manage your databases from phpMyAdmin.
Summary
You have finished setting up phpMyAdmin Windows WSL by enabling the required Windows features, installing Ubuntu, and configuring Apache, MariaDB, PHP, and phpMyAdmin. You can now use this local environment to manage your databases through your web browser.
You have now successfully installed phpMyAdmin with Apache on Windows WSL, setting up a powerful system for managing your databases. The process covered enabling WSL and Virtual Machine Platform, installing Ubuntu, Apache, MariaDB, and PHP, before finally installing phpMyAdmin itself.
-
- Enabled WSL 2, which lets you run Linux on Windows
-
- Installed Ubuntu, a Linux operating system
-
- Installed Apache, a web server
-
- Installed MariaDB, a database system
-
- Installed PHP, a programming language
-
- Installed phpMyAdmin, a web tool to manage databases
Now you have a powerful system for storing and managing data. You can use phpMyAdmin's interface instead of typing complicated database commands.
Step 3Install Ubuntu on Windows
To provide the Linux environment needed for phpMyAdmin Windows WSL, you must install Ubuntu from the Microsoft Store. Search for Ubuntu in the Store app, download the system to your computer, and launch it to finish the initial setup.
Install Ubuntu from the Microsoft Store to continue setting up your environment. Ubuntu is a popular Linux system that provides the environment for your tools. Search for Ubuntu in the Store, click 'Get', and then 'Launch' it.
You can download Ubuntu 20.04 LTS directly from the Microsoft Store by clicking this link: Get Ubuntu 20.04 LTS - Microsoft Store. This link provides the specific version of Ubuntu you need for your Windows Subsystem for Linux (WSL) installation.
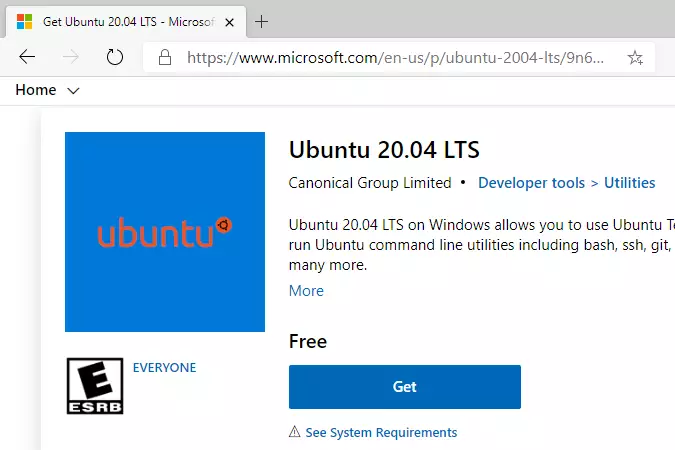
Click the Get button and wait for it to install.
When done, click Launch to start Ubuntu for the first time.
Ubuntu will ask you to create a username and password. Choose anything you want:
Enter new UNIX username: user123

New password: (type your password)

Retype new password: (type it again)

passwd: password updated successfully

Installation successful!
You'll see a welcome message from Ubuntu. This means it's working!
Welcome to Ubuntu 20.04.2 LTS (GNU/Linux 4.4.0-19041-Microsoft x86_64)

System information as of Mon Apr 12 17:57:37 CDT 2021

System load: 0.52 Processes: 7

Memory usage: 26% IPv4 address for eth0: 192.168.1.100
If you run into problems, try these commands:
wsl --set-default-version 1

bcdedit /set hypervisorlaunchtype auto start
Step 4Install Apache Web Server
To host phpMyAdmin Windows WSL and view it in your browser, you need to install the Apache web server inside your Ubuntu terminal. Run the package update and installation commands to get Apache running on your local system.
Install the Apache web server to host phpMyAdmin on Windows WSL and access it through your web browser. Open your Ubuntu terminal and use the commands 'sudo apt update' followed by 'sudo apt install apache2' to get Apache installed and ready to go.
In Ubuntu, run these commands:
sudo apt update

sudo apt install apache2
⚠️ These commands require admin privileges (sudo)
To control Apache, use these commands:
sudo service apache2 stop (stops it)
sudo service apache2 start (starts it)
sudo service apache2 restart (restarts it)
Does it work? Open your web browser and go to:
http://localhost
You should see Apache's test page.
Step 5Install MariaDB Database Server
To store and manage your data for phpMyAdmin Windows WSL, you must install the MariaDB database server within your Ubuntu environment. Use the apt package manager in your terminal to download and set up both the server and client components.
MariaDB is the database system that phpMyAdmin will use to store and manage your data safely. Install it within your Ubuntu environment using the apt package manager. Type 'sudo apt-get install mariadb-server mariadb-client' into your Ubuntu terminal to get both the server and client components.
Run these commands:
sudo apt-get install mariadb-server mariadb-client
⚠️ Requires admin privileges
To control MariaDB, use these commands:
sudo service mysql stop (stops it)
sudo service mysql start (starts it)
sudo service mysql restart (restarts it)
Now secure your database with a password:
sudo mysql_secure_installation
⚠️ Requires admin privileges
Answer the questions like this:
Enter current password for root (enter for none): Press Enter

Set root password? [Y/n]: Y

New password: (type your password)

Re-enter new password: (type it again)

Remove anonymous users? [Y/n]: Y

Disallow root login remotely? [Y/n]: Y

Remove test database and access to it? [Y/n]: Y

Reload privilege tables now? [Y/n]: Y
Did it work? Test by logging in to the database:
sudo mysql -u root -p
Type your password when asked. You should see:
Welcome to the MariaDB monitor. Commands end with ; or g.

Your MariaDB connection id is 46

Server version: 10.3.29-MariaDB-0ubuntu0.20.04.1 Ubuntu 20.04

MariaDB [(none)]>
Type exit to leave.
Step 6Install PHP
To run phpMyAdmin Windows WSL successfully, you need to install the PHP programming language and its required modules in your Ubuntu terminal. Run the apt install command with the full list of dependencies to make sure the web interface works properly.
phpMyAdmin requires the PHP programming language to function, making its installation a vital step for your phpMyAdmin on Windows WSL setup. Run the command 'sudo apt install php libapache2-mod-php php-common php-mysql php-gmp php-curl php-intl php7.4-mbstring php-xmlrpc php-gd php-xml php-cli php-zip' in your Ubuntu terminal to install PHP and its necessary tools.
Run this command to install PHP and the tools it needs:
sudo apt install php libapache2-mod-php php-common php-mysql php-gmp php-curl php-intl php7.4-mbstring php-xmlrpc php-gd php-xml php-cli php-zip
⚠️ Requires admin privileges
Did it work? Check the PHP version:
php -v
You should see something like:
PHP 7.4.3 (cli) (built: Oct 6 2020 15:47:56) ( NTS )

Copyright (c) The PHP Group

Zend Engine v3.4.0, Copyright (c) Zend Technologies
To test PHP more thoroughly, create a test file:
sudo nano /var/www/html/phpinfo.php
⚠️ Requires admin privileges
Type this inside the file:
<?php phpinfo( ); ?>
Press Ctrl+X, then Y, then Enter to save.
Restart Apache:
sudo service apache2 restart
Now open your browser and go to:
http://localhost/phpinfo.php
You should see a page showing all your PHP information.
Step 7Install phpMyAdmin
To manage your databases through a web page for your phpMyAdmin Windows WSL environment, you need to install the phpMyAdmin package in Ubuntu. Run the install command in your terminal and select Apache when the setup asks which web server to use.
phpMyAdmin is the web-based tool you'll use to easily manage your MariaDB databases. To install it on your Windows WSL system, open your Ubuntu terminal and type 'sudo apt install phpmyadmin'. When prompted, select Apache as your web server for the setup.
Run this command:
sudo apt install phpmyadmin
⚠️ Requires admin privileges
When asked which web server to use, select apache2 and press Enter.
Please choose the web server that should be automatically configured to run phpMyAdmin.

[*] apache2

[ ] lighttpd
When asked "Configure database for phpmyadmin with dbconfig-common?", select Yes.
Create a password for phpMyAdmin when asked. Remember this password.
About root access: MariaDB has a security feature that can block the root user from logging into phpMyAdmin. If you need to use the root account, follow these steps:
Log into MariaDB:
sudo mysql
⚠️ Requires admin privileges
Run these commands:
USE mysql;

UPDATE user SET plugin='' WHERE user ='root';

FLUSH PRIVILEGES;

EXIT;
Restart Apache:
sudo service apache2 restart
Now open phpMyAdmin by going to:
http://localhost/phpmyadmin
You should see a login page. Log in with your root username and password.
You're done! You can now manage your databases from phpMyAdmin.
Summary
You have finished setting up phpMyAdmin Windows WSL by enabling the required Windows features, installing Ubuntu, and configuring Apache, MariaDB, PHP, and phpMyAdmin. You can now use this local environment to manage your databases through your web browser.
You have now successfully installed phpMyAdmin with Apache on Windows WSL, setting up a powerful system for managing your databases. The process covered enabling WSL and Virtual Machine Platform, installing Ubuntu, Apache, MariaDB, and PHP, before finally installing phpMyAdmin itself.
-
- Enabled WSL 2, which lets you run Linux on Windows
-
- Installed Ubuntu, a Linux operating system
-
- Installed Apache, a web server
-
- Installed MariaDB, a database system
-
- Installed PHP, a programming language
-
- Installed phpMyAdmin, a web tool to manage databases
Now you have a powerful system for storing and managing data. You can use phpMyAdmin's interface instead of typing complicated database commands.
Step 2Enable Virtual Machine Platform
To make phpMyAdmin Windows WSL run on version 2, you must turn on the Virtual Machine Platform feature in Windows. Open your existing administrator PowerShell window and run the dism command to turn on this system requirement before restarting your computer.
For your phpMyAdmin on Windows WSL setup to work well with WSL 2, you need to enable the Virtual Machine Platform. You do this by running a specific command in the administrator PowerShell window you already have open. This step is crucial for WSL 2 to function correctly.
In the same PowerShell window, copy and paste this command:
dism.exe /online /enable-feature /featurename:VirtualMachinePlatform /all /norestart
If you have Windows 10 version 2004 or older, use this command instead:
Enable-WindowsOptionalFeature -Online -FeatureName VirtualMachinePlatform -NoRestart
Now restart your computer to apply all changes.
After your computer restarts, open PowerShell as administrator again and run this command:
wsl --set-default-version 2
Step 3Install Ubuntu on Windows
To provide the Linux environment needed for phpMyAdmin Windows WSL, you must install Ubuntu from the Microsoft Store. Search for Ubuntu in the Store app, download the system to your computer, and launch it to finish the initial setup.
Install Ubuntu from the Microsoft Store to continue setting up your environment. Ubuntu is a popular Linux system that provides the environment for your tools. Search for Ubuntu in the Store, click 'Get', and then 'Launch' it.
You can download Ubuntu 20.04 LTS directly from the Microsoft Store by clicking this link: Get Ubuntu 20.04 LTS - Microsoft Store. This link provides the specific version of Ubuntu you need for your Windows Subsystem for Linux (WSL) installation.
Click the Get button and wait for it to install.
When done, click Launch to start Ubuntu for the first time.
Ubuntu will ask you to create a username and password. Choose anything you want:
Enter new UNIX username: user123

New password: (type your password)

Retype new password: (type it again)

passwd: password updated successfully

Installation successful!
You'll see a welcome message from Ubuntu. This means it's working!
Welcome to Ubuntu 20.04.2 LTS (GNU/Linux 4.4.0-19041-Microsoft x86_64)

System information as of Mon Apr 12 17:57:37 CDT 2021

System load: 0.52 Processes: 7

Memory usage: 26% IPv4 address for eth0: 192.168.1.100
If you run into problems, try these commands:
wsl --set-default-version 1

bcdedit /set hypervisorlaunchtype auto start
Step 4Install Apache Web Server
To host phpMyAdmin Windows WSL and view it in your browser, you need to install the Apache web server inside your Ubuntu terminal. Run the package update and installation commands to get Apache running on your local system.
Install the Apache web server to host phpMyAdmin on Windows WSL and access it through your web browser. Open your Ubuntu terminal and use the commands 'sudo apt update' followed by 'sudo apt install apache2' to get Apache installed and ready to go.
In Ubuntu, run these commands:
sudo apt update

sudo apt install apache2
⚠️ These commands require admin privileges (sudo)
To control Apache, use these commands:
sudo service apache2 stop (stops it)
sudo service apache2 start (starts it)
sudo service apache2 restart (restarts it)
Does it work? Open your web browser and go to:
http://localhost
You should see Apache's test page.
Step 5Install MariaDB Database Server
To store and manage your data for phpMyAdmin Windows WSL, you must install the MariaDB database server within your Ubuntu environment. Use the apt package manager in your terminal to download and set up both the server and client components.
MariaDB is the database system that phpMyAdmin will use to store and manage your data safely. Install it within your Ubuntu environment using the apt package manager. Type 'sudo apt-get install mariadb-server mariadb-client' into your Ubuntu terminal to get both the server and client components.
Run these commands:
sudo apt-get install mariadb-server mariadb-client
⚠️ Requires admin privileges
To control MariaDB, use these commands:
sudo service mysql stop (stops it)
sudo service mysql start (starts it)
sudo service mysql restart (restarts it)
Now secure your database with a password:
sudo mysql_secure_installation
⚠️ Requires admin privileges
Answer the questions like this:
Enter current password for root (enter for none): Press Enter

Set root password? [Y/n]: Y

New password: (type your password)

Re-enter new password: (type it again)

Remove anonymous users? [Y/n]: Y

Disallow root login remotely? [Y/n]: Y

Remove test database and access to it? [Y/n]: Y

Reload privilege tables now? [Y/n]: Y
Did it work? Test by logging in to the database:
sudo mysql -u root -p
Type your password when asked. You should see:
Welcome to the MariaDB monitor. Commands end with ; or g.

Your MariaDB connection id is 46

Server version: 10.3.29-MariaDB-0ubuntu0.20.04.1 Ubuntu 20.04

MariaDB [(none)]>
Type exit to leave.
Step 6Install PHP
To run phpMyAdmin Windows WSL successfully, you need to install the PHP programming language and its required modules in your Ubuntu terminal. Run the apt install command with the full list of dependencies to make sure the web interface works properly.
phpMyAdmin requires the PHP programming language to function, making its installation a vital step for your phpMyAdmin on Windows WSL setup. Run the command 'sudo apt install php libapache2-mod-php php-common php-mysql php-gmp php-curl php-intl php7.4-mbstring php-xmlrpc php-gd php-xml php-cli php-zip' in your Ubuntu terminal to install PHP and its necessary tools.
Run this command to install PHP and the tools it needs:
sudo apt install php libapache2-mod-php php-common php-mysql php-gmp php-curl php-intl php7.4-mbstring php-xmlrpc php-gd php-xml php-cli php-zip
⚠️ Requires admin privileges
Did it work? Check the PHP version:
php -v
You should see something like:
PHP 7.4.3 (cli) (built: Oct 6 2020 15:47:56) ( NTS )

Copyright (c) The PHP Group

Zend Engine v3.4.0, Copyright (c) Zend Technologies
To test PHP more thoroughly, create a test file:
sudo nano /var/www/html/phpinfo.php
⚠️ Requires admin privileges
Type this inside the file:
<?php phpinfo( ); ?>
Press Ctrl+X, then Y, then Enter to save.
Restart Apache:
sudo service apache2 restart
Now open your browser and go to:
http://localhost/phpinfo.php
You should see a page showing all your PHP information.
Step 7Install phpMyAdmin
To manage your databases through a web page for your phpMyAdmin Windows WSL environment, you need to install the phpMyAdmin package in Ubuntu. Run the install command in your terminal and select Apache when the setup asks which web server to use.
phpMyAdmin is the web-based tool you'll use to easily manage your MariaDB databases. To install it on your Windows WSL system, open your Ubuntu terminal and type 'sudo apt install phpmyadmin'. When prompted, select Apache as your web server for the setup.
Run this command:
sudo apt install phpmyadmin
⚠️ Requires admin privileges
When asked which web server to use, select apache2 and press Enter.
Please choose the web server that should be automatically configured to run phpMyAdmin.

[*] apache2

[ ] lighttpd
When asked "Configure database for phpmyadmin with dbconfig-common?", select Yes.
Create a password for phpMyAdmin when asked. Remember this password.
About root access: MariaDB has a security feature that can block the root user from logging into phpMyAdmin. If you need to use the root account, follow these steps:
Log into MariaDB:
sudo mysql
⚠️ Requires admin privileges
Run these commands:
USE mysql;

UPDATE user SET plugin='' WHERE user ='root';

FLUSH PRIVILEGES;

EXIT;
Restart Apache:
sudo service apache2 restart
Now open phpMyAdmin by going to:
http://localhost/phpmyadmin
You should see a login page. Log in with your root username and password.
You're done! You can now manage your databases from phpMyAdmin.
Summary
You have finished setting up phpMyAdmin Windows WSL by enabling the required Windows features, installing Ubuntu, and configuring Apache, MariaDB, PHP, and phpMyAdmin. You can now use this local environment to manage your databases through your web browser.
You have now successfully installed phpMyAdmin with Apache on Windows WSL, setting up a powerful system for managing your databases. The process covered enabling WSL and Virtual Machine Platform, installing Ubuntu, Apache, MariaDB, and PHP, before finally installing phpMyAdmin itself.
-
- Enabled WSL 2, which lets you run Linux on Windows
-
- Installed Ubuntu, a Linux operating system
-
- Installed Apache, a web server
-
- Installed MariaDB, a database system
-
- Installed PHP, a programming language
-
- Installed phpMyAdmin, a web tool to manage databases
Now you have a powerful system for storing and managing data. You can use phpMyAdmin's interface instead of typing complicated database commands.
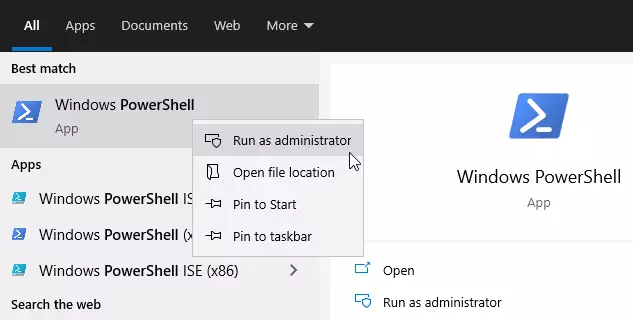
In the PowerShell window, copy and paste this command:
dism.exe /online /enable-feature /featurename:Microsoft-Windows-Subsystem-Linux /all /norestart
You should see a success message like this:
Deployment Image Servicing and Management tool

Version: 10.0.19041.844

Image Version: 10.0.19042.844

Enabling feature(s)

[==========================100.0%==========================]

The operation completed successfully.
Step 2Enable Virtual Machine Platform
To make phpMyAdmin Windows WSL run on version 2, you must turn on the Virtual Machine Platform feature in Windows. Open your existing administrator PowerShell window and run the dism command to turn on this system requirement before restarting your computer.
For your phpMyAdmin on Windows WSL setup to work well with WSL 2, you need to enable the Virtual Machine Platform. You do this by running a specific command in the administrator PowerShell window you already have open. This step is crucial for WSL 2 to function correctly.
In the same PowerShell window, copy and paste this command:
dism.exe /online /enable-feature /featurename:VirtualMachinePlatform /all /norestart
If you have Windows 10 version 2004 or older, use this command instead:
Enable-WindowsOptionalFeature -Online -FeatureName VirtualMachinePlatform -NoRestart
Now restart your computer to apply all changes.
After your computer restarts, open PowerShell as administrator again and run this command:
wsl --set-default-version 2
Step 3Install Ubuntu on Windows
To provide the Linux environment needed for phpMyAdmin Windows WSL, you must install Ubuntu from the Microsoft Store. Search for Ubuntu in the Store app, download the system to your computer, and launch it to finish the initial setup.
Install Ubuntu from the Microsoft Store to continue setting up your environment. Ubuntu is a popular Linux system that provides the environment for your tools. Search for Ubuntu in the Store, click 'Get', and then 'Launch' it.
You can download Ubuntu 20.04 LTS directly from the Microsoft Store by clicking this link: Get Ubuntu 20.04 LTS - Microsoft Store. This link provides the specific version of Ubuntu you need for your Windows Subsystem for Linux (WSL) installation.
Click the Get button and wait for it to install.
When done, click Launch to start Ubuntu for the first time.
Ubuntu will ask you to create a username and password. Choose anything you want:
Enter new UNIX username: user123

New password: (type your password)

Retype new password: (type it again)

passwd: password updated successfully

Installation successful!
You'll see a welcome message from Ubuntu. This means it's working!
Welcome to Ubuntu 20.04.2 LTS (GNU/Linux 4.4.0-19041-Microsoft x86_64)

System information as of Mon Apr 12 17:57:37 CDT 2021

System load: 0.52 Processes: 7

Memory usage: 26% IPv4 address for eth0: 192.168.1.100
If you run into problems, try these commands:
wsl --set-default-version 1

bcdedit /set hypervisorlaunchtype auto start
Step 4Install Apache Web Server
To host phpMyAdmin Windows WSL and view it in your browser, you need to install the Apache web server inside your Ubuntu terminal. Run the package update and installation commands to get Apache running on your local system.
Install the Apache web server to host phpMyAdmin on Windows WSL and access it through your web browser. Open your Ubuntu terminal and use the commands 'sudo apt update' followed by 'sudo apt install apache2' to get Apache installed and ready to go.
In Ubuntu, run these commands:
sudo apt update

sudo apt install apache2
⚠️ These commands require admin privileges (sudo)
To control Apache, use these commands:
sudo service apache2 stop (stops it)
sudo service apache2 start (starts it)
sudo service apache2 restart (restarts it)
Does it work? Open your web browser and go to:
http://localhost
You should see Apache's test page.
Step 5Install MariaDB Database Server
To store and manage your data for phpMyAdmin Windows WSL, you must install the MariaDB database server within your Ubuntu environment. Use the apt package manager in your terminal to download and set up both the server and client components.
MariaDB is the database system that phpMyAdmin will use to store and manage your data safely. Install it within your Ubuntu environment using the apt package manager. Type 'sudo apt-get install mariadb-server mariadb-client' into your Ubuntu terminal to get both the server and client components.
Run these commands:
sudo apt-get install mariadb-server mariadb-client
⚠️ Requires admin privileges
To control MariaDB, use these commands:
sudo service mysql stop (stops it)
sudo service mysql start (starts it)
sudo service mysql restart (restarts it)
Now secure your database with a password:
sudo mysql_secure_installation
⚠️ Requires admin privileges
Answer the questions like this:
Enter current password for root (enter for none): Press Enter

Set root password? [Y/n]: Y

New password: (type your password)

Re-enter new password: (type it again)

Remove anonymous users? [Y/n]: Y

Disallow root login remotely? [Y/n]: Y

Remove test database and access to it? [Y/n]: Y

Reload privilege tables now? [Y/n]: Y
Did it work? Test by logging in to the database:
sudo mysql -u root -p
Type your password when asked. You should see:
Welcome to the MariaDB monitor. Commands end with ; or g.

Your MariaDB connection id is 46

Server version: 10.3.29-MariaDB-0ubuntu0.20.04.1 Ubuntu 20.04

MariaDB [(none)]>
Type exit to leave.
Step 6Install PHP
To run phpMyAdmin Windows WSL successfully, you need to install the PHP programming language and its required modules in your Ubuntu terminal. Run the apt install command with the full list of dependencies to make sure the web interface works properly.
phpMyAdmin requires the PHP programming language to function, making its installation a vital step for your phpMyAdmin on Windows WSL setup. Run the command 'sudo apt install php libapache2-mod-php php-common php-mysql php-gmp php-curl php-intl php7.4-mbstring php-xmlrpc php-gd php-xml php-cli php-zip' in your Ubuntu terminal to install PHP and its necessary tools.
Run this command to install PHP and the tools it needs:
sudo apt install php libapache2-mod-php php-common php-mysql php-gmp php-curl php-intl php7.4-mbstring php-xmlrpc php-gd php-xml php-cli php-zip
⚠️ Requires admin privileges
Did it work? Check the PHP version:
php -v
You should see something like:
PHP 7.4.3 (cli) (built: Oct 6 2020 15:47:56) ( NTS )

Copyright (c) The PHP Group

Zend Engine v3.4.0, Copyright (c) Zend Technologies
To test PHP more thoroughly, create a test file:
sudo nano /var/www/html/phpinfo.php
⚠️ Requires admin privileges
Type this inside the file:
<?php phpinfo( ); ?>
Press Ctrl+X, then Y, then Enter to save.
Restart Apache:
sudo service apache2 restart
Now open your browser and go to:
http://localhost/phpinfo.php
You should see a page showing all your PHP information.
Step 7Install phpMyAdmin
To manage your databases through a web page for your phpMyAdmin Windows WSL environment, you need to install the phpMyAdmin package in Ubuntu. Run the install command in your terminal and select Apache when the setup asks which web server to use.
phpMyAdmin is the web-based tool you'll use to easily manage your MariaDB databases. To install it on your Windows WSL system, open your Ubuntu terminal and type 'sudo apt install phpmyadmin'. When prompted, select Apache as your web server for the setup.
Run this command:
sudo apt install phpmyadmin
⚠️ Requires admin privileges
When asked which web server to use, select apache2 and press Enter.
Please choose the web server that should be automatically configured to run phpMyAdmin.

[*] apache2

[ ] lighttpd
When asked "Configure database for phpmyadmin with dbconfig-common?", select Yes.
Create a password for phpMyAdmin when asked. Remember this password.
About root access: MariaDB has a security feature that can block the root user from logging into phpMyAdmin. If you need to use the root account, follow these steps:
Log into MariaDB:
sudo mysql
⚠️ Requires admin privileges
Run these commands:
USE mysql;

UPDATE user SET plugin='' WHERE user ='root';

FLUSH PRIVILEGES;

EXIT;
Restart Apache:
sudo service apache2 restart
Now open phpMyAdmin by going to:
http://localhost/phpmyadmin
You should see a login page. Log in with your root username and password.
You're done! You can now manage your databases from phpMyAdmin.
Summary
You have finished setting up phpMyAdmin Windows WSL by enabling the required Windows features, installing Ubuntu, and configuring Apache, MariaDB, PHP, and phpMyAdmin. You can now use this local environment to manage your databases through your web browser.
You have now successfully installed phpMyAdmin with Apache on Windows WSL, setting up a powerful system for managing your databases. The process covered enabling WSL and Virtual Machine Platform, installing Ubuntu, Apache, MariaDB, and PHP, before finally installing phpMyAdmin itself.
-
- Enabled WSL 2, which lets you run Linux on Windows
-
- Installed Ubuntu, a Linux operating system
-
- Installed Apache, a web server
-
- Installed MariaDB, a database system
-
- Installed PHP, a programming language
-
- Installed phpMyAdmin, a web tool to manage databases
Now you have a powerful system for storing and managing data. You can use phpMyAdmin's interface instead of typing complicated database commands.
-
- Click the Start button and type PowerShell
-
- Right-click on Windows PowerShell and select Run as administrator ⚠️ Requires admin privileges
In the PowerShell window, copy and paste this command:
dism.exe /online /enable-feature /featurename:Microsoft-Windows-Subsystem-Linux /all /norestart
You should see a success message like this:
Deployment Image Servicing and Management tool

Version: 10.0.19041.844

Image Version: 10.0.19042.844

Enabling feature(s)

[==========================100.0%==========================]

The operation completed successfully.
Step 2Enable Virtual Machine Platform
To make phpMyAdmin Windows WSL run on version 2, you must turn on the Virtual Machine Platform feature in Windows. Open your existing administrator PowerShell window and run the dism command to turn on this system requirement before restarting your computer.
For your phpMyAdmin on Windows WSL setup to work well with WSL 2, you need to enable the Virtual Machine Platform. You do this by running a specific command in the administrator PowerShell window you already have open. This step is crucial for WSL 2 to function correctly.
In the same PowerShell window, copy and paste this command:
dism.exe /online /enable-feature /featurename:VirtualMachinePlatform /all /norestart
If you have Windows 10 version 2004 or older, use this command instead:
Enable-WindowsOptionalFeature -Online -FeatureName VirtualMachinePlatform -NoRestart
Now restart your computer to apply all changes.
After your computer restarts, open PowerShell as administrator again and run this command:
wsl --set-default-version 2
Step 3Install Ubuntu on Windows
To provide the Linux environment needed for phpMyAdmin Windows WSL, you must install Ubuntu from the Microsoft Store. Search for Ubuntu in the Store app, download the system to your computer, and launch it to finish the initial setup.
Install Ubuntu from the Microsoft Store to continue setting up your environment. Ubuntu is a popular Linux system that provides the environment for your tools. Search for Ubuntu in the Store, click 'Get', and then 'Launch' it.
You can download Ubuntu 20.04 LTS directly from the Microsoft Store by clicking this link: Get Ubuntu 20.04 LTS - Microsoft Store. This link provides the specific version of Ubuntu you need for your Windows Subsystem for Linux (WSL) installation.
Click the Get button and wait for it to install.
When done, click Launch to start Ubuntu for the first time.
Ubuntu will ask you to create a username and password. Choose anything you want:
Enter new UNIX username: user123

New password: (type your password)

Retype new password: (type it again)

passwd: password updated successfully

Installation successful!
You'll see a welcome message from Ubuntu. This means it's working!
Welcome to Ubuntu 20.04.2 LTS (GNU/Linux 4.4.0-19041-Microsoft x86_64)

System information as of Mon Apr 12 17:57:37 CDT 2021

System load: 0.52 Processes: 7

Memory usage: 26% IPv4 address for eth0: 192.168.1.100
If you run into problems, try these commands:
wsl --set-default-version 1

bcdedit /set hypervisorlaunchtype auto start
Step 4Install Apache Web Server
To host phpMyAdmin Windows WSL and view it in your browser, you need to install the Apache web server inside your Ubuntu terminal. Run the package update and installation commands to get Apache running on your local system.
Install the Apache web server to host phpMyAdmin on Windows WSL and access it through your web browser. Open your Ubuntu terminal and use the commands 'sudo apt update' followed by 'sudo apt install apache2' to get Apache installed and ready to go.
In Ubuntu, run these commands:
sudo apt update

sudo apt install apache2
⚠️ These commands require admin privileges (sudo)
To control Apache, use these commands:
sudo service apache2 stop (stops it)
sudo service apache2 start (starts it)
sudo service apache2 restart (restarts it)
Does it work? Open your web browser and go to:
http://localhost
You should see Apache's test page.
Step 5Install MariaDB Database Server
To store and manage your data for phpMyAdmin Windows WSL, you must install the MariaDB database server within your Ubuntu environment. Use the apt package manager in your terminal to download and set up both the server and client components.
MariaDB is the database system that phpMyAdmin will use to store and manage your data safely. Install it within your Ubuntu environment using the apt package manager. Type 'sudo apt-get install mariadb-server mariadb-client' into your Ubuntu terminal to get both the server and client components.
Run these commands:
sudo apt-get install mariadb-server mariadb-client
⚠️ Requires admin privileges
To control MariaDB, use these commands:
sudo service mysql stop (stops it)
sudo service mysql start (starts it)
sudo service mysql restart (restarts it)
Now secure your database with a password:
sudo mysql_secure_installation
⚠️ Requires admin privileges
Answer the questions like this:
Enter current password for root (enter for none): Press Enter

Set root password? [Y/n]: Y

New password: (type your password)

Re-enter new password: (type it again)

Remove anonymous users? [Y/n]: Y

Disallow root login remotely? [Y/n]: Y

Remove test database and access to it? [Y/n]: Y

Reload privilege tables now? [Y/n]: Y
Did it work? Test by logging in to the database:
sudo mysql -u root -p
Type your password when asked. You should see:
Welcome to the MariaDB monitor. Commands end with ; or g.

Your MariaDB connection id is 46

Server version: 10.3.29-MariaDB-0ubuntu0.20.04.1 Ubuntu 20.04

MariaDB [(none)]>
Type exit to leave.
Step 6Install PHP
To run phpMyAdmin Windows WSL successfully, you need to install the PHP programming language and its required modules in your Ubuntu terminal. Run the apt install command with the full list of dependencies to make sure the web interface works properly.
phpMyAdmin requires the PHP programming language to function, making its installation a vital step for your phpMyAdmin on Windows WSL setup. Run the command 'sudo apt install php libapache2-mod-php php-common php-mysql php-gmp php-curl php-intl php7.4-mbstring php-xmlrpc php-gd php-xml php-cli php-zip' in your Ubuntu terminal to install PHP and its necessary tools.
Run this command to install PHP and the tools it needs:
sudo apt install php libapache2-mod-php php-common php-mysql php-gmp php-curl php-intl php7.4-mbstring php-xmlrpc php-gd php-xml php-cli php-zip
⚠️ Requires admin privileges
Did it work? Check the PHP version:
php -v
You should see something like:
PHP 7.4.3 (cli) (built: Oct 6 2020 15:47:56) ( NTS )

Copyright (c) The PHP Group

Zend Engine v3.4.0, Copyright (c) Zend Technologies
To test PHP more thoroughly, create a test file:
sudo nano /var/www/html/phpinfo.php
⚠️ Requires admin privileges
Type this inside the file:
<?php phpinfo( ); ?>
Press Ctrl+X, then Y, then Enter to save.
Restart Apache:
sudo service apache2 restart
Now open your browser and go to:
http://localhost/phpinfo.php
You should see a page showing all your PHP information.
Step 7Install phpMyAdmin
To manage your databases through a web page for your phpMyAdmin Windows WSL environment, you need to install the phpMyAdmin package in Ubuntu. Run the install command in your terminal and select Apache when the setup asks which web server to use.
phpMyAdmin is the web-based tool you'll use to easily manage your MariaDB databases. To install it on your Windows WSL system, open your Ubuntu terminal and type 'sudo apt install phpmyadmin'. When prompted, select Apache as your web server for the setup.
Run this command:
sudo apt install phpmyadmin
⚠️ Requires admin privileges
When asked which web server to use, select apache2 and press Enter.
Please choose the web server that should be automatically configured to run phpMyAdmin.

[*] apache2

[ ] lighttpd
When asked "Configure database for phpmyadmin with dbconfig-common?", select Yes.
Create a password for phpMyAdmin when asked. Remember this password.
About root access: MariaDB has a security feature that can block the root user from logging into phpMyAdmin. If you need to use the root account, follow these steps:
Log into MariaDB:
sudo mysql
⚠️ Requires admin privileges
Run these commands:
USE mysql;

UPDATE user SET plugin='' WHERE user ='root';

FLUSH PRIVILEGES;

EXIT;
Restart Apache:
sudo service apache2 restart
Now open phpMyAdmin by going to:
http://localhost/phpmyadmin
You should see a login page. Log in with your root username and password.
You're done! You can now manage your databases from phpMyAdmin.
Summary
You have finished setting up phpMyAdmin Windows WSL by enabling the required Windows features, installing Ubuntu, and configuring Apache, MariaDB, PHP, and phpMyAdmin. You can now use this local environment to manage your databases through your web browser.
You have now successfully installed phpMyAdmin with Apache on Windows WSL, setting up a powerful system for managing your databases. The process covered enabling WSL and Virtual Machine Platform, installing Ubuntu, Apache, MariaDB, and PHP, before finally installing phpMyAdmin itself.
-
- Enabled WSL 2, which lets you run Linux on Windows
-
- Installed Ubuntu, a Linux operating system
-
- Installed Apache, a web server
-
- Installed MariaDB, a database system
-
- Installed PHP, a programming language
-
- Installed phpMyAdmin, a web tool to manage databases
Now you have a powerful system for storing and managing data. You can use phpMyAdmin's interface instead of typing complicated database commands.
Step 1Enable WSL in Windows
To set up phpMyAdmin Windows WSL, you need to turn on the Windows Subsystem for Linux (WSL), a built-in feature that lets you run Linux tools directly on your computer. Open PowerShell as an administrator from the Start menu and run the required activation command to start the process.
Run Linux programs like phpMyAdmin on Windows by enabling the Windows Subsystem for Linux (WSL) first. This involves opening PowerShell as an administrator and running a command to enable this essential Windows feature. It's the first step to getting phpMyAdmin Windows WSL set up.
-
- Click the Start button and type PowerShell
-
- Right-click on Windows PowerShell and select Run as administrator ⚠️ Requires admin privileges
In the PowerShell window, copy and paste this command:
dism.exe /online /enable-feature /featurename:Microsoft-Windows-Subsystem-Linux /all /norestart
You should see a success message like this:
Deployment Image Servicing and Management tool

Version: 10.0.19041.844

Image Version: 10.0.19042.844

Enabling feature(s)

[==========================100.0%==========================]

The operation completed successfully.
Step 2Enable Virtual Machine Platform
To make phpMyAdmin Windows WSL run on version 2, you must turn on the Virtual Machine Platform feature in Windows. Open your existing administrator PowerShell window and run the dism command to turn on this system requirement before restarting your computer.
For your phpMyAdmin on Windows WSL setup to work well with WSL 2, you need to enable the Virtual Machine Platform. You do this by running a specific command in the administrator PowerShell window you already have open. This step is crucial for WSL 2 to function correctly.
In the same PowerShell window, copy and paste this command:
dism.exe /online /enable-feature /featurename:VirtualMachinePlatform /all /norestart
If you have Windows 10 version 2004 or older, use this command instead:
Enable-WindowsOptionalFeature -Online -FeatureName VirtualMachinePlatform -NoRestart
Now restart your computer to apply all changes.
After your computer restarts, open PowerShell as administrator again and run this command:
wsl --set-default-version 2
Step 3Install Ubuntu on Windows
To provide the Linux environment needed for phpMyAdmin Windows WSL, you must install Ubuntu from the Microsoft Store. Search for Ubuntu in the Store app, download the system to your computer, and launch it to finish the initial setup.
Install Ubuntu from the Microsoft Store to continue setting up your environment. Ubuntu is a popular Linux system that provides the environment for your tools. Search for Ubuntu in the Store, click 'Get', and then 'Launch' it.
You can download Ubuntu 20.04 LTS directly from the Microsoft Store by clicking this link: Get Ubuntu 20.04 LTS - Microsoft Store. This link provides the specific version of Ubuntu you need for your Windows Subsystem for Linux (WSL) installation.
Click the Get button and wait for it to install.
When done, click Launch to start Ubuntu for the first time.
Ubuntu will ask you to create a username and password. Choose anything you want:
Enter new UNIX username: user123

New password: (type your password)

Retype new password: (type it again)

passwd: password updated successfully

Installation successful!
You'll see a welcome message from Ubuntu. This means it's working!
Welcome to Ubuntu 20.04.2 LTS (GNU/Linux 4.4.0-19041-Microsoft x86_64)

System information as of Mon Apr 12 17:57:37 CDT 2021

System load: 0.52 Processes: 7

Memory usage: 26% IPv4 address for eth0: 192.168.1.100
If you run into problems, try these commands:
wsl --set-default-version 1

bcdedit /set hypervisorlaunchtype auto start
Step 4Install Apache Web Server
To host phpMyAdmin Windows WSL and view it in your browser, you need to install the Apache web server inside your Ubuntu terminal. Run the package update and installation commands to get Apache running on your local system.
Install the Apache web server to host phpMyAdmin on Windows WSL and access it through your web browser. Open your Ubuntu terminal and use the commands 'sudo apt update' followed by 'sudo apt install apache2' to get Apache installed and ready to go.
In Ubuntu, run these commands:
sudo apt update

sudo apt install apache2
⚠️ These commands require admin privileges (sudo)
To control Apache, use these commands:
sudo service apache2 stop (stops it)
sudo service apache2 start (starts it)
sudo service apache2 restart (restarts it)
Does it work? Open your web browser and go to:
http://localhost
You should see Apache's test page.
Step 5Install MariaDB Database Server
To store and manage your data for phpMyAdmin Windows WSL, you must install the MariaDB database server within your Ubuntu environment. Use the apt package manager in your terminal to download and set up both the server and client components.
MariaDB is the database system that phpMyAdmin will use to store and manage your data safely. Install it within your Ubuntu environment using the apt package manager. Type 'sudo apt-get install mariadb-server mariadb-client' into your Ubuntu terminal to get both the server and client components.
Run these commands:
sudo apt-get install mariadb-server mariadb-client
⚠️ Requires admin privileges
To control MariaDB, use these commands:
sudo service mysql stop (stops it)
sudo service mysql start (starts it)
sudo service mysql restart (restarts it)
Now secure your database with a password:
sudo mysql_secure_installation
⚠️ Requires admin privileges
Answer the questions like this:
Enter current password for root (enter for none): Press Enter

Set root password? [Y/n]: Y

New password: (type your password)

Re-enter new password: (type it again)

Remove anonymous users? [Y/n]: Y

Disallow root login remotely? [Y/n]: Y

Remove test database and access to it? [Y/n]: Y

Reload privilege tables now? [Y/n]: Y
Did it work? Test by logging in to the database:
sudo mysql -u root -p
Type your password when asked. You should see:
Welcome to the MariaDB monitor. Commands end with ; or g.

Your MariaDB connection id is 46

Server version: 10.3.29-MariaDB-0ubuntu0.20.04.1 Ubuntu 20.04

MariaDB [(none)]>
Type exit to leave.
Step 6Install PHP
To run phpMyAdmin Windows WSL successfully, you need to install the PHP programming language and its required modules in your Ubuntu terminal. Run the apt install command with the full list of dependencies to make sure the web interface works properly.
phpMyAdmin requires the PHP programming language to function, making its installation a vital step for your phpMyAdmin on Windows WSL setup. Run the command 'sudo apt install php libapache2-mod-php php-common php-mysql php-gmp php-curl php-intl php7.4-mbstring php-xmlrpc php-gd php-xml php-cli php-zip' in your Ubuntu terminal to install PHP and its necessary tools.
Run this command to install PHP and the tools it needs:
sudo apt install php libapache2-mod-php php-common php-mysql php-gmp php-curl php-intl php7.4-mbstring php-xmlrpc php-gd php-xml php-cli php-zip
⚠️ Requires admin privileges
Did it work? Check the PHP version:
php -v
You should see something like:
PHP 7.4.3 (cli) (built: Oct 6 2020 15:47:56) ( NTS )

Copyright (c) The PHP Group

Zend Engine v3.4.0, Copyright (c) Zend Technologies
To test PHP more thoroughly, create a test file:
sudo nano /var/www/html/phpinfo.php
⚠️ Requires admin privileges
Type this inside the file:
<?php phpinfo( ); ?>
Press Ctrl+X, then Y, then Enter to save.
Restart Apache:
sudo service apache2 restart
Now open your browser and go to:
http://localhost/phpinfo.php
You should see a page showing all your PHP information.
Step 7Install phpMyAdmin
To manage your databases through a web page for your phpMyAdmin Windows WSL environment, you need to install the phpMyAdmin package in Ubuntu. Run the install command in your terminal and select Apache when the setup asks which web server to use.
phpMyAdmin is the web-based tool you'll use to easily manage your MariaDB databases. To install it on your Windows WSL system, open your Ubuntu terminal and type 'sudo apt install phpmyadmin'. When prompted, select Apache as your web server for the setup.
Run this command:
sudo apt install phpmyadmin
⚠️ Requires admin privileges
When asked which web server to use, select apache2 and press Enter.
Please choose the web server that should be automatically configured to run phpMyAdmin.

[*] apache2

[ ] lighttpd
When asked "Configure database for phpmyadmin with dbconfig-common?", select Yes.
Create a password for phpMyAdmin when asked. Remember this password.
About root access: MariaDB has a security feature that can block the root user from logging into phpMyAdmin. If you need to use the root account, follow these steps:
Log into MariaDB:
sudo mysql
⚠️ Requires admin privileges
Run these commands:
USE mysql;

UPDATE user SET plugin='' WHERE user ='root';

FLUSH PRIVILEGES;

EXIT;
Restart Apache:
sudo service apache2 restart
Now open phpMyAdmin by going to:
http://localhost/phpmyadmin
You should see a login page. Log in with your root username and password.
You're done! You can now manage your databases from phpMyAdmin.
Summary
You have finished setting up phpMyAdmin Windows WSL by enabling the required Windows features, installing Ubuntu, and configuring Apache, MariaDB, PHP, and phpMyAdmin. You can now use this local environment to manage your databases through your web browser.
You have now successfully installed phpMyAdmin with Apache on Windows WSL, setting up a powerful system for managing your databases. The process covered enabling WSL and Virtual Machine Platform, installing Ubuntu, Apache, MariaDB, and PHP, before finally installing phpMyAdmin itself.
-
- Enabled WSL 2, which lets you run Linux on Windows
-
- Installed Ubuntu, a Linux operating system
-
- Installed Apache, a web server
-
- Installed MariaDB, a database system
-
- Installed PHP, a programming language
-
- Installed phpMyAdmin, a web tool to manage databases
Now you have a powerful system for storing and managing data. You can use phpMyAdmin's interface instead of typing complicated database commands.
Was this guide helpful?




thanks, that was helpful
Straight, clear. Very helpful
Thank you
Don’t use UPDATE user SET plugin=” WHERE user =’root’;
It will broke your authentication system when you define password earlier