How to Turn On or off Auto-Hide for the Taskbar in Windows 11

Auto-hide makes the taskbar disappear when your mouse leaves the bottom of the screen, and it comes back when you point at the bottom edge again. On a small laptop screen, that extra strip of space helps with websites, games and documents. It also keeps the desktop cleaner, and full-screen apps can use the whole display.
The setting takes less than a minute to change, and you can reverse it just as fast. This guide covers two ways to do it: the Settings app and the command line.
Go to Settings Personalization Taskbar. Expand Taskbar behaviors and toggle “Automatically hide the taskbar ” on or off. The taskbar will hide when not in use and reappear when you move your mouse to the bottom of the screen.
What Does Auto-Hide Do?
- With auto-hide turned on, the taskbar stays out of sight until you need it.
- To bring it back, move your mouse to the very bottom edge of the screen. You can also press Win + T on your keyboard, or swipe up from the bottom edge if you have a touchscreen.
- Pressing the Win to open Start also brings the taskbar up. So does a notification from an app that wants your attention.
While auto-hide is on, the taskbar is gone completely, not just shrunk. It stays hidden until you use one of the methods above, and it slides away again once you move the pointer off it. If the taskbar keeps popping up when you don’t want it, check whether an app is flashing a notification or your mouse is resting against the bottom edge.
How to Turn Auto-Hide On or Off Using Settings
- Open Settings by pressing Win + I on your keyboard. The Settings window opens.
- Click Personalization in the left pane.
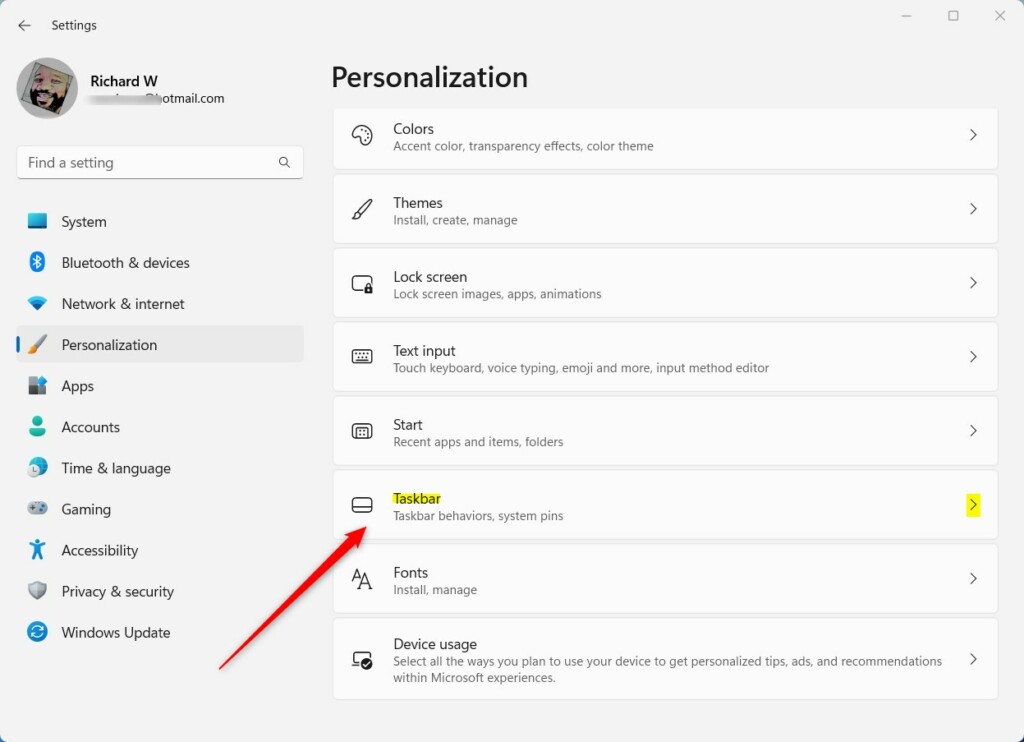
- Click Taskbar on the right side. You now see the taskbar options, such as taskbar items and corner icons.
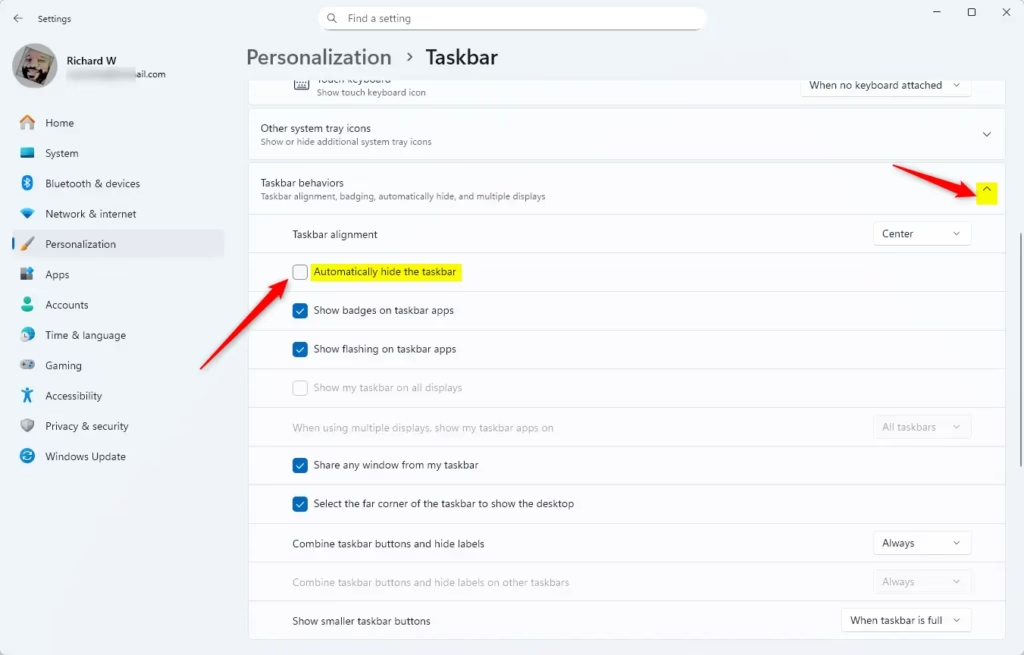
- Scroll down and click the arrow next to Taskbar behaviors. The list expands to show more options.
- Find Automatically hide the taskbar . Check the box to turn auto-hide on, or uncheck it to turn it off. When you turn it on, the taskbar slides out of view as soon as you move the pointer away.
- Close Settings. The change applies right away, and you don’t need to restart Windows or sign out.
This works the same in Windows 11 Home and Pro. If you change your mind, come back to the same checkbox and clear it. The taskbar then stays visible all the time.
If the option seems to do nothing, make sure you are looking at the right checkbox. The Taskbar behaviors list holds several similar options, and you want the one named Automatically hide the taskbar .
How to Turn Auto-Hide On or Off Using Command Prompt
If you prefer the command line, or you want to switch auto-hide without opening Settings, you can do it from Command Prompt inside Windows Terminal. Each setting uses one command. Copy it exactly as shown.
- Right-click the Start button and select Windows Terminal. Then open the dropdown arrow in the tab bar and choose Command Prompt. A Command Prompt tab opens.
- To turn on auto-hide, copy and paste this command and press Enter:PHP
powershell -command "&{$p='HKCU:SOFTWAREMicrosoftWindowsCurrentVersionExplorerStuckRects3';$v=(Get-ItemProperty -Path $p).Settings;$v[8]=3;&Set-ItemProperty -Path $p -Name Settings -Value $v;&Stop-Process -f -ProcessName explorer}" - To turn off auto-hide (the default), copy and paste this command and press Enter:PHP
powershell -command "&{$p= 'HKCU:SOFTWAREMicrosoftWindowsCurrentVersionExplorerStuckRects3' ;$v=(Get-ItemProperty -Path $p).Settings;$v[8]=2;&Set-ItemProperty -Path $p -Name Settings -Value $v;&Stop-Process -f -ProcessName explorer}" - Wait a moment after you run the command. Your taskbar refreshes automatically and shows the new behavior.
- Close the Windows Terminal window.
You only need to run one of the two commands, depending on whether you want auto-hide on or off. If the taskbar doesn't change, open Settings Personalization Taskbar and check the Automatically hide the taskbar box to see the current state. You can also use that checkbox to undo whatever the command did.
Summary
- The taskbar can hide itself automatically to give you more screen space.
- You can turn this feature on or off in the Settings app or by running simple commands.
- To see the taskbar when it's hidden, move your mouse to the bottom of the screen, use a keyboard shortcut, or swipe up on a touchscreen.
- Tablet mode and certain touch settings may change how auto-hide works.
- Once you make your choice, close any open windows. You're done, and no restart is needed.
Auto-hide gives you more room on screen by keeping the taskbar out of the way until you need it. You can switch it on or off from Settings or from Command Prompt. Either way, you can bring the taskbar back at any time by moving your mouse to the bottom of the display.
Did this guide fix your problem?

About the Author
Richard
Tech Writer, IT Professional
Richard is a writer at Geek Rewind who turns complex IT tasks into clear, step-by-step guides. He draws on years of hands-on experience in system administration and enterprise IT operations, focusing on Windows, Linux and WordPress: the problems people actually run into, and the fixes that work. His server and WordPress guides come from systems he runs himself. Richard builds and maintains the platform behind Geek Rewind, from its Ubuntu servers and Nginx configuration to its custom WordPress plugins. Many new tutorials start with readers' questions, and he's always glad to answer them in the comments.
No comments yet — be the first to share your thoughts!