How to Turn On or Off BitLocker Auto-Unlock in Windows 11
BitLocker is a tool in Windows 11 that protects your data by encrypting your drives. This means only you (or authorized users) can access the files on your encrypted drives.
When you use BitLocker on a drive, you can set it so the drive automatically unlocks when you sign in to your computer. This is called auto-unlock. It’s handy because you don’t have to enter a password every time, but it still keeps your data safe from others.
You can use auto-unlock on USB drives, external drives, or fixed drives (like a second hard drive inside your PC). This guide will show you simple steps to turn BitLocker auto-unlock on or off for your drives.
Enable or disable BitLocker auto-unlock by navigating to Control Panel > System and Security > BitLocker Drive Encryption. Select the desired drive and choose “Turn on auto-unlock” or “Turn off auto-unlock.” Alternatively, use Command Prompt or PowerShell with the `manage-bde` or `Enable/Disable-BitLockerAutoUnlock` commands.
How to Turn On or Off BitLocker Auto-Unlock Using Control Panel
Follow these easy steps:
- Click the Start button, type Control Panel, and open it.
- Go to System and Security, then click BitLocker Drive Encryption.
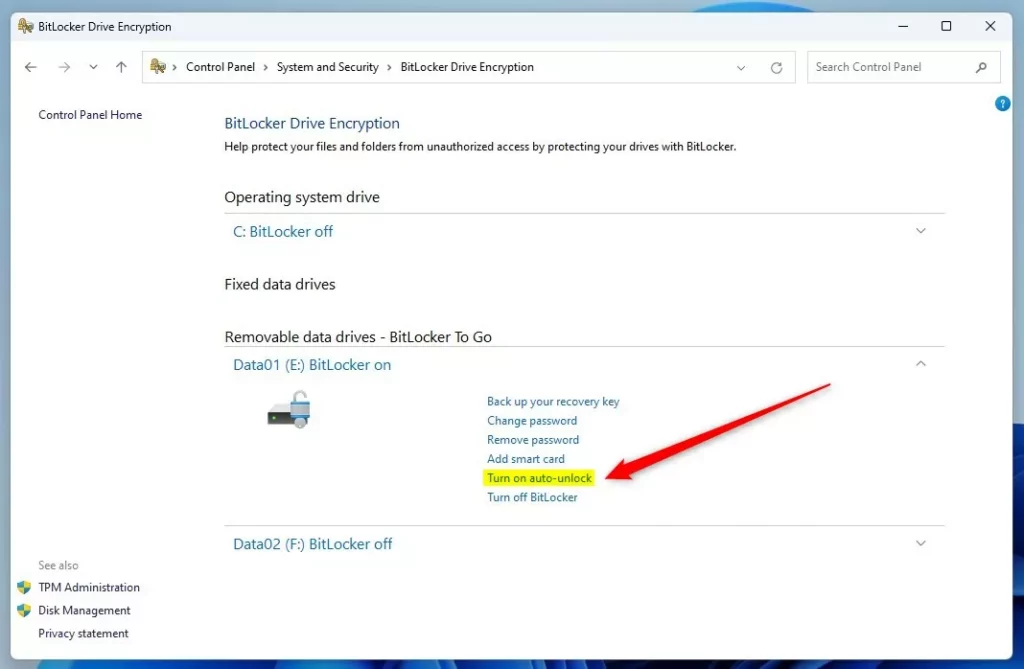
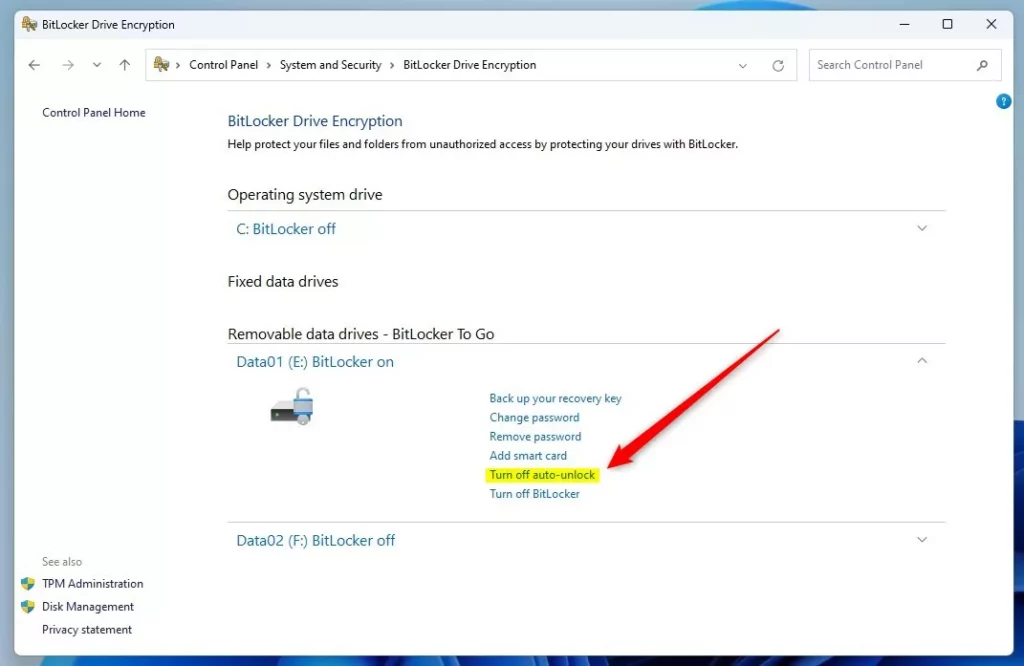
- Find the drive you want to change in the list (it will say “BitLocker On”).
- To turn auto-unlock on, click Turn on auto-unlock next to that drive.
- To turn auto-unlock off, if it’s already on, click Turn off auto-unlock.
Here’s what it looks like when you turn auto-unlock on for a fixed drive:
And here’s the screen when auto-unlock is turned off:
How to Turn On or Off BitLocker Auto-Unlock Using Commands
If you like using commands, you can do this with either Command Prompt or PowerShell. Here’s how:
Step 1Open Windows Terminal
Right-click the Start button and choose Windows Terminal. You can also open Windows Terminal guide if you want help.
Step 2Use the Commands
To turn on auto-unlock for a drive (replace E with your drive letter):
manage-bde -autounlock -enable E:
To turn off auto-unlock for a drive:
manage-bde -autounlock -disable E:
How to Turn On or Off BitLocker Auto-Unlock Using PowerShell
You can also use PowerShell, which is another tool for running commands on Windows.
- Open PowerShell by typing PowerShell in the Start menu and clicking the app. See this guide if you need help.
- To turn on auto-unlock, type this command and press Enter (replace
E:with your drive letter):
Enable-BitLockerAutoUnlock -MountPoint "E:"
- To turn off auto-unlock, type this command and press Enter:
Disable-BitLockerAutoUnlock -MountPoint "E:"
That’s it! Your drive will now either unlock automatically when you sign in or require you to unlock it manually, depending on what you chose.
Summary
- BitLocker helps keep your data safe by encrypting your drives.
- Auto-unlock lets your encrypted drives open automatically after you log into Windows, saving time.
- You can easily turn auto-unlock on or off through the Control Panel, Command Prompt, or PowerShell.
- Turning off auto-unlock adds an extra layer of security, but turning it on makes accessing your files faster.
If you want to learn more about setting up BitLocker, here’s a helpful guide: How to Turn On BitLocker in Windows 11.
Was this guide helpful?

About the Author
Richard
Tech Writer, IT Professional
Richard, a writer for Geek Rewind, is a tech enthusiast who loves breaking down complex IT topics into simple, easy-to-understand ideas. With years of hands-on experience in system administration and enterprise IT operations, he’s developed a knack for offering practical tips and solutions. Richard aims to make technology more accessible and actionable. He's deeply committed to the Geek Rewind community, always ready to answer questions and engage in discussions.


No comments yet — be the first to share your thoughts!