How to Turn On or off BitLocker Auto-Unlock in Windows 11

BitLocker auto-unlock in Windows 11 opens your secondary encrypted drives in the background after you sign in to Windows. You don’t have to type a long password or recovery key for each drive every time you restart. Fixed hard drives and USB flash drives stay encrypted, so outsiders still can’t read them.
Auto-unlock only applies to data drives, not the Windows drive. It also depends on the Windows drive being protected by BitLocker, because Windows keeps the auto-unlock key there. You can turn it on or off from the Control Panel , from Terminal with Command Prompt, or from PowerShell. Full BitLocker management needs Windows 11 Pro, Enterprise, or Education. Windows 11 Home only offers Device encryption, so you will probably not see these options there.
Enable or disable BitLocker auto-unlock by navigating to Control Panel System and Security BitLocker Drive Encryption. Select the desired drive and choose “Turn on auto-unlock” or “Turn off auto-unlock.” Alternatively, use Command Prompt or PowerShell with the `manage-bde` or `Enable/Disable-BitLockerAutoUnlock` commands.
How to Turn On or Off BitLocker Auto-Unlock Using Control Panel
The Control Panel is the easiest way to manage auto-unlock because you can see the state of every drive in one list. Use it to switch auto-unlock on or off for each encrypted data drive. The change applies to that drive only.
- Click the Start button, type Control Panel , and open it.
- Go to System and Security BitLocker Drive Encryption The window now lists your Windows drive, fixed data drives, and removable drives, each with its BitLocker status.
- Find the drive you want to change. It should say BitLocker on. If the drive is locked, click Unlock drive and enter its password first. The auto-unlock options only appear for an unlocked drive.
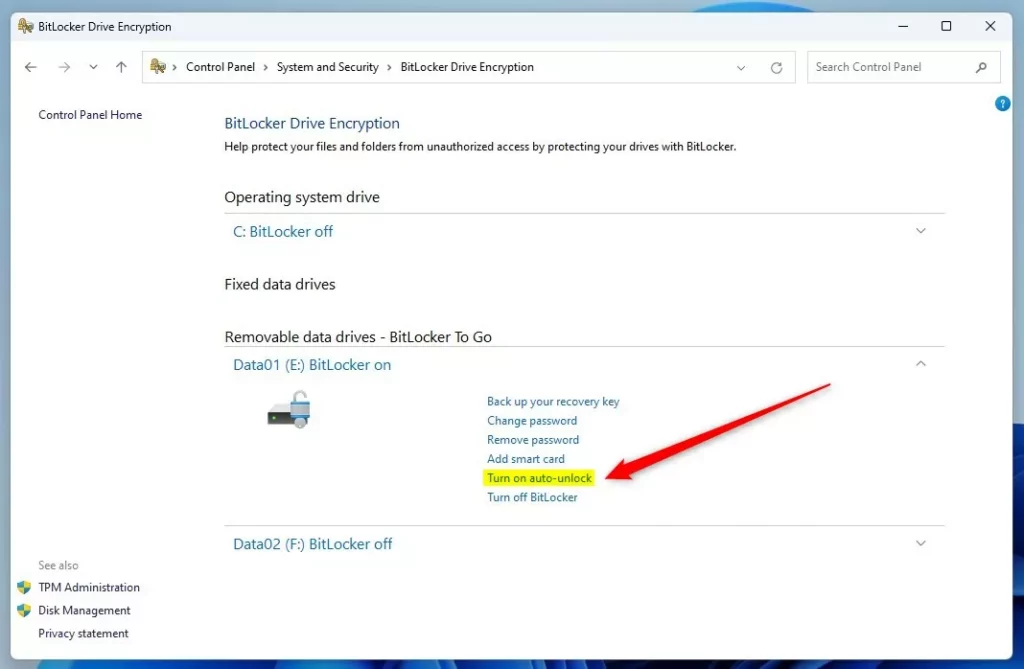
- To turn auto-unlock on, click Turn on auto-unlock next to that drive. The link then changes to Turn off auto-unlock.
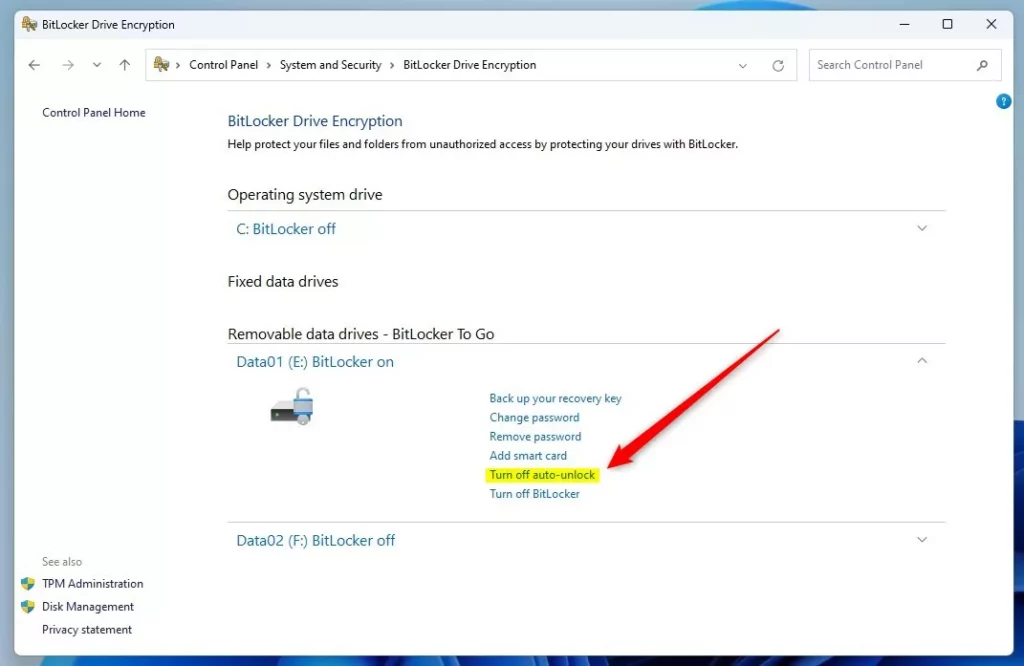
- To turn auto-unlock off, click Turn off auto-unlock next to the same drive. The link changes back to Turn on auto-unlock.
You don’t need to restart. If you don’t see either link, check that the drive is a data drive and that the Windows drive is BitLocker-protected. The links do not appear for the Windows drive itself. To undo a change, click the opposite link.
Here’s what it looks like when auto-unlock is active for a fixed drive:
This panel appears when auto-unlock is disabled:
How to Turn On or Off BitLocker Auto-Unlock Using Commands
You can also set auto-unlock from the command line. The commands need administrator rights, so open the console as an administrator. Without that, they fail with an access denied message.
Step 1Open Windows Terminal
Right-click the Start button and choose Terminal (Admin). On some earlier builds of Windows 11 it is labeled Windows Terminal (Admin). Click Yes if User Account Control asks for permission. If you need help launching the console, review the Windows Terminal guide. Make sure the tab you are using is Command Prompt. You can open one from the drop-down arrow next to the tab bar.
Step 2Use the Commands
To turn on auto-unlock for a target partition, run the command below. Replace E with the correct drive letter. The drive must be unlocked first, or the command will report an error.
manage-bde -autounlock -enable E:
To turn off auto-unlock for that same storage volume, run this command:
manage-bde -autounlock -disable E:
The console prints a short message confirming the change. You can run the opposite command at any time to undo it.
How to Turn On or Off BitLocker Auto-Unlock Using PowerShell
PowerShell does the same job if you prefer it to Command Prompt. The built-in BitLocker commands let you turn auto-unlock on or off without clicking through the graphical menu. This is handy when you manage several drives or work over a remote session.
- Click Start, type PowerShell, right-click the app, and choose Run as administrator. Click Yes if prompted. See this guide if you need help. A blue console window opens.
- To turn on auto-unlock, type this command and press Enter. Replace
E:with your drive letter, and make sure the drive is unlocked first:
Enable-BitLockerAutoUnlock -MountPoint "E:"
- To turn off auto-unlock, type this command and press Enter:
Disable-BitLockerAutoUnlock -MountPoint "E:"
Changes take effect immediately, and no restart is needed. They decide whether the drive unlocks by itself at your next sign-in or asks for a password or recovery key. To confirm the result, open BitLocker Drive Encryption in the Control Panel and check which link shows next to the drive.
Summary
- BitLocker helps keep your data safe by encrypting your drives.
- Auto-unlock lets your encrypted data drives open automatically after you log into Windows, saving time.
- You can turn auto-unlock on or off through the Control Panel, Command Prompt, or PowerShell.
- Turning off auto-unlock adds an extra layer of security, but turning it on makes accessing your files faster.
Auto-unlock lets you balance drive security with everyday convenience. With it on, your encrypted data drives open automatically after you sign in. With it off, each drive asks for its password or recovery key, which gives the most protection if others can use your signed-in PC. You can switch between the two states at any time from the Control Panel, Command Prompt, or PowerShell.
Have a question about this guide?
Answered by AI from this guide. Good questions may be added to this page — please don't include personal details.
Did this guide fix your problem?

About the Author
Richard
Tech Writer, IT Professional
Richard is a writer at Geek Rewind who turns complex IT tasks into clear, step-by-step guides. He draws on years of hands-on experience in system administration and enterprise IT operations, focusing on Windows, Linux and WordPress: the problems people actually run into, and the fixes that work. His server and WordPress guides come from systems he runs himself. Richard builds and maintains the platform behind Geek Rewind, from its Ubuntu servers and Nginx configuration to its custom WordPress plugins. Many new tutorials start with readers' questions, and he's always glad to answer them in the comments.
No comments yet — be the first to share your thoughts!