Deny Write Access to Unprotected Removable Drives in Windows 11


Deny write access to unprotected removable drives in Windows 11 stops anyone from saving files to external USB sticks and flash drives unless the drive is encrypted with BitLocker first. The policy is available on Windows 11 Pro, Enterprise, and Education. Windows 11 Home does not include the Local Group Policy Editor, so Home users need the Registry method later in this tutorial.
Open USB ports are a real data-leak risk. A lost drive or a quick copy by the wrong person can expose private files. With this block on, unencrypted external storage becomes read-only, so nobody can copy new files onto it by accident or on purpose.
To deny write access to unprotected removable drives in Windows 11, open the Local Group Policy Editor, navigate to Computer Configuration Administrative Templates Windows Components BitLocker Drive Encryption Removable Data Drives, find the policy named Deny write access to removable drives not protected by BitLocker, double-click it, select Enabled, then click OK. This feature is available on Windows 11 Pro, Enterprise, and Education only.
What is BitLocker?
BitLocker is a built-in Windows security tool that encrypts your files so only people with the right password or key can open them. It can protect your system drive, internal drives, and removable USB drives. If the PC or the drive is lost or stolen, the data stays unreadable to anyone without the key. BitLocker on a removable drive is often called BitLocker To Go.
BitLocker can protect these kinds of storage:
- USB drives and other removable drives
- Fixed drives inside your PC
- Your Windows operating system drive
When BitLocker Drive Encryption protects the Windows 11 system drive, the computer normally unlocks it automatically during startup. You do not have to type a password every time the PC boots. Removable drives work differently. They stay locked until someone enters the password or key, which is what makes them safe to carry around.
Why Deny Write Access to Unprotected Drives?
Requiring BitLocker encryption stops people from accidentally saving sensitive files to unsecured drives. If a user plugs in a drive that is not encrypted, Windows treats it as read-only. They can still open files already on it, but they cannot add or change anything until the drive is encrypted.
How to Deny Write Access Using Local Group Policy Editor
The first method uses the Local Group Policy Editor. It works on Windows 11 Pro, Enterprise, and Education. You need to be signed in with an administrator account. Follow these steps:
Step 1Open the Local Group Policy Editor
- Click the Start button. The Start menu opens with the search box ready for typing.
- Type
Edit group policyand press Enter. The Local Group Policy Editor opens. If Windows says it cannot find the file, you are on Windows 11 Home. Skip ahead to the Registry method.
Step 2Navigate to the BitLocker Settings
In the Local Group Policy Editor window, use the left pane to move to the location below. Click the small arrow next to each folder to expand it, then click the last folder in the path. Its policies are listed in the right pane.
Computer Configuration → Administrative Templates → Windows Components → BitLocker Drive Encryption → Removable Data Drives
Step 3Find and Change the Setting
In the right pane, find the policy named Deny write access to removable drives not protected by BitLocker. This is the setting that stops users from saving files to unencrypted USB drives. The list is long, so click the Setting column header to sort it by name if you cannot spot the policy quickly.
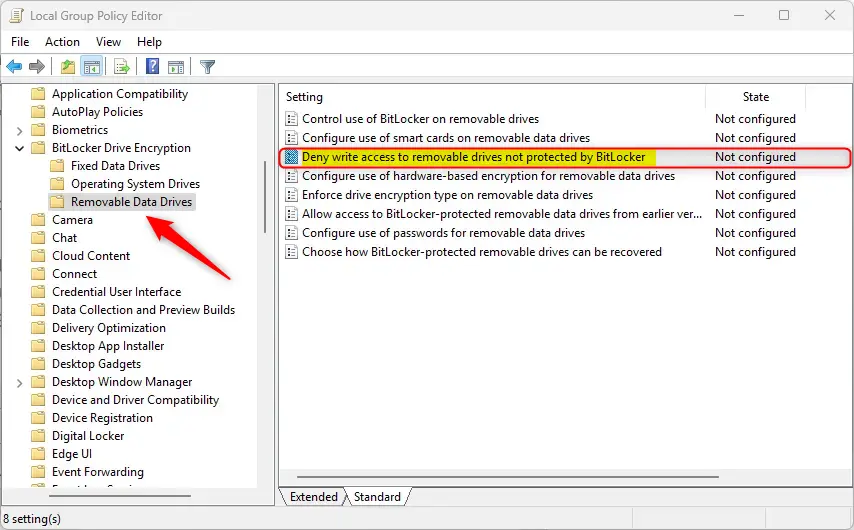
Double-click the policy to open its settings window. Its current state is shown at the top.
Step 4Choose Your Option
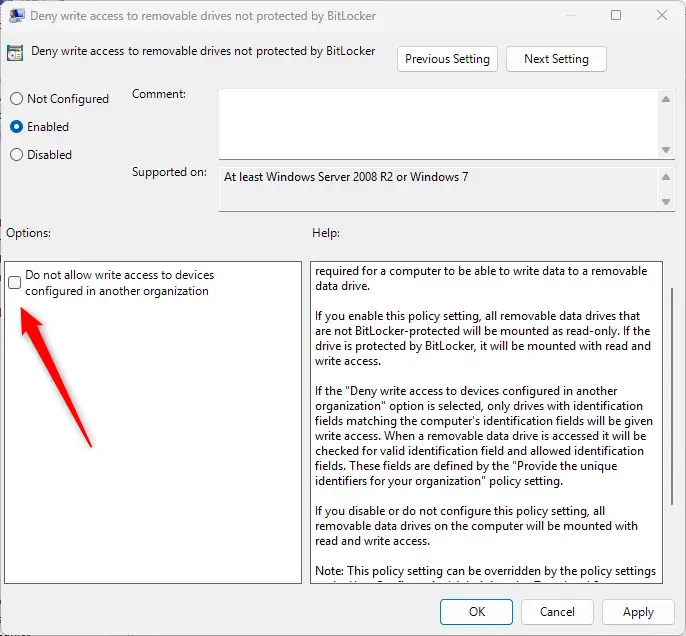
Select the Enabled option. This tells Windows to block file saving on any external storage that lacks BitLocker encryption. Users cannot copy new files onto unapproved USB sticks, but they can still open existing files. The window offers three states:
- Not Configured (default) – Same as disabled. No restrictions.
- Enabled – You can only write to drives protected by BitLocker. Unprotected drives become read-only (you can view files, but not save new ones).
- Disabled – You can write to all removable drives, whether protected or not.
Select Enabled to protect your data. To undo the change later, come back to this window and choose Not Configured.
Step 5Save and Restart
Click OK to save your changes. The window closes and the policy now shows as Enabled in the list.
Save your work first. Policies often apply without a restart, but restarting is the reliable way to be sure the setting is active.
After the restart, test it. Plug in a USB drive that is not encrypted and try to save a file to it. Windows should refuse the write.
Extra option: When you enable this policy, you can also permit write access only to drives configured by your own organization. This works well in corporate or school environments, where you want staff to use company-encrypted drives and block drives encrypted elsewhere.
How to Deny Write Access Using Windows Registry Editor
You can also use the Windows Registry, a database of low-level system settings, to block write access to unprotected drives. This is the method to use on Windows 11 Home. Back up the registry, or create a restore point, before you change anything, because a wrong edit can make Windows unstable. You need administrator rights, and Windows may show a User Account Control prompt that you must approve.
Step 1Open the Registry Editor
- Press the
Windows + Rkeys to open the Run box. A small Run window appears at the bottom left of the screen. - Type
regeditand press Enter. Approve the User Account Control prompt if it appears. The Registry Editor opens.
Step 2Go to the First Registry Path
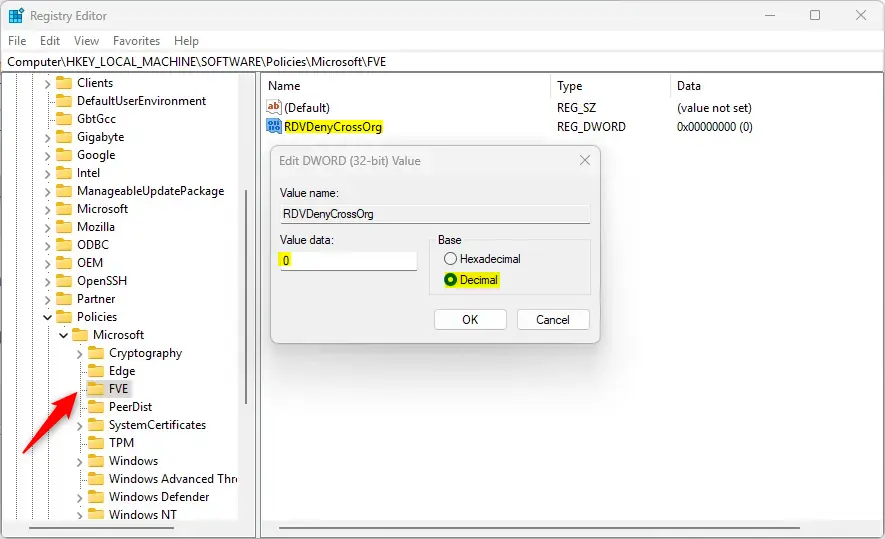
In the left pane, expand the keys one at a time until you reach this path. If a key in the path does not exist, create it: right-click the key above it, choose New Key, and type the missing name.
HKEY_LOCAL_MACHINE\SOFTWARE\Policies\Microsoft\FVEStep 3Create or Edit RDVDenyCrossOrg
Look in the right pane for a value named RDVDenyCrossOrg. If it is not there, create it:
- Right-click an empty area on the right side of the window. A short menu appears.
- Click New DWORD (32-bit) Value. A new value appears in the list with its name highlighted for editing.
- Name it
RDVDenyWriteAccessand press Enter.
Double-click RDVDenyCrossOrg and set its value data to 1 to deny write access to unprotected drives. Click OK to save it.
Step 4Go to the Second Registry Path
Next, navigate to this path in the left pane:
HKEY_LOCAL_MACHINE\SYSTEM\CurrentControlSet\Policies\Microsoft\FVEStep 5Create or Edit RDVDenyWriteAccess
Look for RDVDenyWriteAccess in the right pane. If it is missing, create it using the same method: right-click, then New DWORD (32-bit) Value, and type the name exactly as shown.
Double-click RDVDenyWriteAccess and set its data to 1 to deny write access. Click OK to save it.
Step 6Close and Restart
When you finish editing, close the Registry Editor and restart your computer. This makes Windows apply the new rules. After the restart, unencrypted external USB drives open as read-only until you remove the block.
To check that it worked, plug in an unencrypted USB drive and try to save a file to it. The save should fail, while a BitLocker-protected drive that is unlocked still accepts new files.
1.To allow writing to all drives again, go back to the same registry locations and delete those two values: right-click each one, choose Delete, and confirm. Then restart the PC. This reverts the setting that blocked file changes on removable drives. Users can save files and install software on USB sticks and external hard drives again. If you used Group Policy instead, set the policy back to Not Configured.
Summary
Denying write access to unprotected removable drives in Windows 11 helps protect your computer from unknown USB sticks and data leaks. You can set it up with either the Local Group Policy Editor or the Registry Editor. Windows will then only let people save files to secure, encrypted storage.
Use the Local Group Policy Editor on Pro, Enterprise, and Education. On Home, or if you prefer to script changes, edit the Registry directly. Either way, you need administrator rights, and a restart is the safest way to apply the change.
This setting keeps personal files safer and reduces the risk of unwanted data landing on removable drives, especially drives that have no built-in protection. Encrypt a drive with BitLocker and it becomes writable again.
Anyone wanting to learn more about BitLocker can check out this helpful guide: How to Turn On BitLocker in Windows 11.
Was this guide helpful?

About the Author
Richard
Tech Writer, IT Professional
Richard is a writer at Geek Rewind who turns complex IT tasks into clear, step-by-step guides. He draws on years of hands-on experience in system administration and enterprise IT operations, focusing on Windows, Linux and WordPress: the problems people actually run into, and the fixes that work. His server and WordPress guides come from systems he runs himself. Richard builds and maintains the platform behind Geek Rewind, from its Ubuntu servers and Nginx configuration to its custom WordPress plugins. Many new tutorials start with readers' questions, and he's always glad to answer them in the comments.



No comments yet — be the first to share your thoughts!